
mo:Blog - Mobile Blogging for Palm.
Introduction
mo:Blog is a mobile blogging tool for PalmOS devices. With mo:Blog you can post new messages to most blogging applications. It even allows you to upload binary files - like images - to blogs that support this.
You'll benefit the most from mo:Blog if you have a Palm equipped with some kind of wireless connection. This connection can range from a dial-in account using a GSM, a GPRS connection or a local area network using wlan or bluetooth.
Together with a digital camera for Palm, like a Veo Photo Traveler, you can keep your own photoblog using weblog software that supports the metaWebLog API, like MoveableType.
Configuration
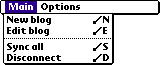
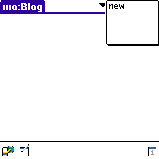
When you startup the application for the first time, you'll need to configure at least one blog. For this, choose new from the popup on the right top corner of the screen, or use new blog from the main menu.
|
|

Provide a name for this blog and choose the appropiate API that your blogsoftware supports. Most blogging tools, private or public, support one of the next three APIs:
In the case of blogger, the URI will point to the
public API of the "blogger.com" service. If you use another blogtool
that supports the blogger API, you'll need to change the URI to the
appropriate value. The URI is the url where you find the API interface
for your blogging tool. For example, for MoveableType blogs, this
mostly ends with mt-xmlrpc.cgi.
Next, you'll need to provide a username and a password that you use to administer your blog.
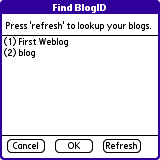
Once this is done, you'll have to provide the blogid - a number or key that identifies your blog - in the appropriate field. You can do this in two ways; If you know the blog id, you can just fill it in, or if you know how to find the blog id in the URL of your blog application, you can do it that way. Otherwise, press the Lookup button. This will bring you to a next form, which allows you to fetch a list of all your blogs on that server, using the Refresh button. Clicking on an entry in the list fills in the appropriate blog id.

If you happen to use MoveableType and you work with categories, then you can follow the same procedure as for the blogid to fill in the category in which to post. This is not mandataory, however.
Next, save the settings for this blog and you're ready to start posting!
Supported Blog tools
We support the next blog APIs at this moment:
- blogger
- metaWeblog
- MoveableType
With this we cover the most popular blogging tools:
- blogger.com
- wordpress.com
- MoveableType
- Typepad.com
- ...
Posting and publishing entries
In mo:Blog you can have multiple blogs. You select the active blog on the main form using a popup in the upper right corner of the form. Once you select a blog, you'll be presented with the posts waiting to be published. Tapping on a post will bring you to the edit form. Clicking on the New post button will bring up the editor also.
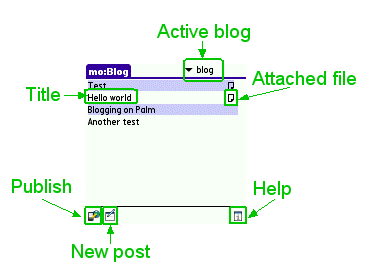
A blog can have a file attached, this is shown with a small file icon on the right side of the screen. An entry can also be just a file, this way you can upload multiple files in one go.

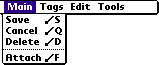
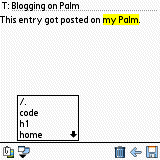
Once you have created a blog, you can start blogging. Press the New post button. This opens up a new form in which you're presented with a minimalistic HTML editor. Provide your blog with a title and tap in the empty space on the screen. You can select the tag menu to insert some basic HTML tags to format your post.


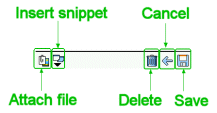
Save your entry, by pressing the Save ( ) button or go back to the main screen by pressing the Cancel (
 ) button.
If you are editing an existing post, you can press the Delete ( ) button to delete the post.
Press the publish button on the main screen to publish the entries to your blog. Selecting the 'sync all' menu item from the main menu published all posts from all blogs at once.
If you don't want to save your post, there is a possibility to publish the blog straight from the editor form. once you have typed some text in the title field, or attached a file, you can select Publish now from the Tools menu to publish the post.
You can select in the preferences if you want to keep the text or if you want to clear the screen. You do this by selecting the Clear/delete publish from editor checkbox. If you previously saved the post and checked the above checkbox, you'll be asked if you want to delete the saved post after being published. Deselecting the checkbox will keep the saved post, so you delete it manually.
Working with snippets.
|
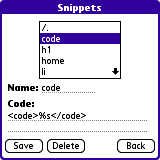
Although some basic tags are included in the Tag menu, like A snippet can be a simple piece of text or it can contain some sophisticated piece of HTML. To create snippets, you'll need to tap the Manage snippets menu item in the Tools menu on the edit form. Alternativeky, you can choose New snip... in the snippets pupop box. In the snippets form, you'll need to provide a name for the snippet - up to 8 characters - and the actual content. The snippets you create are shared over all blogs, even if you create them in different blogs. You apply a snippet by positioning the cursor in the edit screen and selecting a snippet from the snippet popup. A nice feature of snippets allows you to provide a wildcard. This wildcard will be expanded with the selected text when you apply the snippets. Instead of positioning the cursor, you can select a piece of text. A snippet with the wildcard will place the snippet around this selected text. A snippet without the wildcard will just replace the text with the snippet. To create a snippet with a wildcard, you need to use the ' <a href="http://server/you.html">home</a>Imagine you want to make the 'home' dynamic, sometimes you want to call it 'my home page'. You can do this by replacing the word 'home' by the identifier %s. Now it looks as follows:
<a href="http://server/you.html">%s</a>Now, every time you select a piece of text and apply the 'home' snippet, the link tag will be placed around the selected text. Another nifty feature of the snippets comes from the '%a' wildcard. This text will be replaced by the attached file. This makes it easy to make custom image tags with your own preset attributes.
|
   |
Adding files
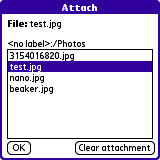
If you want to upload a file to your blog, then you can select a file in the HTML editor screen by pressing the Attach ( )
button. This presents you with a file view on a directory on your flash
card. Now you can select a file that will be uploaded to the server
when you publish the blog. Note that this only works for blogs that
support the metaWebLog and MoveableType API.
)
button. This presents you with a file view on a directory on your flash
card. Now you can select a file that will be uploaded to the server
when you publish the blog. Note that this only works for blogs that
support the metaWebLog and MoveableType API.
You also need to define which flash card and directory to use in the preferences panel.
If you want to upload a file without entering a complete post, then you just need to create a new post but leave the title and body empty. Only selecting a file will trigger the software to only upload the file on the next publish.
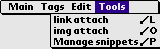
To make it easy to use the attached file in your post, we have provided two menu items under the tools menu. The first function img attach inserts an img tag pointing to the attached file. The second function file attach inserts a a tag pointing to the attached file.
Preferences
The preferences screen allows you to select the directory and flash card on which you keep media files. If, for some reason, your internet connection needs to pass trhough an HTTP proxy, then you can also configure this. The timeout field lets you choose the timeout for the network functions. this is preset to 20 seconds, so, unless you are on a real slow connection, this should be tolerant enough.
If you have a PalmOS powered PDA that with support for flash cards, then you can select a volume and a directory that contains the media files you want to upload.
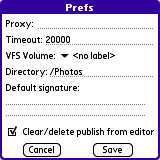
The signature field can be used to define a default signature used for all blogs. If you desire to have different signatures per blog, then you'll need to edit the signature field in the blog's preferences form. You can leave this field blanc if you don't want a signature.
The Clear/delete publish from editor checkbox allows you to set the behavior when publishing a post from the editor form. If you leave this unchecked the editor screen will not be cleared or the published post will not be deleted from the Palm. Which of both happens depends if you are editing a new post or if you are editing a previously saved post. If you check this button, then you theeditor screen will be cleared or the post will be deleted from your Palm. Actually you'll return to the main form as well with this setting.
License code
To be able to use mo:Blog, you'll need to obtain a license key from Tektonica BVBA. For this, you'll need to provide us with your palm HotSync name. Direct enquiries for obtaining a license key to <info@tektonica.com>
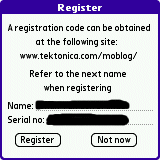
You can enter the license code under the menu item 'register' on the main screen.
Contributors
Design, implementation and original idea by Johan Van den Brande.
Many thanks go to Mike Slocombe (www.urban75.com) for the excellent graphic design and numerous UI usability ideas.
Also, many thanks go to all the beta testers who had to live with most of the errors and who did a fine job at hunting down bugs.
Copyright
mo:Blog is copyrighted by Tektonica BVBA. For more info, direct your enquieries to <info@tektonica.com>
Graphics © by Mike Slocombe www.urban75.com.
TEKTONICA BVBA MAKES NO  REPRESENTATIONS OR WARRANTIES ABOUT THE SUITABILITY OF
THE SOFTWARE, EITHER  EXPRESS OR IMPLIED, INCLUDING  BUT NOT  LIMITED  TO  THE
IMPLIED  WARRANTIES OF MERCHANTABILITY,  FITNESS  FOR  A  PARTICULAR  PURPOSE,
OR NON-INFRINGEMENT. TEKTONICA BVBA SHALL NOT BE LIABLE FOR ANY DAMAGES  SUFFERED
BY  LICENSEE   AS  A  RESULT  OF  USING, MODIFYING OR DISTRIBUTING THIS SOFTWARE
OR ITS DERIVATIVES.