Chapter Four
Menu Bar Commands
The Menu Bar is located at the top of the Main Screen. There are nine Menus on the Menu Bar. They consist of:
4.1 FTP
4.2 Session
4.3 Bookmarks
4.4 Commands
4.5 View
4.6 Directory
4.7 Macro
4.8 Window
4.9 Help
4.1.1 FTP/Site Manager. Chooses the Site Manager screen (basic features covered in Chapter Three: Quick Start).
4.1.1.1 FTP/Site Manager/Edit-Add Host/General Tab
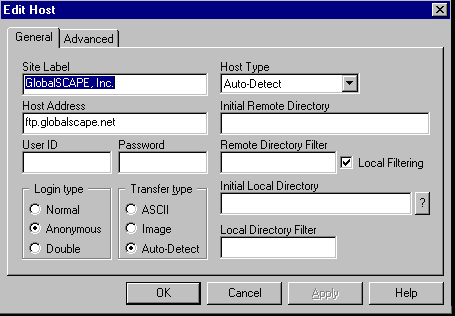
Login Type. The following three radio buttons may be selected under the Login type field.
Anonymous. This is the default selection. If this button is selected, CuteFTP will automatically supply a user I.D. and password to the server for anonymous access. You cannot login anonymously to a server or to your account on that server if your ISP or service administrator has not enabled this option.
Normal. If you type in a password in the Password box, the Normal radio button will automatically be selected. When Normal is checked, you are telling the server that you will be providing a unique User ID and Password to login.
Double. This button is used in conjunction with the Anonymous button if a dual login is required. The Anonymous login will automatically be supplied to the server and then you must enter your password.
Transfer Type. The following three radio buttons may be selected under the Transfer Type field. This selection will determine the method in which files are transferred. This method can be determined globally from the FTP Main Options Menu.
ASCII. This radio button forces all file transfers in ASCII (plain text format).
Image. This radio button forces all file transfers in binary mode.
AutoDetect. This is the default setting. It allows CuteFTP to determine if the files should be transferred using ASCII or Image (Binary) protocols. Unless you have a specific reason to force one of the previous two choices, AutoDetect should be used.
Host Type. This field is used to specify the type of server you want to connect to. By default, the AutoDetect option is selected. CuteFTP can automatically detect which type of server (host) it is connecting to. Sometimes however, if you are having difficulty connecting to a specific host, you can choose a server from the drop down list, which will usually fix the problem.
Initial Remote Directory. This field is used to specify the directory you want to login to. For example, you have created a subdirectory of your root directory on the server called Graphics. To login directly to the Graphics directory, rather than the virtual root, you would type /Graphics in the Initial Remote Directory field.
Remote Directory Filter. This field is used to allow the remote host to do the filtering when local filtering is checked. You can produce filtered listings (useful when trying to get a small piece of a large directory) by typing in a file extension or a Wildcard. For example, type -rtaF in that field and then check the local filter check box. This will cause CuteFTP to send a "list -rtaF" command to the server, which is like an extended list that shows all hidden files and directories.
Initial Local Directory. This field is used to specify the default directory on your hard drive that is displayed in the lower left window on login. By default, CuteFTP specifies the CuteFTP directory as (C:\Program Files\CuteFTP). Any files you download from the server are placed into that directory by default. For example, if you have a directory on your hard drive called Download where you like to place your temporary files, you would type: "\Download" in the Initial Local Directory box.
Local Directory Filter. This will filter the directory listing on your local drive by file extension or Wildcard, if you supply a Wildcard Mask. Wildcard Masks are explained in section 4.1.5.3.
4.1.1.2 FTP/Site Manager/Edit-Add Host Advanced Tab
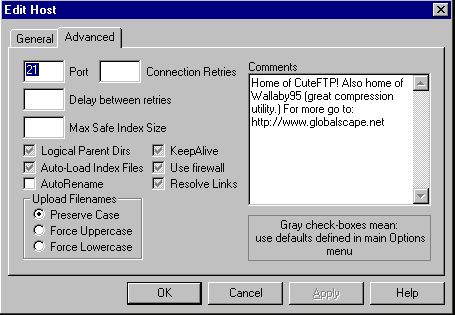
Port. This field is used to define which port on the server CuteFTP will be connecting to. This is set to port 21, the default port for file transfer protocol. Only change this number if your ISP or service administrator has specifically told you to connect to a different port.
Connection Retry/Connection Delay. The Connection Retry field is used to specify how many times CuteFTP should attempt to connect to the server. This is useful for connecting to busy sites that might take more than one try to connect to. The Connection Delay field tells CuteFTP how long to wait after an unsuccessful attempt before trying to connect to the server again. The Delay field does not indicate the delay in waiting for the server's welcome message. Some servers that take a very long time to provide a welcome message will cause CuteFTP to time-out before it has connected. This cannot be fixed by changing the Delay field.
Max Safe Index Size. This field is used to determine the size (in kilobytes) of the largest index file (not to be confused with index.htm) to load without any prompts. If the index file size exceeds this specified limit, CuteFTP will prompt you to continue. Setting this parameter to zero will cause CuteFTP to prompt you for all index files. While setting it to 32000 effectively disables any prompting, it is not advisable to set this parameter too high because there might be multi-directory index files on the sites that CuteFTP can't handle. The default is 10 kilobytes. NOTE: The index file is a file on the server that gives you information about all the directories and files available on that site.
This screen has six check boxes in the center of the screen that will be covered in detail in this section. If the boxes are checked but are grayed out, then it tells CuteFTP to use the defaults under the global settings located under FTP/Settings/Options from the Menu Bar. You can gray check (use default), check (enable), or unchecked (disable) any of these options.
Logical Parent Dirs. This box is used to specify the previously visited directory as the parent directory rather than just a physical parent. It is useful on sites with many inter-directory links. The default is YES.
Auto-Load Index Files. This box is used to specify if the index file is loaded into memory automatically every time CuteFTP finds one.
AutoRename. This box is used to activate the AutoRename feature, which is described in section 4.1.5.5.
Keep Alive. When this box is checked, CuteFTP sends a "NOOP" command to the server every 90 seconds to let the server know you are still connected. This helps avoid idle time-outs.
Use Firewall. When this box is checked, CuteFTP uses the firewall settings defined under FTP/Settings/Options/Firewall tab. This
box is gray checked by default.
Resolve Links. This UNIX specific option asks the server to resolve symbolic links to either file or directory. This option can cause problems with non-UNIX servers. If you are having trouble displaying a list of files located on the server, try deselecting this option.
Upload Filenames. This set of three radio buttons makes CuteFTP "force" a file to upload in lower, upper, or preserved case. This is helpful if you have created files with mixed case on your system, but need them to be all upper or lower case on your server.
Comments. This field can be used to key in any comments you desire.
4.1.2 FTP/Quick Connect. Clicking this option or pressing the Ctrl and C keys brings up the Quick Connect screen, which is like a small FTP Site Edit screen. It enables connection to a site without having to enter it into the Site Manager. This is good for sites you might want to connect to only once.
4.1.3 FTP/Reconnect. Clicking this option or pressing the Ctrl and R keys will reconnect you to the server once you have been disconnected.
4.1.4 FTP/Disconnect. Clicking this option or pressing the Ctrl and X keys breaks the connection with the server.
4.1.5 FTP/Settings. Clicking this option will display: Options, Text-File Extensions, Index File Mask, Index File NOT Mask, and AutoRename Scheme.
4.1.5.1 FTP/Settings/Options. Brings up an Options Screen with following five tabs: General, Advanced, Display, Prompts, and Firewall.
4.1.5.1.1 FTP/Settings/Options/General
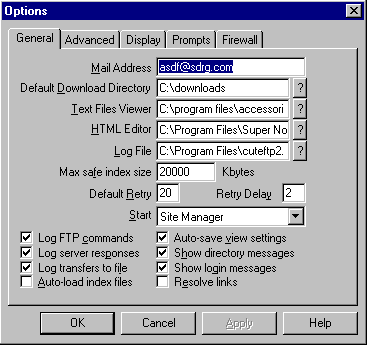
Mail Address Field. Place the e-mail address you want to use for anonymous logins. You can use your actual or a simulated e-mail address.
Default Download Directory. This window displays the directory that will be displayed in the left window. You can click the question mark to select a specific drive and directory.
Text Files Viewer. This field is used to determine what application should be used as the default viewer. The default viewer is Notepad. You can select any word editing application you want by clicking the question mark and selecting the appropriate application.
HTML Editor. This window displays the HTML editor. Your default application associated with .html files is launched. By defining the path to your html editor in this field, CuteFTP will launch that editor when you use the edit function.
Log File. This optional field shows the filename you specify to record the FTP commands, server responses, and transfers to a text file. Use the question mark button or enter the full path and file name of the log file. You can choose which items to include by selecting the check boxes in the lower section of the General tab.
Log FTP Commands, Log Server Responses, Log Transfers to File. These three check boxes define what information is stored to your log file. Each command does as its name implies.
Auto-Load Index Files. This box determines if the index file is loaded automatically into memory every time CuteFTP encounters one.
Auto-Save View Settings. This check box causes CuteFTP to save all display options on exit and restore them the next time the program is started.
Show Directory Messages. Some sites display a message when you access certain directories. This switch controls whether these messages are displayed.
Show Login Messages. This switch controls whether a login message is displayed on login.
Resolve Links. This UNIX specific option asks the server to resolve symbolic links to either file or directory. See 4.1.1.2 for more information.
Max Safe Index Size. This field is used to determine the size in kilobytes of the largest index file which will load without any prompts.
Default Retry and Retry Delay. These fields specify how many times (Default Retry) and with what intervals (Retry Delay) CuteFTP should attempt to connect to the server. Defined in section 4.1.1.2.
Start. This window specifies which function (Site Manager, Quick Connect or Main Screen) is launched when CuteFTP is started.
4.1.5.1.2 FTP/Settings/Options/Advanced
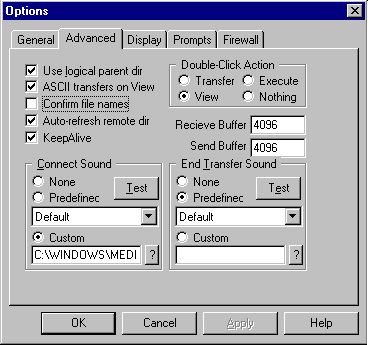
Use Logical Parent Directory. Selecting this box directs CuteFTP to regard the previously visited directory as the parent directory rather than the physical directory directly above it. It is useful on sites with many inter-directory links. The default is YES.
ASCII Transfers on View. Selecting this box directs CuteFTP to switch to ASCII transfer mode whenever you wish to view a remote file. You should keep that option ON unless you are using a custom file viewer that can view other than plain text files.
Confirm File Names. Selecting this box directs CuteFTP to confirm the name of the file that is being transferred.
Auto-Refresh Remote Directory. Selecting this box directs CuteFTP to reload the directory listing from the server after every file management operation (rename, delete, etc.). For large files that take a long time to refresh, you can leave this switch off and manually refresh the directory list with the F5 key.
Keep Alive. Selecting this box directs CuteFTP to send a "NOOP" command to the server every 90 seconds to let the server know you are still connected.
Receive and Send Buffer Fields. These boxes set the size of the Receive and Send Buffer fields, which are similar in function to the file and buffer fields in the Windows 3.x config.sys file. If you are having any trouble uploading or downloading partial files, try increasing the size of these fields. Also refer to Chapter 5: Trouble Shooting.
Double Click Action Radio Buttons. Selecting these buttons lets you choose the action to be taken when you double click a file name. If Transfer is selected, the file is uploaded or downloaded. If Execute is selected, the file will be launched into whatever application is associated with it. If View is selected, the file will be launched into your text editor. If nothing is selected, nothing happens when a file is double clicked.
Connect Sound and End Transfer Sound. This feature accomplishes the same function as setting system sounds in your Windows Control Panel. You can use the defaults or choose your own sounds by clicking on the question mark and selecting a .wav file on your system.
4.1.5.1.3 FTP/Settings/Options/Display
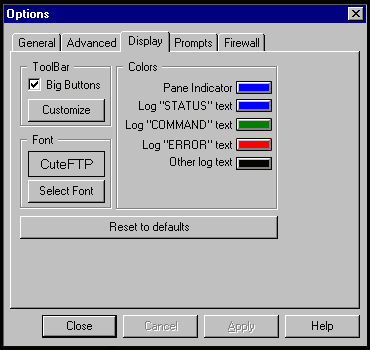
Big Buttons. Selecting this box displays large buttons for the toolbar. The smaller buttons are recommended if you are using a resolution of less than 1024x768, or if you don't wish to display CuteFTP in full screen mode.
Customize. Selecting this box allows you to add and remove buttons to the CuteFTP main window though the Customize Toolbar screen. If too many buttons are selected, CuteFTP may not be able to display them all on the screen.
Select Font. Selecting this box allows you to select the font and style. It is similar to the font selection function in most Window's programs.
Colors. Selecting any of the colors for each of the functions displays a color selection screen that allows you to select a different one, or define your own.
4.1.5.1.4 FTP/Settings/Options/Prompts
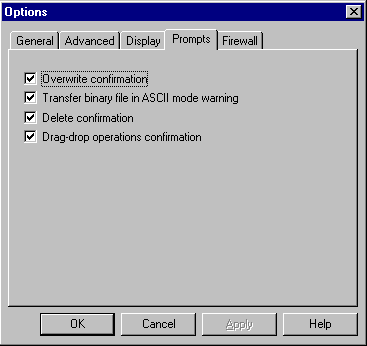
Overwrite Confirmation Checkbox. If your transfer operation is about to overwrite a file and this box is selected, CuteFTP will prompt you, to give you the option of canceling that operation. This works only on downloads.
Transfer Binary File in ASCII Mode Warning. Selecting this box directs CuteFTP to warn you if you are about to transfer a binary file (.exe, .wav, etc.) in ASCII mode.
Delete Confirmation. Selecting this box directs CuteFTP to ask if you are sure if you want to delete a file. It is best to leave this box checked because CuteFTP will not move files to the recycle bin, but rather remove them permanently from your system.
Drag&Drop Operations Confirmation. Selecting this box directs CuteFTP to prompt you for confirmation when you drag and drop files.
4.1.5.1.5 FTP/Settings/Options/Firewall
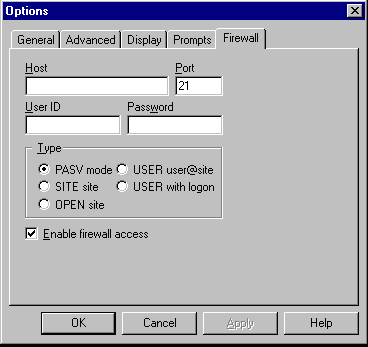
A firewall or proxy server is a safeguard utilized by many Local Area Networks (LANs) or Wide Area Networks (WANs) to protect the network from unauthorized access from the outside. If you are using CuteFTP on a LAN or WAN, you may have some problems caused by the network settings. If you are not on a LAN or WAN, this section does not pertain to you. When you first try to use CuteFTP, leave these settings as they are, and try to connect to some of the predefined sites in the Site Manager. If every site you try to connect to prompts you with the same message, "can't connect" or "can't login, still trying," then you probably need to configure these firewall settings. If your LAN or WAN does not support FTP Proxy protocol, you will not be able to use CuteFTP. If your server does support it, you will need the following information:
IP address for your firewall host
Port number for the FTP proxy server (this is 21 by default, but they could have assigned a different port under special circumstances).
User name
Password
Enter this information in the respective fields and select the USER user@site radio button and the Enable Firewall Access box at the bottom of the screen and try connecting to one of the predefined sites. If you are still having trouble, go back to the Type section, and try the USER with Logon, SITE site, or OPEN site radio buttons. Try to connect using each one. The PASV Mode radio button specifies that CuteFTP will initiate all connections and the server will only wait for requests, therefore avoiding the conflict with the security system. Only use this feature when experiencing problems with the default settings. The default is OFF. Use this setting and the Enable Firewall Access only if you are having trouble displaying a directory list on a particular site. If none of the above work, contact GlobalSCAPE Technical Support for assistance.
4.1.5.2 FTP/Settings/Text-file Extensions
This screen allows you to define the file extensions that CuteFTP should consider as ASCII (plain text) for transferring. Most are already predefined in this box (.txt, .html, .bat, .c, etc.). If you work with a specific file type that you want to be considered ASCII, you can add it to this box.
4.1.5.3 FTP/Settings/Index files mask
This screen allows you to specify two lists of Wildcard Masks to identify index files. A filename is matched against the Index Files Mask list. If any item in the list matches the filename, it is then matched against the Index Files NOT mask (see next section). If it doesn't match any of the items in that second list, the file is then considered to be an index file, and is displayed in the selected viewer.
Wildcard Masks. Wildcard Masks are patterns of special characters used to filter file names. When a Wildcard Mask is matched against a filename, the two patterns are compared, letter-by-letter, from left to right until a mismatch occurs. If all the characters in both patterns compare positively, the filename matches the Wildcard Mask.
A Wildcard Mask can contain the following characters:
"?" Will match any singe character (i.e. ? will match a,b,c,1,2,etc...)
"*" Will match any sequence of characters (including no characters at all), terminated by the next character in the mask. (i.e. * a will match cutea, wwwa, zzza, a etc.).
"[ ]" Will match any character in the character set, enclosed in the brackets. This can also be a range of characters (i.e. [ A - Z ] ).
If the opening bracket is followed by "!", matches any character NOT in the set. (i.e. [abc] will match a,b or c only. [!abc] will match any character except a,b,c)
Wildcard Mask Examples:
Mask Will Match
* all files
*.bmp sample.bmp, xyz.bmp, but not sample.gif
x?z xyz, xaz, but not xyy
a[xyz]c axc, ayc, azc, but not abc
a[!xyz]c abc, adc, afc etc, but not axc
a[a-c]d aad, abd, acd, but not axd
Wildcard Masks are case sensitive, so *.bmp will match abc.bmp, but not abc.BMP
4.1.5.4 FTP/Settings/Index files NOT mask
This screen allows you to specify files that should not be considered as Index Files. This box is the second list CuteFTP looks at when determining which files need to be considered index files. This is a valuable feature of CuteFTP. For example, if you look at the default Index Files Mask list, you will notice a file name *index* using Wildcards. CuteFTP will consider any file with the word "index" in it, to be an index file. That could cause a problem since your web page might be called index.htm. However, CuteFTP passes the filename through a second filter, the Index Files NOT Mask, and sees the *htm extension in the list. It will no longer consider your web page as an index file because of the double filtering system.
4.1.5.5 FTP/Settings/AutoRename scheme
This screen allows you to rename a file extension automatically during upload.
For example, if you create a web page called my page.htm, your server demands that all HTML files have a .html extension (not just .htm). With the AutoRename feature enabled, it will automatically rename "my page.htm" to my page.html" when you upload the file. You must have the AutoRename checkbox selected in your FTP Site Edit screen for this to work. You can add, remove, or modify file extensions in the Auto Rename box.
4.1.6 FTP/Transfer Type. Allows you to select the method used to transfer your files. CuteFTP will normally select the proper method, but this screen allows you to specify ASCII, Binary, or Auto.
4.1.7 FTP/Print. Prints the directory listing of the local or server side, whichever has the focus.
4.1.8 FTP/Exit. Exits the program.
4.2.1 Spawn Session. Opens a new session of CuteFTP.
4.2.2 Add to Database. Allows you to add the contents of Quick Connect to your Site Manager. For example, you have a list of sites to examine. However, many of the sites on that list probably do not exist any more. To save time, you use the Quick Connect option (Ctrl+C) and login to those sites one by one. When you find one you like, you can select Session/Add to Database, and a screen will pop-up asking you for a name. Give the site a name and click OK. That site will now be added to your Site Manager.
4.2.3 Save Local Path and Save Remote Path. Saves the path information into your FTP Site Edit screen for the directory you are currently in. For example, you login anonymously to ftp.cuteftp.com and by default, start out in the root directory. You then double click the pub folder, and then the cuteftp folder, which puts you in /pub/cuteftp. To be able to check back here periodically, click Session/Save Remote Path. Now, /pub/cuteftp is saved into the Initial Remote Directory field under FTP Site Edit in the Site Manager.
This option allows you to add or edit bookmarks. Bookmarks are used to help you keep track of favorite directories on remote servers.
4.3.1 Add. Selecting this option allows you to add a bookmark. When in a directory you would like to return to next time you are at the site, click Bookmarks/Add. You will then give this directory a description. The description will now appear in a list in the Bookmark Menu. You will not see this Bookmark under the Bookmark Menu unless you are connected to the same site. To go to a Bookmarked directory, simply connect to the site then click Bookmark and then on the Bookmark you would like to go to.
4.3.2 Edit. Selecting this option allows you to edit a bookmark. You can edit (add, remove, rename) your bookmarks from the Bookmarks screen, by clicking on the Bookmarks/Edit option.
4.4.1 Download (Ctrl+PgDn). This command downloads a file. You must have the focus on the server, and the specific file(s) or directories highlighted that you want to download. When the file is downloading, the bottom part of the CuteFTP screen will display the rate of transfer (speed, time remaining, time elapsed and percentage of completion). If a download is aborted, attempt to download the file into the same directory again. CuteFTP will ask if you wish to Resume, OverWrite, Rename, or Cancel. To check if the FTP site can resume an aborted download, watch the log window (upon Login) for a message that reads "This site can resume aborted downloads". If the site cannot resume downloads, you will receive a message "This site cannot resume aborted downloads".
4.4.2 Upload (Ctrl+PgUp). This command uploads a file or directory. The focus must be on the local side (lower left window) and the file(s) must be highlighted in order to complete this command.
4.4.3 View. This command will open the highlighted file (Either on the local or remote drive) in your text file viewer. Defined in section 4.1.5.1.1.
4.4.4 Edit. This option allows you to make changes to your HTML documents without having to download the page, edit it, save it, and then upload it manually. Make sure you have specified your HTML Editor in Ftp/Settings/Options. Highlight the file that you want to edit on the server side and then click Commands/Edit. Choose OK from the next pop-up Menu and your HTML Editor will launch. Make the changes to your HTML document and click File/Save from within your HTML editor. Exit the editor and you will see a Menu to either UPLOAD or CANCEL. If you like the changes, select UPLOAD. If you change your mind, select CANCEL.
NOTE: The 16 bit version for Windows 3.1 will require that you use the .htm extension with your webpages in conjunction with the remote site editing feature. Windows 3.1 does not support long filename extensions.
4.4.5 Execute. This command launches the highlighted file (either on your remote or local drive) into the associated application. For example, if you highlight a .wav file on your remote drive and click Commands/Execute, your default media player will play the .wav file.
4.4.6 Get Link as File. This command directs CuteFTP to get a directory link as a file, instead of trying to change directories to that link.
4.4.7 Manual Get. This command display a box where you can name a file (including path information) and download it without having to search for that file on the server.
4.4.8 Change Dir. This command allows you to manually change to a directory on your remote or local drive. Depending on where the focus is, CuteFTP will display the appropriate box for either when the Commands/Change directory command is clicked.
4.4.9 Delete. This command allows you to delete files. You can also delete a file by right clicking on the file and selecting delete (with the left mouse button) or by hitting the Delete key on your keyboard. CuteFTP has the ability to delete entire tree structures on the remote side and local side.
4.4.10 Rename. This command allows you to rename files. Highlight the file or folder you want to change, select Commands/Rename, and type in the new name for that file or folder.
4.4.11 Move. This command allows you to move files on the remote server. Highlight the file(s) or directories you want to move, click Commands/Move, type in the new path and click OK.
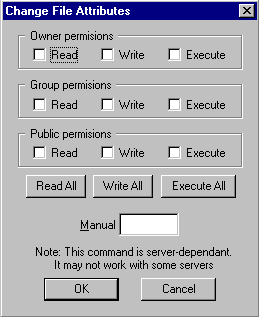
This command allows you to change file attributes on the server. This option is for advanced users only. To change a file attribute, highlight the file on the server side, click the Commands/Change file attributes command to bring up the Change Attributes dialog box. You can then select the Read, Write, or Execute options for each group (Owner, Group and Public ) or type in the corresponding CHMOD command in the manual box. Below is a brief description of CHMOD permissions and how they work.
For your CGI program to run, it must be executable by your Internet server. Therefore, you must set the permissions so the server can read or execute your files, which usually means making your CGI programs world executable. You set your file permissions by using the CHMOD commands. The CHMOD's permission mask is a three digit number. Each digit of the number defines the permission for a different user of the file. The first digit defines the permission for the owner, the second digit defines the permissions for the group and the third digit defines the permissions for everyone else (referred to by CuteFTP as public). Each digit works the same for each group of users: the owner, group, and public. What you set for one digit has no effect on the other two digits. Each digit is made up of the three Read, Write, and Execute permissions. The Read permission value is 4, the Write permission value is 2, and the Execute permission value is 1. You add these three numbers together to get the permissions for a file. If you want a file to only be readable and not writable or executable, set its permission to 4. This works the same for Write and Execute. Executable only files have a permission of 1. If you want a file to have Read and Write permissions, add the Read and Write values together (4+2) and you get 6, the permissions setting for Read and Write. If you want the file to be Read, Write, and Execute, use the value 7 (4+2+1). Do this for each of the three permission groups and you get a valid CHMOD mask. If you want your file to have Read, Write, and Execute permissions (4+2+1) for yourself; Read and Execute (4+1) for your group; and Execute (1) only for everyone else, you would set the file permissions to 751.
4.4.13 Make New Dir. This command will create a new directory on the drive you have selected.
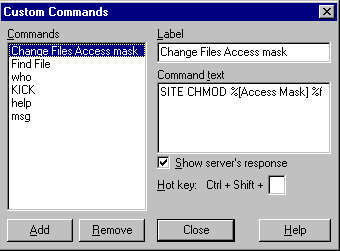
This option allows you to make custom commands and use predefined custom commands. Because the FTP protocol standard was established long ago and hasn't been revised, many operations have to be performed through proprietary extensions. Ideally, your ISP should create custom commands applicable to its Web server and then distribute a COMMANDS.DAT file to its subscribers. You can choose one of the predefined commands by selecting Commands/Custom Commands, and select the command from the list. You can add custom commands by selecting Commands/Custom Commands, and Define. This will launch the Custom Commands box. This box contains all currently defined commands. Click an entry under Commands to review/edit its properties. You can add a custom command by selecting the Add button, and editing the Label field. This Label is used to identify the command in the Command text box and Custom Commands Menu. The command text is the actual FTP command that is sent to the server. It can contain any characters, and one or more macros. Macro expressions are as follows:
%[ prompt ]. When this macro is encountered, CuteFTP will display a prompt dialog box with an input field. The user can then type any text in the input field, which will be inserted into the actual command text in place of the macro. Prompt can be any text, not containing [ ] (square brackets). It will be used as a title for the prompt dialog box.
%f. This macro will be substituted by the name of the file currently selected in remote browser. If more than one file is selected, the command will be repeated for each file.
%%. A single % character.
Show Server's Response Switch. Specifies whether CuteFTP should display the server's response to the command. If set, a dialog box will pop up containing a command-response sequence for each command executed. The Hot Key box is a keyboard accelerator, assigned to the command.
Common Command Examples:
SITE CHMOD %[New Access Mask] %f: This command will prompt the user for a "New Access Mask" and use it for each selected file. For instance, if user enters "=rwx" at the prompt, and FILEA.TXT, FILEB.TXT and FILEC.TXT files are selected, the following sequence of commands will be sent to the server:
SITE CHMOD =rwx FILEA.TXT
SITE CHMOD =rwx FILEB.TXT
SITE CHMOD =rwx FILEC.TXT
SITE INDEX %[Search Text]: This command will prompt for "Search Text" and send a single command to the server. For instance, if user enters "cuteftp" at the prompt, the following command will be sent to the server:
SITE INDEX cuteftp.
4.5.1 Add to Queue. The queue window is used for temporary storage of files you wish to transfer at a later time. You can browse a remote site, select a file(s) and then click Queue/Add to Queue to add that file to the queue. You can add multiple files from different remote or local directories into the queue window.
4.5.2 Remove from Queue Click on Queue/Remove from Queue to remove the highlighted file from the queue. This will cause for that file to NOT be transferred.
4.5.3 Transfer Queue Once you are done transferring files to the queue, and you are ready to upload or download them, clicking on Queue/Transfer Queue will began the process of transferring those files.
4.6.1 Short Listing. This option will display a short listing (just the file name is displayed) in the focused window.
4.6.2 Long Listing. This option will display a long listing (the file name and whatever is selected in the next command View/File Details is displayed) in the focused window.
4.6.3 File Details. This option allows you to select the details to be displayed when View/Long Listing listing is selected. Your choices are: size, date, time, attribute, and description.
4.6.4 Sorting. This option allows you to determine how CuteFTP will display the files on your screen. You can sort by name, extension, size, date, ascending and descending. For example, if you choose sort by name and ascending, your files will be displayed in alphabetical order starting at the beginning of the alphabet.
4.6.5 Auto Load Index. This option is also under FTP/Settings/Options/General. It determines if an index file is loaded into memory automatically every time CuteFTP finds one.
4.6.6 Retrieve Index. This option places the highlighted index file in memory.
4.6.7 Refresh. This option updates the directory listing from the server.
4.7.1 Find and Find Next. The Find command (Ctrl+F) allows you to search for file names and descriptions in the current directory using a piece of text or exact name match. Wild cards will not work. The first entry found will be highlighted. Subsequent entries can be found with the Find Next command (Ctrl+G).
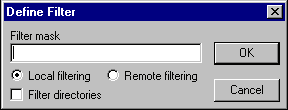
This option allows you to have CuteFTP display a portion of a directory and hide unwanted files temporarily. Filtering works by matching each file's name in a directory against a user-defined Wildcard Mask. If the match is good; the file is displayed, otherwise it's hidden. The filter is defined as follows:
Filter Mask. This is where you enter your Wildcard Mask using Wildcards.
Local Filtering. This option will cause CuteFTP to use the specified filter mask when performing a directory listing.
Remote Filtering. This option allows the remote host to do the filtering and produce a filtered listing.
Filter Directories. This option specifies if directories and links should be included in the filtering process. It is available only with the Local Filtering method.
4.7.3 Group Select, Deselect, and Invert Selection. This option is similar to the filter option. Group selecting allows you to quickly select large groups of similar files, using Wildcard Masks. It is extremely useful for working with large directories such as a home page directory, as it lets you select numerous files in one simple step instead of going through the listing and selecting the files manually. These are the commands:
Select Group. Select a group of files.
Deselect Group. Deselect a group of files.
Invert selection. Invert selected state of each entry.
Filter Mask field. Wildcard expression. (For definition of Wildcard Mask, see section 4.1.5.3).
Mask Directories check box. Apply the operation to directories (directories are excluded from the operation, if unchecked).
Remove Selection check box. If selecting a group, this option specifies whether the current selection should be cleared before starting the operation.
Group Select, Deselect, and Invert Selection examples:
Task. Select all gif files.
Operation. Use Group Select, specify *.gif as filter mask, click OK.
Task. Select all files, except html files.
Operation. Use Group Select with * as a filter mask, then use Deselect Group with *.html as a filter mask.
Task. Select gif and jpg files, but not html, txt, doc, or wpg files.
Operation. Use Group Select with *.gif as a mask. Use Select Group again with *.jpg mask and the Remove selection checkbox cleared.
4.7.4 Directory Info. When this option is selected, a box will pop up providing information about your directory, including the path, number of files in the directory, combined size of the files, and other pertinent information.
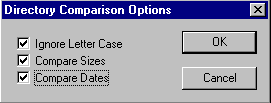
This option compares the contents of the local and remote directories. Make sure you have the directories on the local and remote displayed, and then select the Directory/Compare Directories function. You can then set options for CuteFTP to ignore case, and to compare by date and/or size. Files that are different from each other will be highlighted. Files that are the same will not be highlighted.
4.8 Macro
4.8.1 Start Recording & Stop Recording. Record functions for later automated playback i.e. Connect to your ISP, launch CuteFTP, close the Site Manager, and then select Macro/Start Recording. Now, open the Site Manager, connect to a site, change directories, upload or download files etc., and then change Macro/Stop Recording to save those commands.
4.8.2 Execute Macro. Plays the macro. From the Menu Bar, select Macro/Execute Macro. This will play back the previously recorded commands.
You can also launch the Macro from the START/RUN command line. To do so, type: [path to CuteFTP](a space)Macro=[complete path to saved macro]. For example: C:\Program Files\CuteFTP\CutFTP32.exe Macro=c:\Program Files\CuteFTP\Scripts\my_scrpt.scr. Please note that the macro commands that can be recorded are currently limited to upload, download, delete, and change directory. To have the macro shut CuteFTP down after the finished transfer, edit the script file that was created and add the word SHUTDOWN to the last line.
Files can also be downloaded from the command line by specifying an URL string in the format:
ftp://[userID]:[password]@[host name]:[port]/[path name]/[filename]
For example: C:\Program Files\CuteFTP\cutftp32.exe ftp://userID:password@ftp.domain.com/folder/fileName
(There should be a space between the .exe and ftp://).
This only works for downloading, and CuteFTP must be specified as the default FTP application in Windows Explorer.
Here is another way of scripting with CuteFTP, which does not use the Macro function.
The first thing you need to do for CuteFTP to follow a script is create a Script Text file, and then a batch file that will launch that script. Below is a sample Script Text file. Feel free to copy the information below to a text editor (Notepad) so as to create your script. Do not use multiple LOCAL or REMOTE statements. They will interrupt your transfer and cause your session to end without accomplishing anything.
Use the "#" sign for remarks. The "#" and everything on that line after the "#" is ignored. The following is an example of a Script Text file:
#Begin Script Text file.
# This line sets the address of the server you are contacting.
Host=ftp.cuteftp.com
# The following two lines set your user I.D and password.
User=[your user I.D here]
Pass=[your password here]
# The following command sets the retry count.
Retry=100
# The following command sets socket port to connect to (21 by default).
port=21
# The following command sets the initial local directory.
Local=c:\download
# The following command sets initial remote directory.
Remote=/pub/cuteftp
# Only one transfer per script is allowed. This line retrieves the file
# filename.ext from the specified remote directory and downloads it to the
# directory set in the last local command.
Get=filename.ext
#The following command sends the file filename.txt from the directory
# specified in the last local command and uploads it to the directory set in the # last remote command.
Put=filename.txt
# CuteFTP will automatically shut down.
# End.
Make sure you save the script file with a text extension.
Below is a Batch file the calls the Script file into action. You may type the following text into Notepad, then save the file with a .bat extension. Use the "REM" command for remarks. The "REM" and everything on that line after it is ignored.
REM Begin Batch file.
REM The following command creates a directory on your hard drive called REM download. Remove this line if you already have a directory on your drive REM created and specified in your script file.
md c:\download
REM Adjust the path below to represent the path to your CuteFTP program and REM location of your script file. The script file should be in a plain text format REM (ASCII). You can add the "anonym" command after cuteftp32.exe to tell
REM CuteFTP to ignore the password and user I.D. and log in as an
REM anonymous user.
C:\Progra~1\CuteFTP\CutFTP32.EXE Script=c:\progra~1\cuteftp\script.txt
ECHO ON
REM End.
Now launch your Batch file. It calls the Script file, logs in to the server and gets and puts the files you specified in the script.txt.
4.9 Window
4.9.1 Switch Browser. This option shifts the focus from one drive to the other (i.e. Local to Remote.)
4.9.2 Toggle Local and Toggle Remote. This option forces CuteFTP to use both the left and right windows (local and server) to display the contents of what used to be displayed in only one of those windows. To return to the original configuration, move your mouse pointer over one of the CuteFTP screen borders until it turns into a double arrow and drag that border toward the middle of your screen. This will restore the departed window.
4.9.3 Copy Log Window to Clipboard. This option will copy the entire contents of the log window to your Windows Clipboard. You can then pass this information into your favorite text editor.
4.10 Help
4.10.1 Contents. This option launches the help file for CuteFTP.
4.10.2 Registration. This option shows you how to register CuteFTP.
4.10.3 About CuteFTP. This option launches the About CuteFTP screen that displays the version number, author's name and the "licensed to" information.