
- To create an object:
- Click on the Open button
 on the Standard toolbar or select Open from the File menu to open an image.
- Click on the Drag box
 or Drag freehand
 button on the Area Toolbar.
The Drag box button places a dotted rectangular box around the area; the Drag Freehand button outlines the area. Click on the right mouse button to end the selection.
- Select the area by clicking on the image.
Hold the left mouse button down and drag until the dotted lines surrounds the area.
- Click on the Grab Object button
 on the Area toolbar or select Grab Object from the Area menu.
The Describe Object box is displayed.
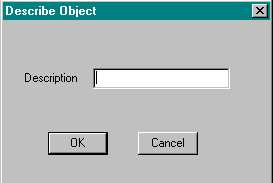
- Type in a description for the object.
- Click OK to return to the image.
- Select Object from the File menu to save the object.
You need to save the object in order to use it in a new image.
- Select Save from the Object sub menu.
The Save Object box is displayed. - Type in a file name.
The Save As Type default extension is *.imi. - Click on the Save button to return to the image.
- Use the options on the Object menu and the tools on the Object Toolbar to manipulate the object.
This Web page created in Web Factory.