
- Click the New button
 on the Standard toolbar.
Or, select New on the File menu.
The New box appears.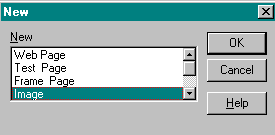
- In the New box, select Image.
- Click OK.
The New Image box is displayed.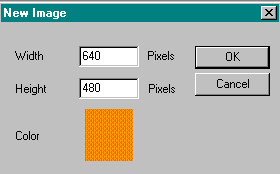
-
Set the width and height of the image in pixels.
Web Factory defaults to a 640 x 480 size window (that is, 640 pixels across by 480 pixels down)
HintThere are 75 pixels to an inch. - Set the background color.
Web Factory defaults to a background color of orange. - To change the background color:
- Click on the Pick button.
The Color Pallet is displayed. - Click on the color.
The color is displayed in the Color/Solid box. - Click OK to close the Color Pallet.
- Click on the Pick button.
-
Click OK to exit the New Image box.
An empty window of the selected size and background color appears on the screen
All of the image-editing menus and tools become available. You can now draw on the new image, load objects into the new image window, or cut and paste parts of another image into the window.
- Follow the instructions above on creating an image.
- Set the width to 640 pixels if you want the bar to span the entire width of the page.
- Set the length to 5 or 10 pixels to create a thin horizontal line.
- Set the background color to white.
- Click on the Paint button
 on the Context toolbar.
The Paint and Brush Shapes toolbars are displayed.- Click on the Foreground color
 button to select the drawing color from the Color Pallet.
Use the left mouse button to color the image with the foreground color. - Click on any of the round or square brush shapes on the Brush Shapes toolbar to set the drawing line size.

- If you want to fill the entire foreground with the new color, use the Flood Fill button
 .
.
To limit what area is to be filled with the new background color, use the Area selection toolbars to outline the area to be filled. - Use the Freehand button
 to paint a freehand design on the image.
 - Or, use the Filters toolbar to add special effects to the bar
For more information on the Filters toolbar, refer to Image Toolbars or see Image Objects - Filters.

NoteUse Undo on the Edit menu to reverse the last action. - Click on the Foreground color
- You can isolate an area to apply color changes, filters, or other effects with the Color Mask.
- Click on the Mask button
 on the Area Toolbar.
Or, select Edit Color Mask on the Edit menu. - Use any of the selection tools to select the colors of the image that you want to isolate.
- Click on the Add button
 on the Area toolbar to include the selected color.
If you want to add other colors into the mask, repeat Steps b and c.
To de-select or subtract a color from the mask, click on the Subtract button on the Area toolbar
 - When you have completed selecting all of the colors that are to be included in the Mask, select Mask on/off from the Edit menu to isolate the mask area.
The mask area is displayed as its normal appearance.
The default on the Edit menu is to Show mask normally - If you want to distinquish the mask area from other areas of the image, select either:
- Show mask as white
The mask area is displayed as white, while the remainder of the image is left at its regular color. - Show non mask as white
The area that is not part of the mask is displayed in white.
- Show mask as white
- Use any of the paint tools or filters on the mask area.
When you want to work on other areas of the image, select Mask on/off from the Edit menu again to turn the masked area off.
- Click on the Mask button
- Select Save As from the File menu to save the horizontal bar.
The Save As box is displayed. - Type the image file name.
- Click on the Save button to save the image.
- Follow the instructions above on creating an image.
Set the width, and height. Since you are creating a bullet, the size should be kept at a minimum. - Click on the Brush Select button
 on the Area Toolbar.
 - Click on one of the round or square Brush buttons on the Brush Shapes Toolbar to set the shape for the bullet.
-
Click on the Foreground color button to select the drawing color from the Color Pallet.
- Use either the Fill options on the Paint toolbar or use a Filter on the Filters toolbar to create the bullet design.
- To save the bullet:
- If the bullet is one color:
- Click on the Magic Wand button
 on the Area toolbar.
 - Select the colored area.
Dotted lines will surround the area. - Select Save Area as Transparent GIF on the File menu to save the area as a bullet.
- Click on the Magic Wand button
- If the bullet is composed of many colors:
- Use any of the Area select buttons to select the area that you want to be part of the button.
- Select Save Area as Transparent GIF from the File menu to save the bullet.
- If the bullet is one color:
- Press the Print Screen button on the keyboard to capture the screen.
The image is pasted into the Windows' clipboard. - Select Paste as New Image on the Edit menu to copy the clipboard contents into the ImagEditor.
- If you want the entire screen print saved as an image, click on the Save button
 to save it as an image.
 - If you only want to save a portion of the screen print, use one of the selection tools on the Area toolbar to outline the area that you want to save as an image.
- Select Copy from the Edit menu to copy the selected area
- Select Paste from the Edit menu.
- Select Paste As New Image from the sub menu.
- Click on the Save button to save the image.
There are many filters that you can apply to edit or enhance an image or selected area of an image. To use a filter:
- Use the Area toolbar to select an area.
- Select Filters from the Area menu.
- Select from the Filters sub menu:
- Fill
- Tint
- Posterize
- Gray-Scale
- Sharpen
- Blur
- Adjust Color
- Flip
The Filter is applied to the area selected.