HOW TO MODEL USING SUBDIVISION SURFACES by Steve Christov

Maya Unlimited

In this how-to you will learn how to model a spoon using Subdivision Surfaces.

   STEP ONE

Create a Polygonal Cube. Scale the cube 3, 0.1, 3

In the Channel box open the polyCube1 node in the Inputs sections. Set the following:

  • Subdivisions Width to 3
  • Subdivisions Depth to 3

With the polygon surface selected select Subdiv Surfaces > Create Subdiv from the modeling menu.

Press 5 on your keyboard to put your model in shaded view.

   STEP TWO

Right-click your mouse while it is positioned over the surface and select Points from the list. Select the four center vertices in the middle and move them down slightly to form the bowl of the spoon.

In the top view, Scale and Move the points along the edge to create a shape as shown.

   STEP THREE

You will notice that the edge of the head of the spoon is rounded rather than creased like a real spoon. You can fix this by creasing the edges.

Right-Click while your mouse is over the spoon and select Edges from the pop-up menu. In your top view, hold the Shift Key and select the edges around the head of the spoon. From the modeling menu set, select SubDiv Surfaces > Full Crease Edge/Vertex.

   STEP FOUR

You are now ready to create the handle for the spoon. You will do this by switching to polygon mode and extruding faces on the original polygon object. As you do so the subdivision surface is updated to reflect the changes in the original polygon mesh.

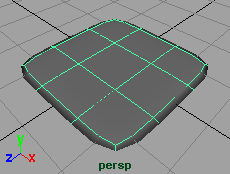
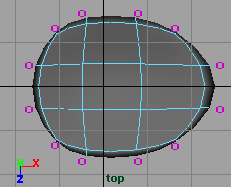
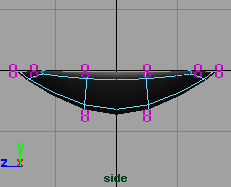
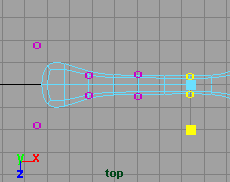
Right-click with your mouse button over the subdivision surface. Select Polygon Mode from the popup menu. A poly mesh will appear around the surface. Once again right-click over the surface and select Faces.

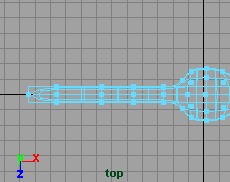
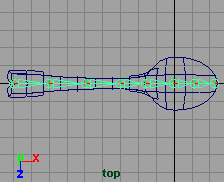
Select the face near the top of the spoon where the handle will be created. Select Edit Polygons > Extrude Face. Click the Blue Handle and extrude the face out about two units. Press g to repeat the last tool and extrude another 3 times making each extrude about two units until you get a handle for your spoon as shown.

 STEP FIVE

Right-Click over the spoon and select Points. In the front view select the sets points along the handle and move them to create a natural shape for that handle as shown.

The end of the handle tapers off rather flat. Right-click and select Edges from the popup. Zoom in to the handle and in your front view select the last two bottom edges on the side. Move them down to add some volume to the handle.

 STEP SIX

Right-click over the spoon and select Hierarchy Mode. Right-click and select Points. Select the last two points of the handle and Scale them out to create a flared end to the handle. Select the set of points at the neck of the spoon and scale them in.

Deselect all points and right-click over the surface and select Finer. This increases the display level on the surface. You will notice many more points and they now to turn to Number 1's to display the detail level.

Select and Move the various points at this level to add some detail to the handle

 STEP SEVEN

When you are finished with your modeling and ready to animate, press F8 to go to object mode. Select the spoon and select Edit > Delete by Type > History.

Now select Modify > Freeze Transformations > Options. Uncheck the Translate and Rotate values leaving only scale checked and click Freeze Transformation.

 STEP EIGHT

You are now ready to bind in a skeleton to your model. In your top view select Skeleton > Joint Tool. Place joints along the length of the spoon. Select the root joint and then the surface. From the animation menu set select Skin > Bind Skin > Smooth Bind.

Test your bind by select a joint and rotating. You now have a bound model that is ready to be animated in the same way you would animate a NURBS or Polygon model.

CONCLUSION

In this lesson you have learned how to model using subdivision surfaces. You have also learned how to bind in a skeleton.

Your use of this file confirms your agreement to the
Terms and Conditions set out in the Terms and Conditions page.