HOW TO COMPOSITE MAYA RENDERED IMAGES by Steve Christov

Play Movie [483 k]

Maya Complete
Fusion Lite - NT

In this article you will learn how to use Maya Fusion to combine a series of hardware rendered images with a series of software rendered images which will then be saved out as an AVI file.

This how-to is a continuation of Lesson 4 in the Learning Maya book. You will be working with images rendered from the final scene file. You may remember that the scene contains elements that use two different render procedures. The majority of your scene is rendered using Maya's software renderer. However, the sparks in the scene need to be rendered using Maya's hardware renderer. Because of this you will end up with two series of files. The next step is to composite them in a compositing package such as Fusion to combine them into a single image or movie file.

Click to view larger image

   STEP ONE

Download the project files for your platform:

Set your project to Merging and open the ballbounce.ma file from the scenes directory.

Your first step is to set-up the render attributes then render the images within Maya. With the final scene file loaded in Maya, and the perspective window active, select Window > Rendering Editors > Hardware Render Buffer.

In this window select Render > Attributes and set the following settings:

  • File Name to sparks
  • Extension to name.1.ext
  • Start Frame to 1
  • End Frame to 60

These images will be composited over the ball and ring scene, therefore it is important for this render to have a mask. In this case we can create a mask by creating an Alpha Channel using the Luminance from the scene. Set the Alpha Source to Luminance.

Finally we need to make the fire particles invisible in the hardware render. Select the fire particles around the ring. Open the Attribute Editor window and in the Render Attributes section, set the Opacity to 0.

In the Hardware Render Buffer Window, Select Render > Render Sequence.

Click to view larger image

   STEP TWO

Once you have finished rendering the sparks, you are now ready to render the rest of the scene. Select Window > Render Globals. Set the following settings:

  • File Name to bounce
  • Frame/Animation Ext to name.#.ext
  • Start Frame to 1
  • End Frame to 60

Select Render > [Save] Batch Render.

   STEP THREE

You should now have two series of images and are ready to composite. Open Maya Fusion or Fusion Lite.

You can open all of your available tools in one window by selecting File > Bins. With the LMB drag a Loader to the work area. Because you are compositing two separate renders, you will need 2 Loaders. Drag a second Loader into the work area, placing it below the first.

   STEP FOUR

In the option box for Loader 1, Click on the Folder Icon and navigate to the rendered frames for sparks and select the first frame. You should normally see the first frame appear in the Loader but because there are no sparks at frame 1 it will be black.

Open the option box for Loader 2 and select Frame One of the render called bounce. The first frame should appear in Loader 2,

Click to view larger image

 STEP FIVE

With the images to be composited placed in the Loader, you will now add tools to tell Fusion what to do with them. In this case you want to have these images output into a merge tool.

In the Bins window drag the Merge tool and place it beside Loader 2. A connection is automatically made.

Drag the Output Arrow from Loader 1 to the arrow located above the Merge window. You have now connected Loader 1 to the Foreground Input of the Merge tool.

NOTE: The merge tool has two different inputs; Foreground and Background. Generally you will want to use the background as your plate, then add elements that contain a mask to the foreground. Because you set the sparks to render a mask or alpha channel, it allows you to use the sparks as a foreground element.

Click to view larger image

 STEP SIX

From the Bins window, drag a Saver and place it beside the Merge window. Fusion will automatically connect the output of the Merge to the input of the Saver.

Open the Options for the Saver. Beside Output Format open the Pulldown Menu and select AVI Files. Click the Folder icon and navigate to the directory you want your movie file saved to. Name the file BallBounce.

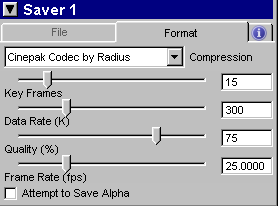
Click the Format Tab. Here you can adjust settings such as compression and frame rates.

Select Cinepak Codec by Radius from the drop down menu beside compression.

You can also turn off Attempt to Save Alpha to slightly lower the final file size.

 STEP SEVEN

At the bottom of the Fusion window, there are settings for the Render Start and Render End frames. Set the Render Start Frame to 0. Set the Render End Frame to 59.

Make sure your Current Time is set to 0. You are now ready to render your composition.

Press Start Render.

When Fusion finishes rendering, go to the directory you specified in your saver to view your animation.

Play Movie [500 k]

CONCLUSION

At this point, you have learned how to composite a series of Maya rendered images and save them to an AVI file format. Keep in mind that Fusion also allows you to output to single images or even single frames.

Your use of this file confirms your agreement to the
Terms and Conditions set out in the Terms and Conditions page.