|
Upgrading from SuperOffice 3.x or 2.5 C-tree to SuperOffice 4.02
SQL Anywhere
Upgrading from SuperOffice 3.x or 2.5 C-tree to SuperOffice 4.02
in a Sybase SQL Anywhere 5.5 environment is done in 5 steps:
- Upgrade SuperOffice 3.x or 2.5 C-tree to SuperOffice 4.02 C-tree.
- Install the Sybase SQL Anywhere server.
- Install the Sybase SQL Anywhere clients.
- Configure the ODBC datasource on the clients.
- Convert from SuperOffice 4.02 C-tree to SuperOffice 4.02 SQL Anywhere.
All steps have to be done in this order, or the installation will
fail. Each step ends with a test witch has to be passed in order
to continue with the next step. If a test fails it?s no use continuing
with the next step before you have corrected the problem and passed
the test successfully.
Upgrade SuperOffice 3.x or 2.5 C-tree to SuperOffice 4.02 C-tree
This is a standard procedure described in the SuperOffice 4.0
User Guide. When the upgrade is done as described in the user
guide and you can log on to SuperOffice 4.02, continue with the
next step.
TEST: Start SuperOffice 4.02, log on as a normal user and make
sure that all looks normal.
Install the Sybase SQL Anywhere server
Create a directory (on the NT computer that is going to be your
SQL server) called C:\SOBASE. Copy the file \SO_ARC\DATA\SUPEROF4.DB
from the SuperOffice CD into this directory.
If you have SuperOffice on floppy disks do as follows:
Start a command prompt, insert SuperOffice disk 4 and type the
following command:
EXPAND A:\SO_ARC\DATA\SUPEROF4.DB_ C:\SOBASE\SUPEROF4.DB
If the file EXPAND.EXE is missing from your computer, you will
find it on the root of the SuperOffice 4.0 floppy disk number
7. Copy this file to your Windows directory.
TEST: Verify that there is a file called SUPEROF4.DB on the C:\SOBASE
directory.
From the NT computer that is going to be your SQL server, start
Setup.exe from the \SERVER\WINNT directory on your Sybase SQL
Anywhere 5.5 CD. Follow the guidelines of the installation program
and use default directory names. You don?t need to install any
additional tools or drivers.
When the installation is finished, start Service Manager from
the Sybase SQL Anywhere 5.0 program-group (in the start menu for
NT 4.0).
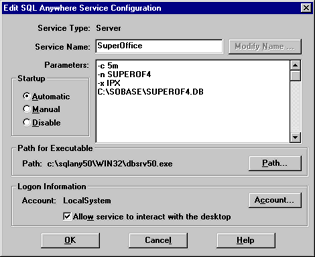
We are now going to define and start the server service.
Click "New" and select "Network server", and click "OK". Type
in the following parameters:
| -c 5M: |
Indicates the size of the cache you will use. We recommend 1/4
- 1/2 of the size of the database (C:\SOBASE\SUPEROF4.DB), and
if this is a new database we recommend 5 Mb. |
| -n SUPEROF4 : |
Set the name of the server to SUPEROF4. |
| -x IPX : |
Specify the network protocol that this dB-server is going to broadcast
on. In this example we use IPX. |
| C:\SOBASE\SUPEROF4.DB: |
The name of the database file. |
Click "OK" to return to Service Manager, and click "Start" to
start the server.
PS! You can configure this service to start automatic when you
start the NT computer. For more information about this look in
the NT and Sybase SQL Anywhere manuals.
TEST: Start the dB server and verify that the server broadcasts
on the right protocol with the name SUPEROF4.
Note that the SQL server name (SUPEROF4) can be case sensitive
depending on witch protocol you run on.
Install the Sybase SQL Anywhere clients
IT IS VERY IMPORTANT THAT YOU INSTALL THE 16-BIT CLIENT OF SYBASE,
NO MATTER WHAT OPERATING SYSTEM YOUR CLIENT COMPUTER RUNS ON.
From the each computer that is going to run SuperOffice 4.0, start
Setup.exe from the \CLIENT\WINDWOS directory on your a Sybase
SQL Anywhere 5.5 CD. Follow the guidelines of the installation
program and use default directory names. You do not need to install
any additional tools or drivers.
Let the installation program alter you Autoexec.bat file when
you are asked this question.
When the installation is completed reboot your computer.
TEST: Start the client and verify that it finds the server.
This is done by creating a shortcut or program item with the following
command line:
C:\SQLANY50\WIN\DBCLIENW.EXE -x IPX SUPEROF4
Note that the SQL server name (SUPEROF4) can be case sensitive
depending on witch protocol you run on.
Configuring the ODBC datasource on the clients
This step also has to be done for each computer that is going
to run SuperOffice 4.0.
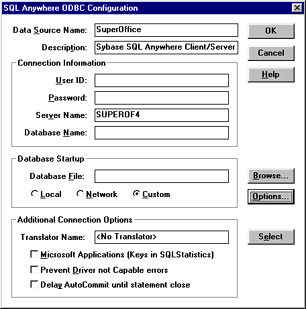
From the Sybase SQL Anywhere 5.0 program-group start the ODBC
Administrator.
Click on "Add", select "Sybase SQL Anywhere 5.0", click "OK" and
type in the following information on the screen that now appears:
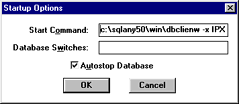
Click on "Options" and type inn the following information:
Click "OK" twice and then "Close"
TEST: On the root directory on the SuperOffice CD or disk number
7 you will find a small ODBC-test application called ODBCTEST.EXE
start this application on your workstation, select datasource
SuperOffice and type in user id (DBA) and password (SQL or the
DBA password you have provided).
If the application reports that the ODBC-connection is OK, the
test is successful.
Note that both MS Access 2.0 and 16-bit MS Query also are examples
on a 16-bit ODBC application that can be used to perform this
test.
Converting from SuperOffice 4.02 C-tree to SuperOffice 4.02 SQL
Anywhere
Reinstall SuperOffice 4.02 in order to get all Sybase specific
files in to your program directory.
From one of the client computers that are going to run SuperOffice
4.0, insert the SuperOffice CD or disk 1 and run setup.exe from
the root directory. When asked, select New Installation Multi-user.
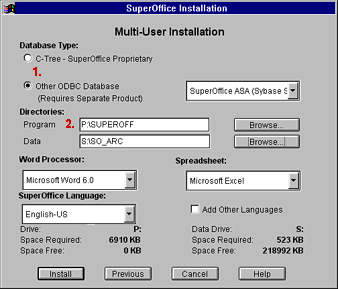
1. Select Other ODBC Database and select the datasource: "SuperOffice" from the dropdown list.
2. Specify the network directory to place the program files and
directory on where to store your letters and templates.
Click on "install" and follow the instructions on screen.
When prompted do NOT overwrite any files, except AREA.DB. This
file may be overwritten.
When the installation is done, do NOT start SuperOffice. Open
the file SOSETUP.INI located in your SuperOffice network program-directory.
Change the following settings:
From:
[General]
Version=4.0
Action=Register
To:
[General]
Version=4.0
Action=Rebuild
Datapath=S:\SO_ARC\DATA\SUPEROF4.DAT *Must be adjusted to your location of superof4.dat
Datapath2=ODBC:SuperOffice
Save the file and start SOSETUP.EXE from your SuperOffice network
program-directory.
Enter a user-id and password for a user with userlevel 0 in your
c-tree database. When prompted for a DBA-user in the SQL database,
that is not going to be a SuperOffice user.
SuperOffice will now complete the conversion of the database and
when this is done, you can start SuperOffice 4.02 on your new
platform.
|