|
|
5 Converting from C-tree to Oracle.
Converting from SuperOffice 4.02 C-tree to SuperOffice 4.02 Oracle
is done in 4 steps:
- Install the SQL*Net client
- Configure the SQL*Net client
- Configure the ODBC datasource on the client
- Convert from C-tree to Oracle 7.3
All steps have to be done in this order, or the installation will
fail.
TEST: Start SuperOffice 4.02, log on as a normal user and make sure
that all looks normal.
5.1 Install the SQL*Net client
IT IS VERY IMPORTANT THAT YOU INSTALL THE 16-BIT CLIENT OF SQL*Net,
NO MATTER WHAT OPERATING SYSTEM YOUR CLIENT COMPUTER RUNS ON.
- Insert the Oracle Network Products CD-ROM for Windows in your
CD-ROM drive
- Run ORAINST.EXE
Path: X:\WINDOWS\INSTALL, where X denotes the CD-ROM drive.
- Select configuration parameters
Follow the on-line instructions to set language, company and Oracle
Home Directory.
You will also be asked to specify the User Type (Data Base Administrator,
Application User or Custom). Your choice will determine which
products to install.
Make your own choice, but make sure that at least SQL *Net is
selected!
If you are a database administrator and you need to configure
SQL *Net version 2,
the Oracle Network Manager must also be selected.
5.2 Configure the SQL*Net client
Before you start the procedure below, please remark the following:
- Choice of configuration tools
Both SQL *Net Easy Configuration and Oracle Network Manager can
be used.
But do not attempt to use both of these utilities on the same
machine!
In the following procedure SQL *Net Easy Configuration is assumed.
- Enter your data with care
Since Oracle Installer scripts mainly implement this utility,
it cannot perform extensive error checking on the data you enter.
Ensure that you enter the correct data!
- You may reverse the configuration procedure
The Cancel button, which is found in every dialog box, deletes
any changes made since the last confirmation and exits the utility.
Procedure:
- Run SQL*Net Easy Configuration
In the Oracle program group in your Program Manager, doubleclick
on the SQL*Net Easy Configuration icon. The SQL*Net Easy Configuration
dialog box appears.
- Choose type of operation
The SQL*Net Easy Configuration dialog box is the first screen
that appears after you
doubleclick on the Oracle SQL*Net Easy Configuration icon. The
SQL*Net Easy Configuration dialog box lets you:
- Choose protocol
The Choose Protocol dialog box only appears if more than one supported
Oracle Protocol Adapter resides in your Oracle Home Directory.
If so, make your own choice!
- Enter the appropriate Service Name
Enter a Service Name according to the following:
- Host Name for TCP/IP
- Service Name for SPX/IPX
- Server Name for Named Pipes
- NetBIOS Name for NetBIOS
- Enter Database Instance Name
Accept the default name ("ORCL") or type the Database Instance
Name to which to connect.
If you used SQL*Net version 1 in the past, you can use the same
values for Service Name and Database Instance as you used for
SQL*Net version 1. If you do not know this information, ask the
person who administers your network or remote database.
5.3 Configuring the ODBC datasource on the clients
This step also has to be done for each computer that is going
to run SuperOffice 4.0.
- Start the ODBC Administrator.
- 2. Click on "Add"
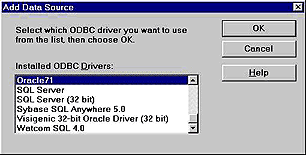
- 3. Select "Oracle71" form installed ODBC Drivers. If Oracle71
driver has not been installed, you have to install it first.
- 4. Click "OK" and type in the following information on the screen
that now appears:
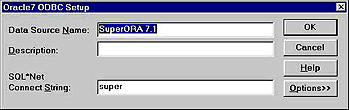
- 5. You can give any name to Data source name, but you should use
this data source name when you install superoffice. The SQL*Net
Connect String must be the same as the database alias. In other
words the name you used when you added database alias in SQL*Net
client configuration.
- 6. Click "OK" twice and then "Close"
5.4 Converting from SuperOffice 4.02 C-tree to SuperOffice 4.02 Oracle
Reinstall SuperOffice 4.02 in order to get all Oracle specific
files in to your program directory.
From one of the client computers that are going to run SuperOffice
4.0, insert the SuperOffice CD or disk 1 and run setup.exe from
the root directory. When asked, select New Installation Multi-user.
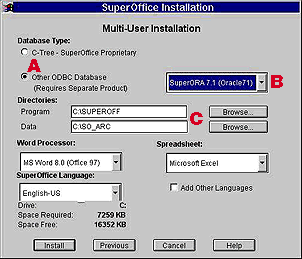 |
- SelectOther ODBC Database and select the datasource:
- "SuperOffice" from the dropdown list
- Specify the network directory to place the program files and directory
on where to store your letters and templates
|
- Click on "install" and follow the instructions on the screen.
- When prompted do NOT overwrite any files.
- When the installation is done, do NOT start SuperOffice. Open the file SOSETUP.INI located in your SuperOffice network
program-directory. Change the following settings:
From:
[General]
Version=4.0
Action=Register
To:
[General]
Version=4.0
Action=Rebuild
Datapath=C:\CTREE\SO_ARC\DATA\SUPEROF4.DAT ?Must be adjusted to
your location of superof4.dat
Datapath2=ODBC:SuperORA7.1
- Save the file and start SOSETUP.EXE from your SuperOffice network
program-directory.
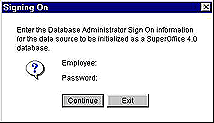
- Enter a user-id and password for a user with userlevel 0 in your
c-tree database.

- 6. When prompted for a DBA-user in the Oracle, that is not going
to be a SuperOffice user. (This user must be created in oracle
before the installation)
- 7. SuperOffice will now complete the conversion of the database
and when this is done, you can start SuperOffice 4.02 on your
new platform.
|