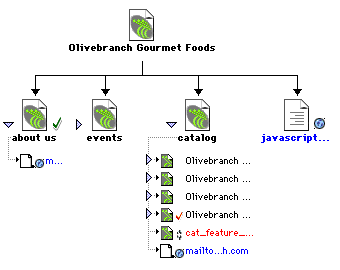
Use the Site Map View to view local sites as a visual map of linked icons, to add new files to a site, or to add, modify, or remove links. The Site Map View is ideal for storyboarding. You can quickly prototype of the entire structure of the site and then create a printed image of the site map.
Note: The Site Map View applies to local sites only. If you want to create a map of a remote site, copy all the content to your local drive.
To view a site map, do one of the following:
| Choose Window > Site Map to open the Site window. | |
| In the Site window, click the Site Map button. |
The site's home page is the starting point of the map. If Dreamweaver can't determine which page in the current site is the home page, the Site Definition dialog box opens to the Site Map Layout panel, prompting you to select the correct page.
The site map shows HTML files and other page content as icons. Links are displayed in the order in which they are encountered in the HTML source code.
 |
Text displayed in red indicates a broken link. |
 |
Text displayed in blue and marked with a globe icon indicates a file on another site or a special link (such as an e-mail or script link).
|
 |
A green check mark indicates a file checked out by you. |
 |
A red check mark indicates a file checked out by someone else. |
 |
A lock symbol indicates a file that is read-only (Windows) or locked (Macintosh). |
By default, the site map displays the site structure two levels deep, starting from the current home page. Click the plus and minus signs (Windows) or the expander arrow (Macintosh) next to a page to show or hide pages linked below the second level.

By default, hidden files and dependent files are not displayed in the site map. Hidden files are HTML files marked as hidden. Dependent files are non-HTML page content such as images, templates, Shockwave files, or Flash files. See Modifying the site map layout and Showing and hiding site map files.