A behavior is a combination of an event and an action. Events are situations that trigger actions. For example, an event called onClick can occur when the user clicks a button, or an event called onMouseOver can occur when the mouse pointer passes over an object. Actions are pieces of pre-written JavaScript code that perform specific tasks, such as opening a browser window, playing a sound, or stopping a Shockwave movie.
When attaching a behavior to a page element, you specify both an action and the event that triggers it. Dreamweaver offers several pre-defined actions that you can attach to page elements.
Here, you'll apply Swap Image actions to the about, events, and catalog graphics so that the images appear to light up when the mouse passes over them (that is, when the onMouseOver event occurs). For example, when the about image appears on the page normally, it looks like this:

After you've defined a behavior that includes the Swap Image action during the onMouseOver event, the about image will look like this (a highlighted version of the original image) when the mouse passes over it:

Begin by reopening the home page file you edited earlier in the tutorial, then attach behaviors to specific graphic elements on that page.
To reopen the page in Dreamweaver:
| 1 | Move the Site window to the foreground by choosing Window > Site Files. |
| 2 | Double-click the listing for the home page file DW2_index.htm to reopen it in the Document window. |
To attach a behavior to a graphic element on the page:
| 1 | Click to select the about image in the Document window. |
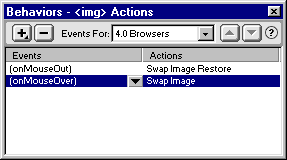
| 2 | Choose Window > Behaviors to open the Behavior inspector, which lists all behaviors defined for the selected element (there shouldn't be any yet). |
| 3 | Add a new action to the list by clicking the plus (+) button and choosing Swap Image from the pop-up menu. |
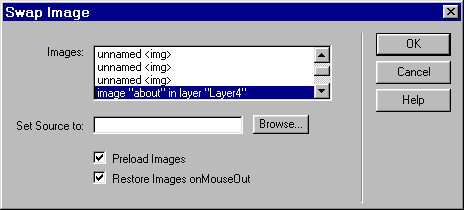
| The Swap Image dialog box appears, displaying a list of all images on the page. | |
| 4 | In the Swap Image dialog box, select the about image from the Images list. |
This is the original image, which will be replaced with a highlight image when the mouse pointer passes over it.

|
|
| 5 | Click Browse next to the Set Source To field and navigate to the image nav_about_roll.gif in the Assets folder. |
| This image replaces the original image during the onMouseOver event. | |
| 6 | Accept the default options below the Set Source To field. |
| The Preload Images option loads the swap image into the browser's cache as the page loads, so that there is no noticeable pause before the highlight image appears when the user first moves the mouse pointer over the about image. | |
| The Restore Images onMouseOut option automatically assigns the Swap Image Restore action to the onMouseOut event for this image. This returns the button to its original state when the user moves the mouse pointer away from the button. | |
| 7 | Click OK to close the Swap Image dialog box and apply the changes you just made. |
The Behavior inspector now includes the events and actions you just defined for the image. The onMouseOver event appears with the Swap Image action; above it is the onMouseOut event with the Swap Image Restore action, which was defined for you when you accepted the default options while setting the Swap Image action.

|
|
| 8 | Repeat these steps to attach Swap Image actions and onMouseOver events to the events and catalog images: |
| Replace the events image with the swap image nav_events_roll.gif. | |
| Replace the catalog image with the swap image nav_catalog_roll.gif. | |
| 9 | Close the Behavior inspector. |
Now, see how the behaviors act by previewing the page in a browser.
To preview the page in a browser:
| 1 | Click F12 to preview the home page in a browser. |
| 2 | Move the mouse pointer over the about, events, and catalog images to see how they change. |
| Close the browser when you're finished previewing the page. | |
| 3 | Return to Dreamweaver and save your changes by choosing File > Save. |