Create a series of page headers for a long document with Helen Bradley's technique.
In the \INTERACT\HEADERS\ folder on the CD you will find several .DOC files with headers in Word 6 & 7 formats.

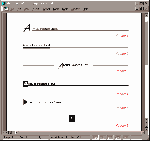
Figure 1a: This month's project is a series of interesting page headers
you can use to add some style to long documents.
What you need: Word 6.0, 7.0 or 97
User level: Beginner to Intermediate
When you want text to appear on every page of your document you should put it into either the Header or Footer area of your document. Headers and footers are a handy word processing function -- they allow you to create a piece of text once and your word processor then makes sure it appears on every page. This saves time and effort because the program takes control of the pagination of your document and once you've created your header or footer you don't have to worry about it again. If you're unsure how to create a header in your word processing package see the instructions in the box 'How to create a header'.
Here are instructions for each header in Word 97 (these work fine in Word 6.0 and 7.0,
too):
Header 1
This header is created using a frame for the leading letter. Type the heading text (minus
the first letter), press Enter and then format the text using Arial, 12 point type. Using
Format, Borders and Shading, select a 1╜ point line along the bottom of the paragraph.
Select Format, Paragraph and set the Left indentation to 1cm and click OK. Now using
Insert Frame, draw a small frame and position it to the left of the title and type the
leading letter into the frame (Word 97 users, see the box 'Using Insert Frame in Word 97'
for instructions). Use Format, Borders and Shading, Borders tab, None to turn off the
frame border.
You can now select the letter in the frame and format it using your choice of fonts -- we used Brush, 455 BT at 40 points. When the shape of the letter 'A' is determined, move the frame into position so that the bottom of the letter lines up with the other text or the line itself -- whichever gives the best result.

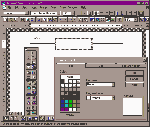
Figure 2a: Creating text in a text box with a white fill allows you to position this over a paragraph border and block out the line underneath.
This header uses a two-column, two-row table to create an interesting effect. Type the heading text, format it to Arial 12 point and press Enter. Insert the table using Table, Insert Table and select Number of Columns: 2, Number of Rows: 2 and click OK. Select the first column of the table and using Format, Borders and Shading, select the Shading tab. Select Custom, Shading, Solid 100% and click OK. Now select the first row of the table and repeat this last step. Still with the first row selected, use Table, Cell Height and Width and set the height of the first Row to Exactly and 2 point and the height of the second row to Exactly and 4 point. If there are borders on your table, then select the table and use Borders and Shading, Borders tab and select None and OK.
Using the length of the heading text as a guide, adjust the width of the first column to match your heading text.

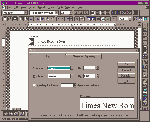
Figure 3a: Using the Position options in WinWord you can raise or lower a character in relation to the adjacent text.
To create this header create a double line by selecting Format, Borders and Shading, Borders tab. From the Style list select the bottom of the paragraph and a 1╜ point double line and click OK.
Display the drawing toolbar, using View, Toolbars, Drawing and click OK. Select the text box button and drag a long rectangular text box over the line. Select the text box, right-click, select Format Drawing Object (Format Text Box in Word 97), Fill tab and select Color: White (see Figure 2a). If the text box has a border, remove it by clicking the Line tab and selecting Line: None (No Line in Word 97) and click OK to finish.
Type the text in the text box and format it to Arial, 12 point and centre it. Select the first letter of the title and format it to a contrasting font, we used Brush 455 BT, 28 point. The letter will stand too high on the line so lower it by selecting it and using Format, Font, Character Spacing and select Position: Lowered, By: 8 point and click OK. Depending on the font you use, you may need to adjust this setting to get the letter in position. Adjust the size and position of the text box over the line.

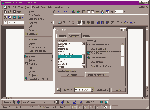
Figure 4a: If you miss having the Insert, Frame option in Word 97, you can add it using the Customize options.
This smart header again uses a Frame but this time to create an interesting white text on black background effect. The white letter in a black box is balanced by the strong line.
To create this header, type your text all in capitals (minus the first letter) and format it to Arial, Bold, 12 point. Using Format, Borders and Shading, select the Borders tab and set a 2╝ point bottom line for the paragraph. Create a Frame using Insert, Frame, select it and use Format, Borders and Shading, Shading tab to set a Custom Shading of 100% and click OK. Type the first letter of your title in the frame, select it and using Format, Font, set its Color to White and choose a suitable sans serif font for it -- we used Swiss Black Extended BT to get the solid character.
Move the frame into position over the line and add spaces in front of the remainder of the text to move it far enough along the line to be in position next to the frame.
| How to create a header |
| WordPerfect: Select
Format, Header/Footer, select Header A or Footer A and Create. Word (all versions): Select, View, Header and Footer. Word Pro: Right-click on the document, select Page Properties and select the Header tab. |
This header is simple and effective. The triangle is a character from the Wingdings 3 collection. Insert this using Insert, Symbol, Symbols tab, Font: Wingdings 3 and select the triangle character and format it to 28 point. (If you don't have the Wingdings 3 font, check the other symbol and bullet fonts in your font collection for a character the same or similar.)
Press the Spacebar twice and type in your heading -- we used mixed upper- and lower-case type and then formatted it to Arial, 14 point, Small Caps (using Format, Font). You will notice that the symbol character is too high on the line so lower it by selecting it and using Format, Font, Character Spacing tab, Position: Lowered, By: 5 point and select OK (see Figure 3a). If lowering the symbol by 5 point doesn't align your character correctly, experiment until you get a suitable result.
| Using Insert Frame in Word 97 |
| Word 97 lacks the
Insert, Frame menu option that existed in Word 6.0 and 7.0, but you'll find an Insert
Frame button on the Forms toolbar. Display this by selecting View, Toolbars and select the
Forms toolbar from the list. You can add the Frame option to the Insert menu by following these steps: 1. Select Tools, Customize and select the Commands tab 2. Select All Commands from the Categories list. 3. Locate the Insert Frame item in the Commands list. 4. Click on the Insert menu to open it. 5. Drag the Insert Frame option from the Commands list up into the Insert menu and drop it where you want it to appear (see Figure 4a). 6. Click Close to finish. |
This is the most complicated of the headers and it creates an automatic page number which will appear at the top of each page in reverse video. To create the header, using the Drawing toolbar create a 1.5 point line the full-width of the header area (if you hold down the Shift key as you drag your line it will be horizontal). Over the top of this line create a rectangle which is filled with white and which has no border. Centre the rectangle over the line and adjust the layering, if necessary, so that the rectangle blocks out the middle of the line. Now hold down the Shift key and select the line and the rectangle and click on the Group button (on the Drawing toolbar's Draw menu in Word 97) -- this keeps the two objects together.
To get the automatic page number press the Page Number button on the Header and Footer toolbar. Select the page number and use Insert, Frame to place it in a frame. Using Format, Font, format the page number to Arial, Bold, 14 point, white type. Use Format, Borders and Shading, Shading tab and select Solid 100% to make the frame black. Adjust the frame to the size you require (if your document goes to more than 10 pages you'll need to allow room for double-digit page numbers) and position it centrally over the line you created. If the frame disappears under the line, select the line and use the Send Behind Text button (on the Drawing toolbar's Draw menu in Word 97) to alter the layering. Centre the page number horizontally in the frame using the Center button on the Formatting toolbar. To centre the number vertically, move the cursor over the page number and press Enter to create a line above the page number. Select this line and format it to 4 point type. Experiment with different values of type size until you get the page number appearing in the centre of the frame.
Top of page |
WEB: |What's New
| Net Guides | Web Workshop | Net Sites | About PC User |
|