Add a menu to your Visual Basic projects with Helen Bradley's tutorial.
To create the project start a new project and add these controls and set these properties:
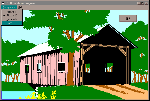
Figure 1d: This month's project is a menu for your Visual Basic projects to allow the user to alter the background for the main form.
| Object | Property | Setting |
| Form1 | Name | Form1 |
| Caption | PC User Menu Program | |
| AutoRedraw | True | |
| WindowState | 2 - Maximised | |
| Picture | Name | Picture1 |
| Visible | False | |
| Picture | Add your choice of BMP or WMF file | |
| Picture | Name | Picture2 |
| Visible | False | |
| Picture | Add your choice of BMP or WMF file | |
| Command | Name | cmdQuit |
| Caption | &Quit | |
| Cancel | True |

Figure 2d: The Menu Editor is where the menu is designed and should look like this when you are finished.
Now, repeat this process to add these menu items (to move between creating first and second level menu items press the left or right pointing arrows):
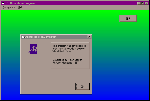
Figure 3d: The About form shows information about the program and loads over the top of the main form.
| Caption | Name | Index | Checked | Enabled | Visible | Level |
| Picture #&2 | mnuPicture | 1 | No | Yes | Yes | Second |
| &Color fade | mnuPicture | 2 | Yes | Yes | Yes | Second |
| &None | mnuPicture | 3 | No | Yes | Yes | Second |
| &Help | mnuHelp | No | Yes | Yes | first | |
| &Index | mnuIndex | No | No | Yes | Second | |
| &About Menu | mnuAbout | No | Yes | Yes | Second |
Now add a new form using Insert, Form -- this will be Form2 and add this control and set these properties:
| Object | Property | Setting |
| Form2 | Name | Form2 |
| BorderStyle | 1 -- Fixed Single | |
| Caption | About the Menu Program | |
| Command | Caption | &Ok |
| Name | cmdOk | |
| Cancel | True |
Type the text from Code Box #1 into Form1 and the text from Code Box #2 into Form2. Save the project, call Form1 main.frm, call Form2 about.frm and call the project menu.vbp. Run the program to test the menu.
The files on the CD won't all work in your version of Visual Basic so you need to use the ones that will.
Start by opening the VBP file, if you get errors then you can't use it. You will, however, be able to copy the code from the TXT file to save you typing it. Just make sure you have named all your controls correctly so that the code will match them.
The files main.frm, about.frm, main.frx,
about.frx and main.vbx are on this months disc as is the text of
the code in main.txt and about.txt. You will find them
in the \interact\diymenu folder on the CD.
In the Menu editor the Caption is what your user will see on the menu when they select the various options and the Name property is the name you use to refer to the menu items in your VB code.
The items on the Background menu have been created as a control array of menu items because they are easier to process this way. Each of the items is mutually exclusive so if you have one turned on all the others must, by definition, be turned off. The control array allows us to easily identify which menu item was chosen as its index number is stored by Visual Basic in the Index variable.
The mnuPicture_Click subroutine controls what happens when the user selects a menu item, first it turns off the checkmark against the previously selected menu option (its value is stored in the screenBackground variable). The value of the most recently selected menu item is stored in screenBackground and the checkmark next to this menu item is set. Then a case statement is executed to change the background image to one of the pictures in the invisible picture boxes, the form fade colours from the May issue of the magazine or no background at all (created by loading no picture at all).
The Index option on the Help menu has been created but disabled as there is no help index available. Setting the Enabled property of a menu item to false allows you to show the menu item but make it unavailable to the user. If you select the About option on the Help menu the procedure mnuAbout_Click runs and loads Form2 (the about form) as modal so the user must close down the About form before they can continue.
The two invisible picture boxes on Form1 simply act as storage space for the graphics which will be used as the form background. The remainder of the code controls the fading colour effect which is a cut-down version of the code that appeared in the May '97 issue.
Top of page |
WEB: |What's New
| Net Guides | Web Workshop | Net Sites | About PC User |
|