In a first of a series, Helen Bradley and John Hilvert look at what style sheets are, how you use them and some of the typographical options available for controlling layout of text.

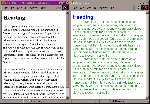
Style sheets offer a range of opportunities to control your page and site design and over the next months we will look at various aspects of style sheets. On the left of Figure 1d is a 'traditional' Web page using an H1 heading and standard body text. On the right is a page formatted using a style sheet showing some of the options achievable, such as indented paragraphs and reduction of the spacing around headings.

.
A style in HTML terms is similar to a style in a word processing package. It's a collection of attributes, such as font size, type, emphasis, line spacing, margins and alignment, that can be applied to text on a page.
Using a style to format text allows you to group a number of attributes together under a 'name' and to apply all these attributes to a piece of text using the style name rather than having to apply each formatting option individually.
Before you can view pages created using style sheets, you'll need a browser that supports them. Netscape Navigator 4 and Internet Explorer 3 onwards both support the use of style sheets in varying degrees. You'll find copies of each of these on this month's cover CD.
Given that only a minority of Web users have style sheet-enabled browsers, you could be excused for wondering why you would use style sheets. The short answer is that style sheets are part of the future of the Web. Like any leading-edge function, it will take time for users to catch up but, in time, they will upgrade to compatible browsers and style sheets will be an important design tool to give them flexibility for viewing Web pages.
In the meantime, if you design your pages with style sheets and still ensure that
they view cleanly in non-compatible browsers, there should be no issue with using them.
People with non-compatible browsers won't know that they're viewing a page that is
formatted with a style sheet -- the page will look fine to them, and others will see your
page formatted with the style sheet as you want them to see it.
You should be aware that although Navigator 4 and IE4 are style sheet-enabled, they are
not 100 per cent compatible with the Cascading Style Sheets -- Level 1 (CSS1)
recommendation and they have incompatibilities between them. You can expect that future
releases will be more closely compatible with the standard but for now, check your pages
carefully in both browsers -- the results may surprise you.
In this tutorial we have used the W3C's CSS1 recommended implementation of cascading style sheets. The resources list contains the Web address of this document and it's worthwhile studying it if you are using style sheets.
dtp1.htm, dtp2.htm, dtp3.htm & dtp4.htm
These can be found in the interact\style\ folder on the CD.
Styles are used primarily because they're convenient and allow you to apply a number of attributes in a single step rather than having to apply each individually. Styles reinforce consistency when you're working on a large document or a series of pages because you don't have to remember and apply all the attributes individually. Instead, you simply need remember the style name to format each paragraph as required.
Styles also help when you want to change your document. Simply by changing the definition of the style itself, every paragraph or piece of text formatted with that style will alter to the new definition without having to be individually edited.
In addition to the more 'traditional' benefits of styles, in HTML, styles allow you to achieve formatting options and layout effects that simply aren't otherwise available. They also reduce some of the mess of tags you'll have in your HTML source. You can place your style definitions in the document Head area and simply refer to the styles themselves in the Body area.
If you're using style sheets, how your page looks will depend on how careful you are with its design. This is particularly the case if your viewer is using a non-style sheet compatible browser. You should check your page design in a range of compatible and non-compatible browsers and determine what your approach will be.
In some cases, the results will be acceptable and in others the results will be extremely ugly and tantamount to a visual disaster. If there are problems with your design then you will need to make some decisions about it. For example, you may opt for a style sheet and non style sheet version of your site, much as others use frame and no frames versions, or you may revamp it so that the results are less visually offensive.
Because this is new technology, take care not to be seduced (at least unknowingly) by certain proprietary CSS approaches that abound particularly in relation to Dynamic HTML (see last month's column). Tags such as Netscape's <LAYER> tag are proprietary and best avoided. You should try to achieve the results you want using the CSS standards, not browser specific approaches. At this stage you'll find IE4's implementation is more faithful to HTML 4.0's CSS1 than is Communicator's. However, this could change and you are best to develop a familiarity with the standard and stick to it.
In this month's column embedded styles have been used. These style definitions appear in the Head of the document (between the <HEAD>...</HEAD> tags). This is not the only way to apply styles and in later columns we will look at linking styles using an external style sheet and creating inline styles to meet 'one off' formatting needs.
HTML Source Box #1 shows the tags for the simple Web page on the left of Figure 1d. A heading tag <H1>...</H1> has been used to format the heading and a paragraph tag <P> to format the two paragraphs of the document.
In contrast, the HTML Source Box #2 contains an embedded style sheet in the Head of the of the document (between the <HEAD>...</HEAD> tags). In this area are the Style tags <STYLE>...</STYLE> and in between these opening and closing tags are the actual style rules. These style rules are placed inside a set of comment tags <!-- ... --> so that they won't be displayed on the screen by older browsers that don't support styles.
In HTML Source Box #2 are three style rules, the first one is:
H1 {font-size: 20 pt; color: blue; text-align: left}
This style rule assigns various attributes to the H1 heading tag. The Heading style H1 here is called the Selector and its usual appearance is modified by the combination of properties and values that follow it. The property 'font-size' is given a value of 20pt so that the text will appear in the page as 20 point type.
Each property (font size, colour and text align) in a style rule is separated from its value by a colon (:) and each property/value combination is separated from the next with a semi-colon (;). The entire collection of property/value combinations for a particular selector is surrounded by a set of curly braces. In addition, you must have at least one space between the selector and the opening curly brace.
The properties used in this month's HTML examples include:
color: you can specify a named colour for your text using one of the 16
colours that can be identified by name or by an RGB value representing the hexadecimal
combinations of red, green and blue in the colour. For example, the property/value
combination colour: silver and colour: #C0C0C0 both set text to the same light grey
colour.
text-align: allows you to specify the alignment for text. Values for this property include left, right, centre and justify.
font-family: allows you to specify a font for your text. If the font is not available then the default font is used. Providing only one named font as we have done here limits your options for displaying text if this font is not available. A better option is to provide a variety of possible fonts from the list of fonts typically available on Macs and PCs and a 'catch all' generic font family name in case the others are not available. We'll cover this in next month's tips column.
background: the background property provides a colour for the page background. You can specify one of the 16 named colours or any other colour using its RGB value.
text-indent: this property specifies a paragraph indent which you can set in points (pt), inches (in), centimetres (cm), pixels (px), ems (em) or a percentage. It is not advisable to use ems as a measurement as this is not supported by IE4.
margin-top: allows you to specify the top margin for the current element. We've used this property in these examples to set the top margin setting for a paragraph. The possible measurements you can use for margin-top are the same as for the text-indent property. You can use negative values, as these examples show, to 'close' up the distance between paragraphs.
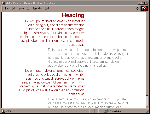
line-height: is another way of specifying leading which is the 'extra' spacing between lines of text. In DTP, it is usual to add one or two points of extra spacing between lines of text to make it easier to read. As a line height value of zero will place two consecutive lines of text on top of each other, it is usual for line height to be, at a minimum, the height of the text. The example on the right of Figure 2d which uses the HTML Source from Box #3 shows 12 point text that has been set with a line height of 14 points. This extra 2 points of space assists readability. Contrast this to the example on the left which uses the source from Box #3 and has the default line-height for the browser being used. Similar units can be used for line-height values as are used for text-indent.
margin-right and margin-left allow you to specify the margin for an element. In the example in HTML Source Box #4, the margins of paragraphs have been set using percentages but any measurement that can be used for text-indent can be used here, too.
In HTML Source Box #2 two types of selectors have been used. The first type are the H1 and BODY selectors, where two standard HTML tags have had new definitions applied to them. The BODY definition specifies the new 'default' settings for the page, which can be overridden by other tags.
The H1 style takes (or inherits) properties such as color and font style from the BODY tag. The differences between text formatted using the H1 tag and the remainder of text on the page will be in relation to those text attributes which the particular browser uses to display H1 text (which can be modified by inline styles or a style sheet). In this case one of the BODY properties, text color (set to green), will be overridden whenever a H1 tag is used because the property 'color' for the H1 tag has been given a different value (blue) in the style rule for the H1 selector.
This layering or inheritance means that you should place the typical text attributes in the BODY definition and then alter only those that you need to for the other selectors.
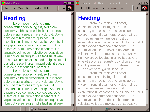
In HTML Source Box #4, the selectors .left and .right are called Class Selectors and are effectively 'labels' identifying a particular Selector that can be applied to another HTML tag. The class called 'left' has been used to provide the margins, colour and alignment for the H1 formatted text, as well as two of the four paragraphs on the page. The other class selector 'right' has been used for the other two paragraphs (see Figure 3d).
Class selectors can be called anything you like but must be prefixed with a period. In all other respects, providing their definitions is similar to creating definitions for other selectors. The method of using a class selector is to add the attribute CLASS = to the tag and to refer to the particular class selector by name (not including its leading period). Hence the use in Source Box #4 of the tag <H1 CLASS=left> means that the style definitions for selector H1 and Class selector 'left' are both applied to this text. Later on in the document, the style definitions for the Class Selector 'left' have been applied to paragraph text (text inside a pair of <P>...</P> tags).
The styles used in this month's column are best viewed using Internet Explorer 4 and they're rendered less than ideally in Netscape 4.
- The WWW3 consortium's Cascading Style Sheets Level 1 Specification: http://www.w3.org/TR/REC-CSS1-961217
- What can you do with style sheets? http://www.webreview.com/97/05/30/feature/tutorial.html
- This Style sheet reference guide has good information on browser support: http://www.webreview.com/guides/style/mastergrid.html
- To see what can be achieved with style sheets (in under 10 Kb) visit: http://www.microsoft.com/typography/css/gallery/4.htm
- This newsgroup provides a lively discussion of CSS: news:comp.infosystems.www.authoring.stylesheets
Top of page |
WEB: |What's New
| Net Guides | Web Workshop | Net Sites | About PC User |
|
