Helen Bradley shows you how to create a welcome screen for your Visual Basic projects.
All the files associated with this tutorial are in the \INTERACT\WELCOME folder on the CD.
The files on the CD won't all work in your version of Visual Basic so you need to use the ones that will.
Start by opening the .VBP file -- if you get errors then you can't use it. You will, however, be able to copy the code from the .TXT file to save you typing it. Just make sure you have named all your controls correctly so that the code will match them.
The files form1.frm, welcome.frm, welcome.frx and welcome.vbp are on this CD and the text of the code in welcome.txt.

This month's project is a welcome screen that shows while your project is loading.

The main form contains the timer control that specifies the time that the welcome screen
will appear for.
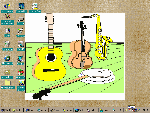
Figure 1d shows the welcome screen laying over the top of the project's main form.
How to create the screen
Step 1: Start a new project and add a new form using Insert, Form -- this
will be Form2. Using Form2, add these controls and set these properties:
| Object | Property | Setting |
| Form | Name | Welcome |
| Caption | Welcome | |
| BorderStyle | 0-None | |
| BackColor | Choose to suit the graphic | |
| ScaleMode | 1-Twip | |
| Picture | Choose appropriate .WMF or .BMP file |
You won't see the form's caption when it runs but it's handy to label it so you know which form is which while you're in design mode. It is important that you leave Form1 for your main form and use Form2 for the welcome screen as Visual Basic automatically runs Form1 on startup unless you change the settings. For this project we want Form1 to load first and it will do the work of displaying the welcome screen for us.
While we have added only a single graphic to the welcome form, you can add text and other graphics using any combination of label, picture and image box controls.
Add the code from Code Box 1 to Form2.
Now, switch to Form1 and add these controls:
| Object | Property | Setting |
| Form1 | Name | Form1 |
| ScaleMode | 1-Twip | |
| Command | Caption | &Quit |
| Name | cmdQuit | |
| Cancel | True | |
| Label | Caption | This is the main project form |
| Timer |
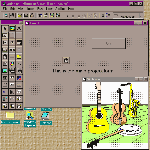
Add the code from Code Box #2 to Form1. This is just the bare bones of a main form and is only used here so you can see the welcome screen work and exit gracefully afterwards (see Figure 2d). In a real project you would create Form2, add a timer control to your main form and the code from the form load and timer events from Form1.
Save the project, call Form1 form1.frm, the welcome form (Form2) should be named welcome.frm and call the project welcome.vbp. Run the program to test the welcome screen.
The work in the program is done by the Form1_load event. The first lines force the size of the main form to just smaller than the current screen width and centre the form on the screen. The line show forces the main form to display on the screen. The timer event is initialised with a time of five seconds, the welcome form's mouse pointer shape is fixed to an hourglass (or the pointer your system uses in place of it) and the welcome form is displayed with Welcome.show. The DoEvents function passes control to the operating system for it to process other events, namely the program initialisation routines.
When the five seconds has expired, the Timer1_timer event is executed and it unloads the welcome screen, restores the mouse pointer and disables the timer as it is no longer required. To vary the time the welcome screen is displayed, simply alter the timer interval (1000 = 1 second).
Sizing issues
This project assumes that the size of the welcome screen is the same size as the form
itself when it loads. This doesn't have to be the case so you can size the welcome screen
to any size and place it on the screen in whatever position you choose.
The code which both sizes the welcome screen and centres it on the screen is in the welcome form's load module. To alter it, change it here or alter the form's properties in design mode, but note that you have better control of centring the form if you use code to do it. For example, in the welcome screen the form will be centred on any screen regardless of the size, as its position is calculated relative to the current screen size. The main form, too, is sized to just smaller than the current screen dimensions, again regardless of screen size in Form1's load event.
Top of page |
WEB: |What's New
| Net Guides | Web Workshop | Net Sites | About PC User |
|