|
Telstra Internet Access Kit Configure this PC with your existing Account Details. Windows 3.x |
|
So you already have an Internet Access Account with Telstra Big Pond Home
(formerly known as Telstra On Australia) and
you want to setup a second or subsequent PC to allow you to connect?
While not difficult, there are a number of steps to this procedure, instructions have been provided both in this web page and as a Microsoft Write document here. You may want to print a copy of this document so you can refer to it during the configuration. For this procedure to work, you should have Microsoft Internet Explorer for Windows 3.x fully installed on your PC. (If you aren't sure if you do, insert the Telstra Internet Access Kit disk in your drive and run setup.exe). This procedure configures Microsoft Internet Explorer to allow you to connect to the Telstra Big Pond Home Service. Please Note: This procedure does NOT create an Internet Access Account. If you do not have an Internet Access Account with Telstra Big Pond Home yet, click here to apply. Before you can correctly configure your PC, you need to know a few things;
In addition to the above items, you will need the following information;
|
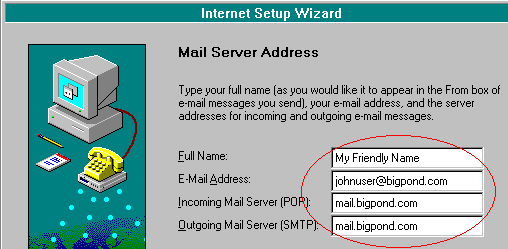
||||||||||||||||||||||||||||||||||||||||||||||||||||||||||||||||||||||||
| Configuration Instructions | ||||||||||||||||||||||||||||||||||||||||||||||||||||||||||||||||||||||||
|
0. To configure your PC correctly, this browser should be shut down. Please review these instructions or print a copy for reference before commencing, then click here to close this browser.
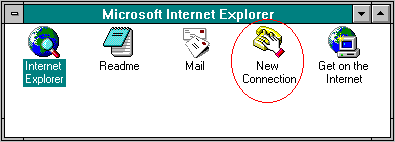
1. Configuring your PC to access the Telstra Big Pond Home Service is easy using
the Microsoft Internet Setup Wizard. Locate the "Microsoft Internet Explorer"
Group in Program Manager and double-click the Icon titled New Connection.
Please Note: The Icon titled "Get on the Internet" will lead you through the steps
of creating a new account rather than simply configuring your PC.
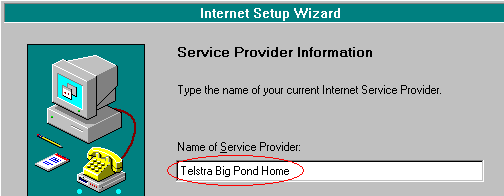
2. Enter a Name for the new connection object you are creating.
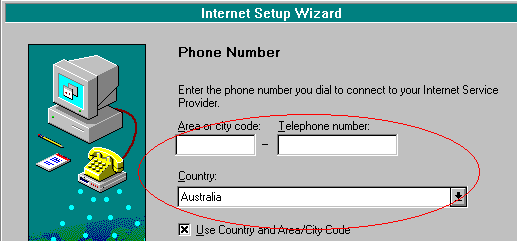
3. Enter the Area Code and Telephone Number of the Telstra Big
Pond Home
POP (Dial-In Point) you wish to call.
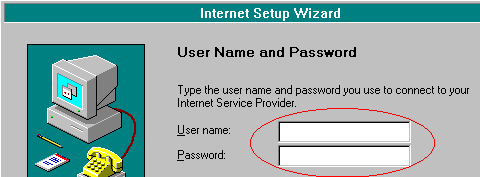
4. Enter the Username and Password of your existing Telstra Big
Pond Home
account.
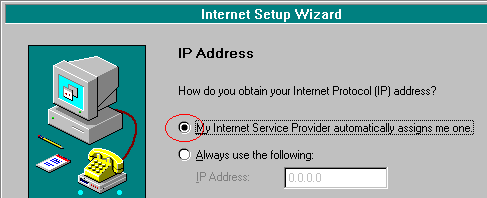
5. The Telstra Big Pond Home Service automatically assigns your PC an address
each time your connect, leave this option set as indicated.
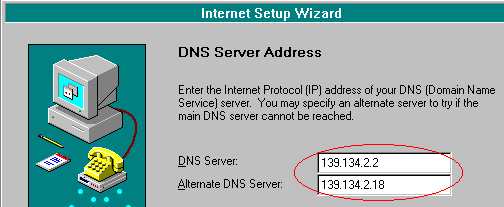
6. Domain Name Servers DNS are devices which perform translation between the numeric addresses which are used by computers and the names which are more commonly used by Internet users.
The Telstra Big Pond Home DNS's are 139.134.2.2 and 139.134.2.18,
enter these
two DNS addresses as shown.
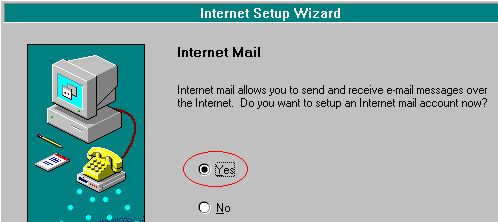
7. The next part of the Setup helps you configure electronic mail, if you want to read Email
from this PC leave this screen as indicated.
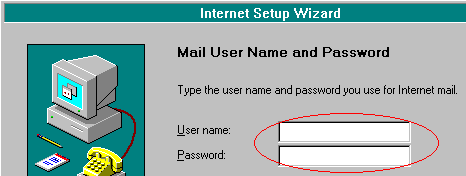
8.To automatically pass your Username and Password to the Mail
Server when you connect, enter your Telstra Big Pond Home Username and Password
here.
9. You now enter your electronic mail details.
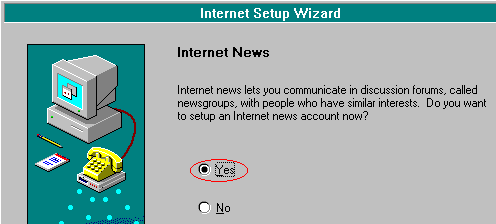
10. The next part of the Setup helps you configure electronic news, if you want to read Usenet News
from this PC leave this screen as indicated.
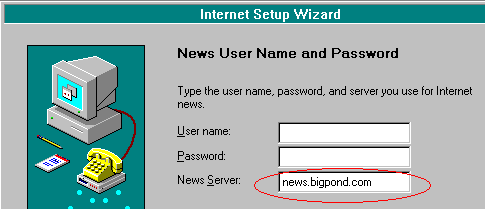
11. The Telstra Big Pond Home News server does not require you to
use a Username or Password to connect.
Leave the Username and Password fields blank. You do however have
to enter the address of the
Telstra Big Pond Home News server, it is news.bigpond.com.
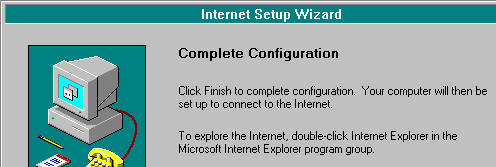
12. This finishes the Microsoft Internet Setup Wizard, click Finish to finish the Setup process.
POP Locations: *
* The above list of Dial-In POP's is current as at June 1997. For updated information, please call the Telstra Big Pond Customer Support Centre on 131-282. |

Back to the Setup page.
Copyright. © On Australia Pty Limited. 1997.
The Telstra Big Pond Home Service is provided by On Australia Pty Ltd,
a 100% owned subsidiary of Telstra Corporation Ltd.