It's very simple to add CyberSecretary to your own Visual Basic macro projects, following these directions:
Step 1. Record a basic macro.
While you can write a CyberSecretary-enhanced macro from scratch, probably the easiest way to begin is to record a macro using the Word or Excel macro recorder. This enables you to specify a hotkey or toolbar button for accessing the macro, lets you specify a template as a container for the macro, and lets you record those steps which are recordable.
Step 2. Open the macro in the Visual Basic editor.
Press {Alt-F11} to access the Visual Basic editor. In the Project list on the left side of the window, select the template containing the macro. The code for the macro will probably be found under Modules | NewMacros. Now, click anywhere in the Code window and scroll down until you find the macro which you recorded. It will appear as a subroutine bearing the name you assigned to the macro.
Step 3. Add a reference to the CyberSecretary object library.
Select Tools | References on the menu. This will display a list of external ActiveX files that can be accessed by your macros. If CYBERSEC.DLL has been installed on your computer, you will see an entry for the CyberSecretary Object Library. Make sure this is checked. If this entry isn't visible, click the Browse button and find CYBERSEC.DLL. This step will make the CyberSecretary Object Library available for your programs.
Step 4. Initialize your CyberSecretary.
This is done by declaring variables of the type CSAgency and CSDialog, initializing the CSAgency variable using the New keyword, and then using this variable to initialize and return the CSDialog variable. If you understand object oriented programming this will already make sense; but if this is unfamiliar, just copy the following five lines of code to the beginning of your macro's code:
Note that if you've already used your CyberSecretary, then your personal information (e.g. your CyberSecretary's name, gender, how you'd like to be addressed, etc.) are automatically initialized.
Step 5. Use properties and methods to define the CyberSecretary Dialog.
CyberSecretary is an ActiveX object. What this means is that he or she is controlled by setting his or her properties (such as the dialog message, icon, sound effect), reading his or her properties (such as the text entered by the user at run-time, the item chosen from a list, or the button that was pressed), and invoking his or her methods (such as opening a document or getting a file from the Internet). If you're already familiar with object-oriented programming, this will be second nature. If you're not, then working with your CyberSecretary is an excellent and simple way to learn!
Properties essentially describe the CyberSecretary û his or her appearance and content. Methods are actions that can be performed by your CyberSecretary. (If this doesn't make complete sense, just think of properties as adjectives and methods as verbs.)
Once you've initialized your CyberSecretary, properties are set or read and methods are invoked by specifying the name of your CyberSecretary object variable, followed by a period, followed by the name of the property or method. For example, the following code gives the CyberSecretary a sad expression:

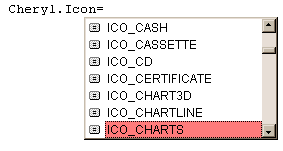
Note that the Visual Basic editor will automatically present you with a list of recognized properties and methods; and, as shown above, valid values for certain items (e.g. the .Picture, .Icon, .Gender and .Sound properties), making it easy as pie to write error-free macro code.
Usually you will be setting more than one property at a time, or invoking more than one method. To save keystrokes and make your code more readable, use the With keyword:
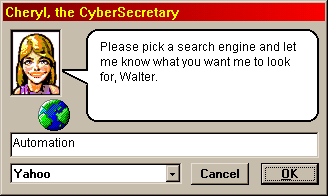
This code would produce the following dialog:
With MySecretary
.Gender = CS_FEMALE
.Picture = CS_SMILE
.Icon = ICO_EARTH
.Message = "Please pick a search engine and let me" _
+ "know what you want me to look for, <N>."
.InputLines = 1
.List = "Infoseek|Altavista|Lycos|Excite!|Yahoo"
.ShowOKCancel
.Show
End With

In this example, the first seven lines of code between With and End With set six properties (.Gender, .Picture, .Icon, .Message, .InputLines and .List) and invoke one method (.ShowOKCancel) to set up the contents of the dialog. This is followed by the .Show method, which displays the dialog and waits for user input.
Step 6. Invoke the Show method to display the dialog.
In the above example, the first seven lines of the With structure set the visual elements of the CyberSecretary dialog: the gender, the picture, the icon, the message, the text input line, the drop-down list and the buttons. The dialog is not displayed, however, until you invoke the .Show method. The .Show method causes the CyberSecretary dialog to be displayed with the most recently defined parameters. Note that if the dialog includes any elements requiring user input (buttons, list or text box), the dialog will remain displayed until the user presses a button. If the dialog does not include any elements requiring user input (i.e. if it is just displaying a message), the dialog will remain displayed for the length of time specified by the .Wait property (default 3 seconds). Please note, while code execution continues when the .Wait time has passed or the user has pressed a button, the dialog will not disappear until macro execution ceases or you invoke the .Hide method.
Step 7. Determine the user's response.
Subsequent code would determine which button the user pressed, and would
extract the information from the text box and the drop-down list box:
With MySecretary
If .Button = CS_OKBUTTON then
sSearchSite = .ListSelection
sSearchData = .UserInput
'Insert code here if OK was pressed
End If
.Hide
End With
Your macro can then use this information for further execution. This may include using some of the other useful methods provided by your CyberSecretary, avoiding the need for Windows API calls.
MySecretary.SearchInternet sSearchSite,
sSearchData
sData = MySecretary.GetURL "my.yahoo.com"
Open "c:\Temp\Yahoo.htm" for Output as #1
Print #1, sData
Close #1
MySecretary.PrintFile "c:\Temp\Yahoo.htm"
Kill "c:\Temp\Yahoo.htm"
Step 8. Clean up.
Before your macro exits, be sure to hide your CyberSecretary, and clear your CyberSecretary and any other object variables. Otherwise, CYBERSEC.DLL will remain in memory even after your macro is finished.