Insanity Editor
Copyright © 2002, Lonely Cat Games, s.r.o.
Files and organization of game
Following directories and files are found in target directory when you install the game (assuming Full Install was selected):
Data\*.dta
|
Data files, containing bitmaps, sounds, models, and other game resources. This is actually uncompressed RAR archive file. You may uncompress the contents into game target directory, but if you do so, you must erase/move the DTA file, otherwise the game will always look for resources in DTA files, not directly into system directory, and any changes you make to existing files will not be visible. To create the DTA file, simply use RAR archive utility without compression (store only). |
|
Data\*.cnt |
This is a contents-file for appropriate DTA file, which holds file names, their locations and sizes within a DTA file. You don’t need to worry about this file, anytime a DTA file is modified, or CNT file is not present or mismatched, it is reconstructed first time a DTA file is opened. |
|
Bin\*.* |
Game and Editor binaries. These files contain all necessary executable files and libraries needed for proper run of the Game and the Editor. |
|
Bin\H&D.exe |
Game executable. |
|
Bin\HDEdit.exe |
Insanity Editor for editing and tuning Hidden and Dangerous. |
|
Bin\IConfig.exe |
Utility for configuration of your graphics hardware. |
|
_tmp\Dbase.bin |
Game cache, used to store and re-use run-time data. This file is created and fully managed by Insanity Engine. If it is deleted, it will be created next time you run the Game or Editor. |
When you choose to install Editor, following files will be created:
|
Editor\editor.bin |
This file holds current editor settings. This is created first time when Editor is run. |
|
Editor\Help\*.htm |
Help files about the Insanity Editor and editing of Hidden and Dangerous. |
|
Editor\MaxPlugins\ |
Plug-ins for importing and exporting of Insanity 3D files from and to 3D studio MAX 3.x. |
When you extract the contents of DTA files into destination installation directory, following folders will be created:
|
Maps\ |
Directory containing all textures used in the game. Note that you may only use the root directory (without subdirectories) for placing your bitmaps. Any subdirectories contained in the Maps\ directory are used for special purposes of the Game. Following file types are supported: PNG, BMP, JPG Palletized, True-color, grayscale. |
|
Sounds\ |
Directory containing game sounds and voices. Following file types are supported: WAV, OGG Keep files in 22025 Hz, 16-bit format for best performance. |
|
Sounds\Common\ |
Common sounds for all languages. This is the directory, which is usable from within the Editor. Subdirectories are allowed. |
|
Sounds\English\ |
Language-specific sounds (voices). Similar directory exists for other languages. |
|
Music\ |
Game music. |
|
Tables\ |
Game-specific data. It is not recommended to edit any of these (although Editor may allow this). Editing the tables can lead to improper work of the game. |
|
Text\ |
Game text files. For each supported language there’s a subdirectory with name of the language. |
|
Procedurals\ |
Engine scripts that define functions of procedural textures and morphing objects. |
|
Models\ |
Model files. All files placed in this directory, and subdirectories, have extension I3D, which is the extension used for Insanity 3D scenes and models. Subdirectories are allowed. |
|
Anims\ |
Game animations. |
|
Missions\ |
Game missions, briefing, maps, etc. |
Notes:
Sound file format OGG is an alternative to MP3. This has similar compression ratio and quality, but it does not require copyright for its usage. You may download plug-ins for many sound-processing programs, like WinAmp, GoldWave, etc.
Important!
When you start making
modifications to the game, be sure all the files you want to modify are
accessible. While they are stored in the .DTA files in Data\ directory, all
files are not write-able. To make modifications to files, please extract
contents of .DTA files into game target installation directory, and erase contents
from .DTA file, so that game doesn’t search for files in .DTA files, but loads
them directly from extracted directories.
By modifying contents of internal tables and other important files, the game
may become unplayable. To recover changes which you’re unable to undo, you must
UNINSTALL the game., ERASE ENTIRE CONTENT of target installation directory, and
REINSTALL the game from installation CD.
Editor basics
Controlling
the Editor
The work in Editor is performed in two editing modes – a View mode and an Edit mode. By switching between these two modes gives, a designer may navigate freely through the mission and simultaneously edit objects in the scene.
Following is description of mouse and keys behavior in these modes.
Both View and Edit modes
|
Space |
Toggle between Edit and View Mode. |
|
|
0 .. 9 |
Select Speed of camera movement, translation, rotation, scale, and other actions. |
|
|
Shift |
+ mouse X/Y move |
Move selected objects in X/Z axes. |
|
Alt |
+ mouse Y move |
Move selected objects in Y axis. |
|
Ctrl + Alt |
+ mouse X move |
Scale selected objects - uniform or non-uniform (dependent on current scale mode). |
|
Shift + Alt |
+ mouse X move |
Rotate selected objects around current axe, in world or local coordinates (dependent on current rotate mode), around pivot point. |
View mode only:
|
Ctrl |
+ mouse move |
Orbit camera around an object at center of screen. |
|
Left mouse button |
Move camera Forward in current speed. |
|
|
Right mouse button |
Move camera Backward in current speed. |
|
|
Left + Right mouse button |
+ mouse move |
Move camera in its local XY axes, in current speed. |
Edit mode only:
|
Left mouse button |
Select model or object, or clear selection if clicked on background. |
|
|
Right mouse button |
Select object, or clear selection if clicked on background. |
|
|
Double-click (left or right button) |
Select unpick-able visuals, like particles, flares, etc. |
|
|
Ctrl |
+ left mouse button |
Add/Remove model or object to/from current Selection. |
|
Ctrl |
+ right mouse button |
Add/Remove object to/from current Selection. |
|
Ctrl + Shift |
+ left mouse button |
Link current selection to model or object, or primary sector, if clicked on background. |
|
Ctrl + Shift |
+ right mouse button |
Link current selection to object. |
|
Ctrl + Shift + Alt |
+ right mouse button |
Select collision volume. |
The Insanity Editor is a tool, which allows designers to design scenes and turn raw 3D graphics into a game. It is NOT a modeling tool. Thus, any modeling is done in a graphics package. This package ships with import and export plug-ins for 3D studio MAX 3.1. You may import, modify and re-export any mission, model or animation in the game.
Basically, raw scenes are modeled and texture-mapped offline in a graphics package. Then they’re fine-tuned in scene. Models are a micro-scenes, which are inserted into one big game scene. Models are used in places when you want to reuse the same entity in multiple places, thus it wouldn’t be efficient placing the same geometry into each 3D scene. Rather, a scene uses a reference to another 3D file – model. Such a model may be used many times in the same mission, or in many missions.
Designer’s work in the Editor includes:
- Lighting and light-mapping.
- Adding sounds
- Putting models into scene.
- Setting camera properties.
- Editing collisions.
- Placing game elements (actors, checkpoints).
We’ll come through the process of creating a game scene in next paragraphs.
Building blocks
A typical 3D scene is built from following elements, which make up the scene.
These include visual objects and helping objects. Figure1 shows the object
selection menu found in the Editor.
|
Description of the elements follows: - Visual – visible object – this is anything which is actually rendered Various types of visual objects are available - Light – helper object which represents a source of a light - Sound – helper object which represents a sound source - Model – group of other elements, typically loaded from disk file. - Camera – source of viewing - Volume – helper object which roughly estimates shape of a visual object and represents its collision volume - Sectors – helper object which, along with portals, helps in visibility optimizations - Target – helper, which is used to aim other object at it. Used mainly for camera animations - Dummy – helper object. Its only meaning is specifying position and rotation for various purposes of the game - Occluder – object used for optimization purposes, capable of hiding geometry behind it - Joint – object used together with single-mesh visuals for definition of rotational joints - User – undefined type of object. In H&D it is used for checkpoint editing |
Figure 1 – object selection. |
||
3D object
properties
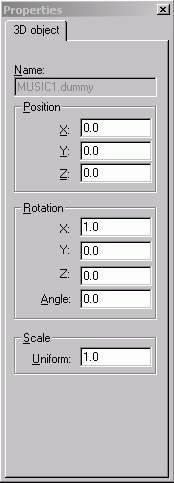
All these objects have these common properties: - position in 3D space - rotation - scale See Figure2, which shows common properties of selected object(s). |
|
|
|
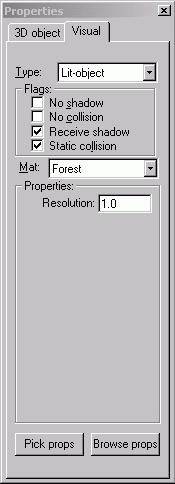
Visual
- Type – here user may see or modify the type of visual object. Note that it is also possible to set this property directly in modeling package (MAX). -
Flags – following flags are present: - Mat – type of material used when object has static collision - Properties – visual’s properties. The contents of this are is dependent on type of visual being edited - Pick props, Browse props – buttons used for copying Properties from other visual |
|
|
|
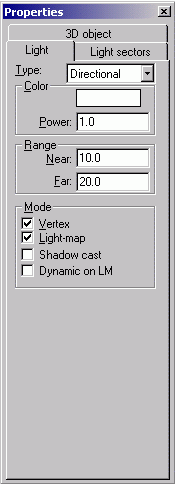
Light
-
Type – here user may see or modify the type of light
object. The light types are: - Color – the color of light - Power – multiplier for color; utilize this to change intensity of the light - Range – range of some types of light, in meters; except of fog light, where near range is ratio from 0.0 to 1.0 where fog starts, and far range may be zero, in which case range of current camera is used as far range of fog -
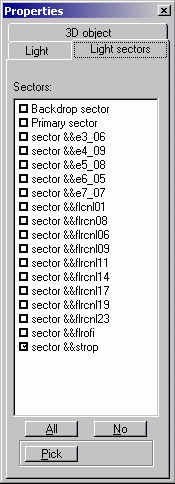
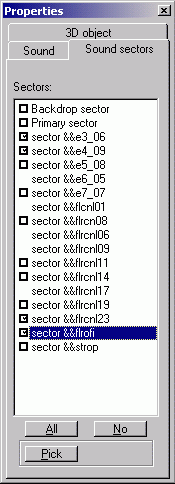
Mode – following flags are present: Light sectors – this sheet is used for assigning selected light(s) to operate in particular sector(s). |
|
|
|
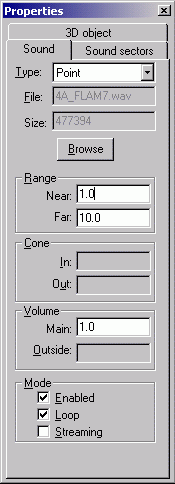
Sound
-
Type - here user may see or modify the type of sound
object. The sound types are: - Browse – button for replacing the source of the sound - Range - range of some types of sounds, in meters - Cone – cone of Spot sound type, in degrees; volume linearly fade from full intensity inside of inner cone to Outside volume intensity beyond outer cone - Volume Main – volume multiplier of sound, value from 0.0 to 1.0 - Volume Outside – volume applied outside the Spot’s cone, value from 0.0 to 1.0 -
Mode – following flags are present: Sound sectors – this sheet is used for assigning selected sound(s) to operate in particular sector(s). |
|
|
|
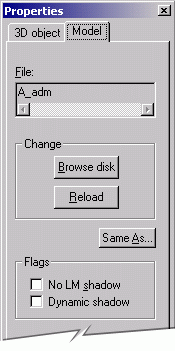
Model
- Browse disk – button for replacing selected model(s) by model from disk - Reload – reload model, forget changes - Same As – make selected model(s) to use the same file as desired model -
Flags – following flags are currently present: |
|
|
|
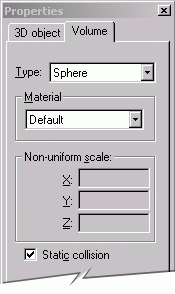
Volume
-
Type - here user may see or modify the type of volume
object. The shape of collision volume roughly approximates a shape of visual
object(s), but it’s mathematical object is much more simpler; valid types
are: - Material - type of material assigned to this volume - Non-uniform scale – scale of some types of volume - Static collision – when checked, this collision is included into static (BSP) collision group; usable for objects which will never move |
|
|
|

Object names
Object placed in the scene are identified by their names. For this reason, any objects which user creates must have unique name. Anytime a new object is created, user is prompted for a new name, given a hint to a name, which is not used yet. The Editor strictly checks for the possibility of name collision.
The names of objects are case-sensitive.
Sectors and
portals
The Insanity Engine utilized sectors and portals for various purposes. One of most important purpose is optimization of rendering. Sectors are connected together by small openings – portals. Each sector has assigned some number of lights, which illuminate only visuals linked to this sector. Also, each sector has assigned some number of sounds, which are audible only when active camera is in the sector. Any sound or light may be assigned to any sector in the scene.
Actual building of sector is discussed later.
Working with Editor
Missions are stored under Missions\ directory. Each mission is placed in separate directory, and consists of two files - Scene.i3d (file exported from 3D package - 3DS MAX) and Scene.bin (file created by Editor). The file created by editor holds all changes made on original exported scene file, like created objects, their positions, lightmaps, game parameters, etc. You can do many modifications on loaded scene in the Editor.
Now we’ll step through all commands which Editor offers, describing possibility of each. Each command is described by its location in the menu, but many commands have shortcuts, so may use these shortcuts once you’re familiar with them. The shortcuts for all menu items are written next to menu item, for example “Undo Ctrl+Z”.
Opening scene
Current scene is opened by
Selecting File->Open mission command from menu. A dialog box, which
appears, allows user to navigate through available missions. The Editor scans
entire directory tree in Missions\ directory, and offers those directories,
where Scene.i3d file is present.
Prior to opening new scene, user is prompted to save changes on currently
edited scene.
Saving scene
Save mission by selecting File->Save mission. This command rewrites current Scene.bin in edited mission. But before doing so, it saves previous Scene.bin into Missions\_backup\ directory, so that the last save may be restored.
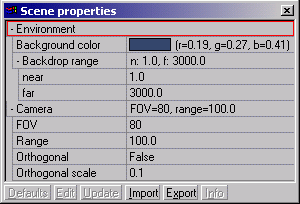
Scene properties
|
Invoke scene properties menu by selecting File->Scene properties menu item. Following items are present in Scene Properties table: - Background color – color to which screen is cleared screen before rendering - Backdrop range – near and far camera range in Backdrop Sector - Camera FOV – horizontal field of view of cameras in the scene - Camera Range – far range of camera - Orthogonal – flag specifying if orthogonal projection is used in scene; this flag is usually set to False - Orthogonal scale – scale for orthogonal projection |
|
Editing game
tables
Editing any of game tables is not recommended; they make up the game itself. Modifying values can make the game unplayable.
Saving screen
shot
You may save screenshot from current camera by selecting File->Save shot.
Exiting Editor
Exit the Editor by selecting File->Exit menu item. Prior to exiting, user is prompted to save scene, if it was modified.
Undo and Redo
The Editor has virtually unlimited number of Undo and Redo steps, so you may experiment with your settings without fear of making un-returnable change. The Undo and Redo operation are under Edit->Undo and Edit->Redo menu items.
Working with
Selection
The Editor is designed to work with multiple selected objects. There are several ways to work with selections. You may use selection dialog as seen on Figure1, for browsing objects. In this dialog, you may browse by displaying only particular object types, or in Quick search field select using wild-masks (? character to replace letter, * character for ignoring name to the end.
Choose Edit->Select by name menu item to invoke the object browse dialog.
To clear the selection, choose File->Clear selection, for inverting selection, choose File->Inver selection.
You may also traverse the selection by selecting parent object of current selection, or child objects of current selection. Use Edit->Select parent or Edit->Select children.
Choosing Edit->Draw links menu item switches on or off a feature, which draws links of currently selected object to its parent.
Selected objects are specially marked, depending on their type. Selected visuals have bounding box rendered around them, while non-visual objects are drawn in various ways, depending on their type and usage. You may select drawing of the non-visual objects in the scene in View->Debug menu.
Manipulating
Selection
Most commands, which change properties of objects, operate on entire selection. See paragraph Controlling the Editor for details how to manipulate objects using mouse and combination of Ctrl, Alt and Shift keys.
Other modifying commands include:
Edit->Rotate 45 degrees, which rotates selected objects by one eight of circle along active rotation axis.
In Edit->Gravitation, you may find commands for falling the selection to ground, or link the to ground.
Selecting
rotation and scale axes
You may rotate selected object(s) by an axis. To choose rotation axis, use the Axis sub-menu. You may select here the rotation axis used for rotation. Actual rotation is done by mouse – see Controlling the Editor for details. You may work either in object’s local coordinates (default method), or in world coordinates. To switch between modes, use Axis->Local switch. Selected axis mode also controls scale axis when non-uniform scale mode is selected. Use the switch Axis->Uniform scale for toggling between uniform and non-uniform scale mode. Note that the only objects that support non-uniform scales are collision volumes (rectangle and box). In the Axis menu, you’ll also find two align methods - Axis->Align by Y to align object’s local Y axis with world Y axis, and Axis->Align to normal to align object’s Y axis with user-picked surface normal. |
|

Modifications
to objects
Any modification you make to a 3D object is remembered – also on objects originally imported from scene (loaded from Scene.i3d file). So for example if you move a box contained in scene, this movement will be saved and applied when the scene is loaded again. You may dismiss one or more such flags from selected object(s) by choosing Edit->Reset modify command, and choose which properties you want to reset. Figure10 shows how this dialog may look like – you may “forget” your changes to position, rotation, scale or link. Note that you will not be able to Reset changes to implicitly created objects, because there is no original position to revert to, and all properties of created objects must be saved. |
|

Collisions during
editing
You may want to enable or disable collision testing during the editing. This is done by toggling Edit->Collisions switch in the menu. When collisions are enabled, editing camera collides with geometry, as well as moved object containing collision sphere volumes do collide against other geometry.
This is useful for checking the collisions in scene, as well as for placing some objects exactly. Other time you may want to fly through walls, so you’ll want to disable this switch.
Linking selection
All objects in scene are linked to other objects, and make up a scene hierarchy. The root of scene hierarchy is Primary sector and Backdrop sector; objects of type SECTOR that has no parents. Linking is critical to proper and optimal work of scene. You may also need to use linking for making some object to move or rotate with other object, because linking object to other object causes the object to inherit parent’s position, rotation and scale. This is the same principle as used in most of modeling packages.
You may link selection to new parent either by holding Ctrl+Shift and clicking mouse button, or by invoking the object browser by Edit->Link to and browse for new parent directly.
Object visibility
By default, visual objects are rendered and visible, but in some cases, they may be hidden (for editing purposes, or for game purposes). Visibility is inherited to children, so if object is hidden, all linked child objects are hidden too.
The Editor keeps track of hidden objects. You may hide selected objects and later unhide hidden by name, or unhide all. Hide commands are found in the Edit submenu of the Editor menu.
Object creation
A designer may create several types of objects within the editor. Usually, any created object is placed in front of camera, but there are exceptions to this rule for some objects.
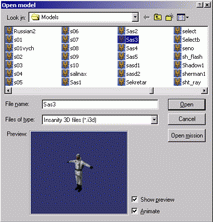
Creating model
By creating model, you must specify file, which will be used to open the model. A dialog that appears displays files with preview of currently selected model. Files in Models\ directory are available for selection. Note that loading models from sub-directories is possible, because Editor keeps also directory names for loaded models (relative to Models\ directory). |
|
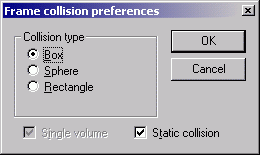
Creating
collision volume
A collision volume requires active selection. Created volume is scaled to best enclose the selection. In this dialog, you may choose which type of volume you want to create. Single volume specifies (if multiple objects are selected) if one volume is to be created, considering entire selection, or one volume is to be created for each selected object. When Static collision is checked, created volume is automatically made static (see Volume Properties for details). |
|
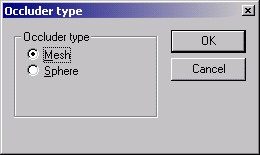
Creating
occluders
To create an occluder, you must select which kind you want to create. There are two choices – Mesh occluder and Sphere occluder. When you choose type, it depends if you have some objects selected or not. If objects are selected, occluder tries to match best current selection; otherwise an occluder in front of camera is created. Note that newly created occluder sometimes needs adjusting – see Editing occluders for details. |
|
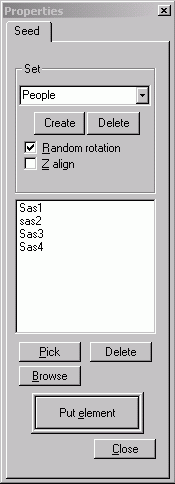
Seed plug-in
A good utility for placing objects into scene is available when you invoke the Create->Seed command. This utility allows you to create sets of objects, which are then randomly placed into the scene on position where user clicks cursor. Each set may contain one or more objects, so you may create various sets for various objects. Each time you click on terrain, on of objects from selected sets is placed into the scene. |
|
Object
duplication
Additionally, it is convenient to duplicate already created object with the same parameters. To do so, choose Create->Duplicate menu item. |
|
Deleting
objects
Objects may be deleted from scene – but only those created in the editor. This means you can’t delete object contained in Scene.i3d file. |
|
Visualization and
debugging
The Editor supports many ways of visualizing your scene. You may select drawing of objects that are usually not visible to player – like light and sounds, collision volumes, occluders, etc.
Grid
You may toggle grid during editing by selecting View->Grid menu. Here you’ll also find configuration tools for the grid. |
|
Cameras
If there’re multiple cameras in the scene, you may navigate between them. A handful of navigation commands are found in the View->Camera submenu. Note that only the default Editing camera is intended for editing. When you’re switched to another camera, and move around the scene in the View Mode, you actually modify the properties (position or rotation) of the camera, which is written into the UNDO buffer. A useful feature, mainly in very large scene, is navigating the camera to currently selected object(s). This command is invoked by choosing View->Camera->Find selected objects, and it places camera to look at the selected objects, so that you can easily find them. |
|
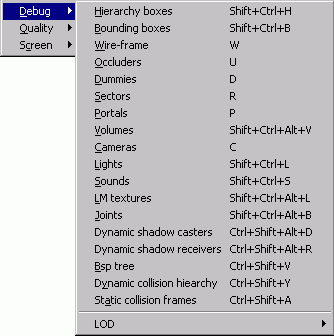
Debugging scene
The submenu View->Debug offers a lot of debugging switches: - Hierarchy boxes, Bounding boxes – display hierarchy bounds - Wire-frame – toggle wire-frame rendering - Occluders – toggle drawing of occluders (green spheres or meshes) - Dummies – toggle drawing of dummy objects - Sectors – toggle drawing of sector skeletons - Portals - toggle drawing of portals - Volumes - toggle drawing of collision volumes - Cameras - toggle drawing of cameras (except of default editing camera) - Lights - toggle drawing of lights - Sounds - toggle drawing of sounds - LM textures - toggle drawing of light-mapping texture cache - Joints - toggle drawing of joint objects - Dynamic shadow casters - toggle drawing of dynamic shadow textures and helper objects -
Dynamic shadow receivers - toggle drawing of
dynamic shadow receivers -
BSP tree - toggle drawing of BSP collision
tree -
Dynamic collision hierarchy - toggle drawing
of dynamic collision tree -
Static collision frames - toggle drawing of
objects (visuals and volumes) which has Static collision flag set -
LOD – submenu offering change of current
level-of-detail on objects; the default value is –1, when automatic LOD is
used |
|
Selecting
rendering features
The submenu View->Quality Allow user to disable some rendering features: - Clear background – toggle erasing of background before rendering - Draw visuals – toggle rendering of visual objects - Filtering – texture filtering switch - MipMapping – texture mipmapping switch - Dithering – dithering switch - Fog – toggle fog - Light-maps – toggle using lightmapping - Textures – toggle using textures - Environment mapping – toggle environment-mapping - Bump mapping – toggle bump-mapping - Mirrors – toggle mirror rendering - Shadows – toggle dynamic shadows - Use occlusion – toggle occlusion testing |
|
Selecting
window resolution
It is possible to select one of resolutions available by adapter, by using the View->Screen submenu. Note that it is also possible to resize the Editor window by dragging its border. |
|
Helping light
Helping light is a light, which may be toggled on or off and remains in scene also when Editor restarts. This switch is found at Debug->Helping light submenu. Helping light command actually creates two lights (ambient and directional) and sets them to all existing sectors. This helping light is invisible to user, and cannot be edited. |
|
Scene
validation
In some point during editing, scene can be validated. During the validation, Editor checks for most common errors during editing, and reports them to user. The validity check is invoked by choosing Debug->Scene validity check menu item. All errors will appear in the Log window, which pops up when editor is finished with validation, or writes a message into the status window: Scene is OK. Validation check includes following: - models – check duplication of model on the same position and with same rotation - lights – check if there are not redundant lights - sounds - sectors - volumes – check volume duplication - links – check if all visuals and models are properly linked to correct sectors - checkpoints – consistency check - geometry – detection of duplicated faces When an error is reported, appropriate object is put into selection, so that user can find and fix it quickly. Note that validation is made in several phases, and if some phase reports errors, further phases are not executed until existing problems are fixed. So if you encounter some problem, it doesn’t mean these are the only problems, more errors may show up when you fix reported ones. |
|

Statistics
The Editor gives valuable feedback in form of run-time statistic. This way you may learn a lot about your scene and available resources. The statistics are available in the Stats menu. Following items are available:
- FPS – frames per second; this information is displayed in left top corner and informs about current rendering speed
- Video – stats about available video memory and textures
- System memory – stats about system memory usage (currently not implemented)
- Collision – stats about number of tested collisions (per frame) and their type
- Scene – stats about number of rendered triangles and vertices, and number of visible objects
- Selection – stats about current selection (vertices and faces)
- Sounds – stats about sounds in scene
- BSP – statistics about BSP collision tree
Light-mapping
Light-mapping offers a significant improvement of scene look by applying pre-computed detailed lightmap textures on selected geometry. Note that lightmaps consume system resources – memory and textures, so the number of light-mapped objects in scene is limited.
Lightmaps are suitable for:
- large planar areas (walls, ground, boxes)
Lightmaps are not suitable for:
- highly tessellated objects or very curved surfaces
Light-mapping makes illusion of realistic shadows in the scene. Note that light-mapped objects are supposed to be static, as well as objects casting shadows are supposed not to move. If an object casting shadow moves, its shadow in lightmap does not. To disable object (and its children) from casting shadows on lightmaps, see Visual and Model properties.
Creating
light-mapped object
Light-mapped object is created from normal visual object by modifying its properties in Visual Properties window. To do so, select one or more visual objects, and change the type to Lit-object. You can anytime later change the properties back to standard vertex-lit object by selecting Object type again. When you change the type of the object to light-mapped, it is initially un-computed. Such an object is drawn with original texture in a dark green color. |
Computing
light-maps
To compute light-maps, you must first add some light-mapping light to scene. Then you choose the resolution of lightmaps – each lightmap object may have different resolution. The resolution of lightmaps (quality) is found in the Visual property menu. The default value is 1.0. This value means number of lightmap pixels per meter. The greater this number is, the more detailed lightmap will be computed, but also more resources are consumed. When you’re done with this setup, you may compute lightmaps on selected objects by choosing Lightmap->Construct selection or Lightmap->Construct all. The lightmaps on selected objects will be computed. |
Quality of
lightmaps
The quality of computed lightmaps is determined also by used algorithm. Currently user may adjust antialiasing mode used during lightmap computation, which can be found in Lightmap->Antialiasing submenu. During designing the scene, the preferable value is 1x1 to fast see the results of lights. When scene is finalized, lightmaps may be recomputed by selecting 2x2 or 3x3 mode, which removes “steps” in computed lightmaps and improve quality. |
Saving
lightmaps
Computed lightmaps are saved into the Scene.bin file, when scene is saved. Note that when you modify the geometry of light-mapped object, its lightmap will not be loaded, and you’ll have to re-compute it. |
Collisions
In order to make game function properly, the scene must have set collisions – properties on visual objects and helper collision volume objects. From this information, a BPS collision tree is computed. Each collision object (Visual or Volume) may have set material, which further defines game behavior when collision with this object is detected.
This means that we can set up collisions either by considering all object’s faces, or we can simplify its shape by collision volume (sphere, rectangle or box). It is up to designer to select appropriate mode for particular object, but in general, objects with few large faces are suitable for face collision testing (for these, you may set the Static collision flag in the properties. You may also visualize all currently marked objects and volumes, which will cause static collisions by selecting the View->Debug->Static collision frames. This will draw all static collisions by yellow. Note that you may (and should) mark all non-moving volume boxes static; otherwise they’ll be considered dynamic, which affects game performance. When you don’t check the Static collision on a visual, this visual won’t cause collisions with game elements.
Some collision volumes should be left with Static collision checkbox unchecked – these are those, which will move; for example when you load a model of human player, you’ll see it has two collision volumes on it. To visualize collision volumes, select the View->Debug->Volumes – this will draw all collision volumes in scene, where yellow are the static ones and red are non-static ones.
Building the
collision tree
In order to make static collisions work, you must build a BSP collision tree. Use the BSP-tree->Create menu item to compute the BSP tree. This may take a while, if scene contains lot of collision objects. When you save your mission, the BSP tree is saved into the Scene.bin file. Note that if geometry participating in the BSP tree is modified, the BSP tree becomes invalid and needs to be recomputed.
You cannot test and run the game without computed BSP tree.
Game elements
Game elements are those elements in the scene, which directly contribute to the game. The most important elements are Actors and Checkpoints.
Checkpoints
Checkpoints and their connection grid is a system of AI navigation in the scene. AI doesn’t know as much about scene as human can know, at it’s very hard to teach AI to know the environment – for this reason there’s a helping navigation web in each scene, which defines where AI can move to. Designer is responsible for placing checkpoints in the scene, and to make appropriate connections.
Note that the AI doesn’t follow the checkpoint grid exactly, it makes shortcuts to reach its destination.
Checkpoint grid may be visualized by selecting the CheckPoint->Show menu item. This will display existing checkpoints in the scene and their connections.
Editing checkpoints
When checkpoints are visible, they may be picked by cursor like other objects in scene, may be moved around (scaling and rotation doesn’t make sense), and may be deleted.
To create and edit checkpoints, jump to checkpoint editing tool by selecting CheckPoint->Edit. In this mode, you may create and destroy checkpoints and their connections by simple mouse click. When clicking on existing checkpoint connection, it gets erased. To create a new connection, click on a checkpoint and drag cursor to another checkpoint. To create a new checkpoint, simply click anywhere on terrain, and new checkpoint will be created. The Editor will auto-connect new checkpoint with neighbor ones, and automatically reorganize connections. You may want manually re-connect those connections which seems to be not correct.
When you click on existing checkpoint, drag cursor and release it over a terrain, a new checkpoint will be created, connected with existing one.
Checkpoint types
There’re three types of checkpoints:
- AI navigation (yellow)
- destination and helper (green)
- vehicle navigation (red)
Note that the first type must always form a connected grid – each checkpoint must be somehow connected to the entire grid. This is for AI to find its way anywhere in mission, and if you leave one or more checkpoints unconnected with the rest, AI will not behave as expected.
To change the checkpoint type, use CheckPoint->Type command. This commands affects selected ckeckpoint, as well as all connected checkpoints.
Checkpoint names
It is possible and desirable to give some checkpoints a name. This is for later AI setup and behavior. You may set AI to use the location of some checkpoint as destination of their action. To edit the name of checkpoint, select a checkpoint, and choose CheckPoint->Rename menu command. The name of checkpoint appears as text above the checkpoint.
Checkpoint connections
Standard connections between checkpoints define standard path. Some specialized connections may be defined though. To define such a specialized connection, click on existing connection holding down the Ctrl key. A table will appear, which allows designer to enter parameters for connection. Following possibilities are available:
- Use ladder – this connection is between two ladder entries (on top and bottom of ladder), so AI knows it should use the ladder
- Use door – this connection is passing door, so AI knows it should open the door if it is closed
The type of connection is drawn above the connection line.
Actors
So far we’ve spoken about editing environment, now it’s time to talk about putting life into the scene. This is done by putting so-called actors into the scene. Actors are entities, which always operate on one 3D object in the scene.
To create an actor, select an object and choose Game->Create actor menu item. You’ll be prompted for type of actor you want to create. When you choose one, the actor will be assigned on the selected frame.
You may draw names of actors by switching the Game->Draw actor names menu item on. This will draw actor names above all actors in scene.
Some actor has associated properties. To invoke their properties, select the actor object and choose File->Edit table->Current scene-actor command from menu. This will invoke properties dialog. The items contained in this dialog are discussed below.
Following is description of available actors, with brief description:
Player and Enemy (can be applied only on model)
This actor represents a
human in the scene. It can be either player’s character, enemy or NPC.
|
Resource
This is item pick-able by player. Its properties are: - Inventory type – what kind of inventory item it is; this is identified by index - to get list of available items, see table invoked by choosing File->Edit table->Inventory. Simply write index of desired item into this property. - Amount – represents number of items in the resource, or number of bullets for weapons |
Door
This actor is to be set on doors. Its properties are: - Close angle – angle to set when the door is closed. - Open angle - angle to set when the door is open. - Auto-close time – time after which door will automatically close. Set this to 0 to disable this feature. - Lock – when this is checked, door requires user to have a key in his inventory. - Open sound – sound to play when door is opened/closed. Leave this blank to use default sound. |
Ladder
Helper actor for navigating on ladders. This actor may be set on models only, and specifically only on two dummy models named _lad_up.i3d and _lad_dn.i3d. These models are already in the game’s Models\ directory. There’s no setup for this actor. You simply put model _lad_up at bottom of ladder, with its positive Z-axis pointing towards the ladder and Y pointing up. Similarly, put model _lad_dn at the top of ladder, with positive Z-axis pointing away of ladder and Y pointing up. Put the models about 1 meter above ground level, bottom one about 20 cm away of ladder, and top one above the ground, again about 20 cm away of ladder. Assign the Ladder actor to both and you’re done. |
Mine
Mine actor is a simple one, which creates explosion when anything (human of vehicle) collides with this. For this reason, it is important that mine has linked a non-static collision volume to it, which will detect the collision. There’re no properties for this actor. |
KillAnim
Special actor, which provides, that some animated objects are able to kill humans when they collide with them. The object being assigned the KillAnim actor should have non-static collision sphere volumes linked to it, which will detect collision with other actors. This actor is suitable for ambient animated objects in scene, such as trains or similar, which only purpose is to make up atmosphere, but should be avoided. |
Version
This actor type is used for destroyable objects. It detects hits and explosions. Initially it has some resistance, when this resistance reaches zero, the object’s version is switched to destroyed. This is usually applied on models, but this is not a rule. Such a destroyable object must have modeled also destroyed version (visual), which is linked to non-destroyed version (visual). The name of destroyed version must start with “~01”, so that the game can find it. Initially, destroyed version is hidden, and when versions are switched, it is unhidden, and original version is hidden. Properties of this actor are: - Default version – initial version to use (0 or 1) -
Resistance set – resistance ID of this object, which
is actually an index into resistance table. To invoke resistance table, use
the File->Edit table->Resistance command. You can learn
about resistance sets here, but modifying the contents of this table is not
recommended. |
Cannon
This is for static heavy cannons placed in the scene. It is a weapon type, and its properties are following: - Type – one of Cannon or Reflector; this means this actor may also be used for searching lights - Rotation – rotation limits and speed - Firing – all about firing from the cannon; here you can enter number of ammunition, bullet power, sound (leave blank to use default), as well as type of projectile – either bullet or rocket (for tank cannons) |
Automobil
This actor serves as a vehicle, which may be driven by player or enemy. This actor is also Version, which means it inherits all properties of version (may be destroyed, exploding, etc). Here we’ll discuss only what’s available in vehicle part of actor. Vehicle setup is quite complicated. You may set up items like number o transmissions, fuel (putting here zero means the vehicle won’t drive), sounds to use (leave blank for using defaults), and large area of advanced settings. We recommend try what each setting does and tune vehicle appropriately. In the advanced tab of properties, designer may find also setup of seats – how they are used, whether they allow using weapons, etc. |
AutoCannon
Combination of Automobil and Cannon actors. This actor is used for most advanced vehicles, which additionally to standard vehicle has mounted cannon. This cannon may be controlled from one of positions in the vehicle. There’re no additional properties for this actor type, it just allows setting the properties for all kinds of actors it contains. |
Detector
Finally, the actor that makes up the game logic. This is the actor, which detects actions required by designer, and makes appropriate decisions. Actually this is the thing in the game that makes the game flow. The principle of detector’s work is as follows: - first it detects up to 16 conditions - then it performs up to 16 actions This is not ideal possible scheme, but combining more detectors will yield desired results. You can set up this actor on any object you like, but most usually it is placed on dummy objects, because all it needs is a 3D position in the scene. But you can assign it on any object you like. Conditions are processed from the first to the last. When a condition is detected, the processing is moved to the next condition, until all of them are processed. Following are conditions which can be detected: - Player in range – detect if player actor is in specified range - All alive players in range – detects all players which are alive to be in specified range - Any human in range - detect if human actor is in specified range - All players dead – detects if all players are dead - All enemies dead – detects if all enemies are dead - Countdown – will pause detection for specified amount of time - Resource in range – detects specified resource in given range - Signal received – detectors may send signals each to other, this is the way how detectors waits for signal; signals are identified by ID, which must be specified - Actor destroyed – detects if specified actor (identified by name) is destroyed; this can detect Version, Player and Enemy actors, for human actors destroyed = dead - Explosion in range – detects if explosion happened in specified range - Sounds – detects sounds to happen, with specified sensitivity - Actor in range – detect actor, identified by name, in specified range Each condition may be negated, in which case right the opposite condition is detected (e.g. player not in range). Note: when ranges are mentioned, a distance from detector’s object to the object being detected is considered. When name is mentioned, the name of object is meant. Name of actor is always the name of object in the scene, on which the actor is attached. Actions are also processed from first to last. Following are possible actions performed by detector: - Play sound – play ambient sound loaded from disk, specified by name - Send signal – send signal to specified actor (identified by name), or all actors (if name field is blank); signal is identified by ID number - Mission successful – tells the game that mission is completed successfully - Mission failed – tells the game that mission failed - Pause detector – pause action execution for specified time - Explosion – create an explosion on specified checkpoint; explosion is specified by ID (which is actually index into explosion table, which may be invoked by File->Edit table->Materials - Set on/off – enables or disables specified object; object is identified by name - Deactivate detector – deactivate detector identified by name - Destroy actor – force destroying specified actor identified by name; the actor is actually exploded - Objective completed – writes a objective completion text, where text is an index into game texts (which are located in text file) - Set focus – sets focus to specified actor, identified by name; leaving the name field blank sets focus back to active player |
File import and export
The Editor is shipped with export and import plug-ins for the 3D Studio Max. These plug-ins are found in the Editor\Plugins\Max3.0\ directory. The Insanity Engine imports files exported from 3D Studio Max, using Inanity export plug-in, which is based on original 3D Studio 4 (DOS) compatible file format, with few specific extensions. The files have default extension .i3d.
General modeling rules:
- Negative scale is illegal. If it is detected, a warning is issued.
- Non-uniform scale is not inherited, if present, it is converted into uniform scale and applied to I3D_frame object, and vertices of I3D_visual are rescaled appropriately, so that the visual looks like it was intended to look
- Texture coordinates must be in range -128 ... +127 for a mesh. If they are out of range, a warning is issued.
- If default material is present, it is converted to white, and a warning is issued.
- Valid mesh must have at least three vertices and one face. Meshes with no vertices or faces are discarded.
- Invalid faces and unused vertices are automatically removed during loading.
|
Imported lights are converted to point lights. |
|
When material name contains... |
|
|
! |
The texture will be drawn color-keyed, with color key being the first color in palette (for palletized textures), or black color for RGB textures. |
|
!! |
The same as above, but this will cause using zero alpha-ref value, which will improve mipmapped colorkeyed textures. Suitable for fences and textures with thin opaque pixels, which would disappear in lower mipmap levels. |
|
$ |
Mipmap levels of texture will be created (default behavior also without this flag set). |
|
$$ |
Mipmaps will not be created on loaded texture. |
|
+ |
Choose true-color pixel format for texture, if available on hardware. |
|
% |
Environmental material. The environment texture is in "Reflection map" slot in 3DS MAX material editor. |
|
@ |
Keep original diffuse color of material (as set in material editor), also if material has texture assigned. If this flag is not set, diffuse color of material is set to white. |
|
&<proc_name> |
Procedural attached to material. Procedurals are used for
generation of various real-time effects on materials and textures. Their
definition is in the Procedurals\ directory. |
Note: you can use combination of these special letters in material’s name. For example, your material name may be: “$!+Clouds”.
3D objects:
A user-defined properties of 3D objects in a scene are scanned for a block
enclosed in '{' and '}'. This block is scanned for known keywords with optional
parameters. This way, objects may be given special properties, or they can be
modified to different objects.
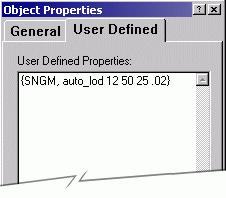
Figure 17 – example of user-defined properties in 3DS MAX
Following are keywords and their meaning for various object types.
|
When four-character keyword is... |
Loaded object is cast to... |
|
PRTC |
Particle; only material of the (visual) object is used |
|
LMAP |
Light-mapped object |
|
BBRD |
Billboard |
|
SNGM |
Single-mesh object |
|
MRPH |
Morphing object. |
|
FLRE a b c d e |
Flare object. Parameters have following meaning: Example: {FLRE, 5 90 0.02 500} |
|
Additional properties of visual objects: |
|
|
smooth |
Smooth current (visual) object with adjacent objects with the same keyword. Smoothing means that normals of points of different visuals on same position are blended, so that these objects look continuously - the effect visible in lighting and light-mapping. |
|
auto_lod a b c d |
Create automatic levels of detail on mesh. Parameters have
following meaning: For example: {auto_lod 5 20 12 .05} creates
12 levels of detail, with last LOD having quality 0.05, and distance range
where LOD is used from 5 to 20 meters. You may assign automatic LOD to most visual objects. |
|
hide d |
Object will be hidden when its distance from camera is greater than d. Note: distance is valid for camera's Field-Of-View set to 65 degrees. If other FOV is used, the distance is scaled accordingly. |
|
material <n> |
Assign static collision flag to visual, and set appropriate material ID. |
Example:
{SNGM auto_lod 4 20 6 .3}
|
Joints (or bones in graphics packages): |
|
|
Recognized parameters: |
|
|
lock |
The joint is locked - it means its position cannot be adjusted. |
Example:
{lock}
|
When four-character keyword is... |
|
|
JTBB (joint's bounding-box) |
The dummy is used as a bounding-box of parent joint object. It is not put into 3D scene hierarchy. |
|
JTVB (joint's volume box) |
The dummy is used as a volume-representation of parent joint object, or parent single-mesh object, for geometry collision testing on single-mesh objects. It is not put into 3D scene hierarchy. |
|
region |
The dummy encloses region of vertices of parent visual. Regions are used for various reasons, depending on visual types they are attached to; for example to define morphing regions of morph objects. |
Example:
{JTBB}
|
Sectors are built during scene loading. The frames making up a sector skeleton must have following keywords and optional parameters: |
|
|
SECT (sector) |
The frame is a root of sector, or a sector's wall. The hierarchy is processed from top to bottom, and when a top-level frame with this keyword is found, it is a base of a new sector, and all its direct children with this keyword become walls of the new sector. |
|
help |
The object is a help wall, which is deleted after sector is created. Any children originally linked to the frame are re-linked to parent of the deleted object. |
|
simple |
The sector built with this flag will have no portals, thus is will be always visible when its parent sector (usually Primary Sector) is visible. This sector is intended only for grouping due to lighting, sound properties and optionally occlusion. This parameter can be set only on the root frame of the sector. |
Example:
{SECT help}
|
Volumes (dummies in 3DS MAX): |
|
|
When keyword is... |
Dummy is changed to volume of type... |
|
VOLS (volume sphere) |
Sphere |
|
VOLR (volume rectangle) |
Rectangle |
|
VOLB (volume box) |
Box |
|
Recognized parameters: |
|
|
material <n> |
Set material ID to created volume. |
Example:
{VOLS}
Tips and tricks
Measuring units
Both the editor and the game work with meters as measure units. So when you model in 3rd-party graphics package, make sure your objects are in reasonable resolution.
Cameras
Designers do not need to worry about cameras. There is one editing camera always present in the editor. Game manages cameras on its own. So there is no need to explicitly put cameras into scenes. The only setting that is necessary is camera field-of-view (FOV) and visibility range. We recommend setting FOV to 80 degrees. Setting visibility range is dependent on scene, but the smaller range, the faster the scene is rendered.
Occluders
Occlusion testing is a powerful feature for hidden surface removal, but it requires some experience. It is useful to see what occluder actually hides by switching to wire-frame rendering, and optionally switch occluder visualization.
Occluder always hides only objects in the same sector where it is linked, and it may cause some problems when assigning occluders on buildings. Usually occluder is (like other created objects) is linked to the sector where it is created, so you should re-link it to the sector where you want to make it work (Primary sector for example).
Finally, when you’ve selected an occluder, you may switch to sub-object edit mode by choosing Edit->Sub-object edit menu item. In this mode, you’ll be able to fine-tune occluder’s vertices, erase vertices and create new ones. This gives a great possibilities in building occluder with exactly the shape you like. When you hold down Ctrl+Shift keys in this mode, you may create new occluder vertex by clicking anywhere on geometry. It is also recommended to put bottom occluder’s vertices below terrain, so that the occluder has greater chances for hiding objects behind it.
Building and shipping your own scene
In this section, we’ll come through the process of building your own scene step by step. We’ll discuss all tasks that must be carried in order to complete a playable scene and offer it to other mates in the world.
Designing your
mission
We strongly recommend starting work by design on a paper. This means sketching the mission, objectives, models, etc, on a sketch of paper. This will give you an idea what you want to accomplish in your game.
Modeling scene
geometry
Another step is to model the scene geometry in a modeling package. Since the only currently available importers are for 3D Studio Max™, we’ll consider this as the modeling tool. When you create the landscape, buildings, rivers, etc, keep in mind following rules:
- Do not keep entire landscape in one big piece with 40.000 triangles. Rather, cut it to smaller pieces with 30 – 300 triangles each – you’ll avoid problems with performance (because one big piece of geometry is always transformed and rendered, but smaller pieces have chances to be off-screen, thus rendering is optimized), and you’ll also avoid problems with light-mapping and definition of materials.
- Do not insert items, which repeat many times (like trees, boxes, stones, etc) in the Max – this is pure wasting of memory because geometry for each copy is duplicated. Also this way your design in the Editor will be limited. Rather, keep those repeating things as models and put them into scene later in Editor.
- Do not use non-uniform scale in MAX. The non-uniform scale is evil and not supported by the Editor. Thus, when this is encountered, it is converted into uniform scale, without actually changing the shape of such an object, but this conversion will affect position and scale of linked objects, so use uniform scale whenever possible. If you must use NU scale, use Max’ Reset Xform.
You save the scene in .i3d format into Scene.i3d file. Although you may want to keep MAX file during modeling, you may rely on re-importing the exported scene and continue in editing without losing anything (expect Modifier Stack history in MAX).
Directories
Place the scene into the Missions\ subdirectory. You may use any models, textures and sounds from the game, as all players playing your Add-on will play it with those files installed, so this is repository which you can freely use in your scenes. If you add another resources, which should be, distribute with your Add-on, keep them in following directories:
- Models.mod\ - for models.
- Sounds.mod\ - for sounds.
- Maps.mod\ - for textures and bitmaps.
- Texts.mod\ - for any texts you’ll add.
- Missions\AddOn – for your Add-on missions.
The reason for not storing these resources in standard game directories (Models\, Sounds\, Maps\ and Texts\) is that if you did this, you wouldn’t then know which resources were added for your Add-on, among the resources shipped with the game. Later, we’ll learn how to make a single distributable file for the Add-on from these files. The game knows above mentioned directories and can load game resources also form them.
Note: be careful not to give some resource a name that already exists in directories of original game. If you did this, you’d cause an ambiguity during loading, when the game would load different file as you expected. You may avoid this by selecting an unique character sequence preceding all your bitmaps, sounds, models, etc.
If you create more Add-on packs, you don’t need to worry about such name collision, because the game always opens only resources of one Add-on at a time. You may also ship more missions in the same Add-on.
Your missions are stored in the Missions\AddOn directory. You may ship 1 – 6 missions in one pack, which will be played linearly, from first to the last. Player won’t get access to higher mission until he/she finishes preceding mission.
To store missions, create unique directory named “1” up to “6” in the above mentioned directory. Each mission consist of game mission itself, located in Game\ subdirectory, and optionally a briefing located in Briefing\ subdirectory, and finally an optional map, located in Map\ subdirectory.
For example, first mission in your Add-on will be stored in Missions\AddOn\1\Game\ directory.
File types
For your bitmaps, you may choose 3 formats: PNG, BMP and JPG. We recommend using PNG format, which uses lose-less compression. This is clear win against both BMP (non-compressed, or only RLE compressed) and JPG (losing compression).
For your sounds, we recommend using what is more convenient for you – either WAV or OGG. The later one uses losing compression, so make sure you keep copies of your sounds in WAV format during editing. OGG format will compress sounds to about 20% of original size, and is preferable for games transferable over the Internet.
Characters
We recommend putting exactly four Player characters into the scene. Please choose one of “Sas*.i3d” models from original game and assign them actor Player from the Game menu. Do not assign any properties like Program, Inventory, etc, in the actor’s table, since this is filled automatically when game starts.
Then you can put any number of enemies into the scene – load enemy model (“German*.i3d” for example) into the scene and assign it the actor Enemy from the main menu. Then you may equip them using their Property windows. You may assign them inventory items (usually you’ll want them hold one german weapon and possibly some grenades). Finally let them some work to do under the Program tab of the Property window.
Checkpoints
In order to make your AI live, you must put some navigation points into the scene. Refer to the Checkpoints section for details. With provided checkpoint editor, it is easy to create the grid by just clicking on the terrains; anyway you must be careful and manually delete connections that you believe characters couldn’t pass through (like connections over traps, steep climbing, etc). Ideal distance of checkpoint connections is 6 – 30 meters. The number of checkpoints varies by mission size. Reasonable numbers are from 300 to 3000 checkpoints per scene.
Yellow checkpoint grid is used for path-finding, and must be consistent – any yellow checkpoint must be connected with the net of other yellow checkpoints. Green checkpoints are for destination assignment (for human AI, like guarding and movement destinations, or for definition of walking paths).
Collisions
In order to make a mission playable, you must define collisions. Terrain geometry usually needs to have static collisions enabled directly on the geometry. Use Property sheet on selected visuals to check the Static collision checkbox.
Most imported models contain collision volumes inside of them. What must be done is choosing if the object will move or not, and setup object’s collisions accordingly. For static objects, make all its collision volumes static (drawn by yellow in visualization mode). For moving objects, make its collisions non-static (drawn by red).
Finally, build a BSP collision tree once you’re finished. Whenever you add/remove/adjust static collision in the game, the Editor will detect this and will invalidate the BSP tree, so that you may re-compute it after all changes you make to static collisions.
You must also enclose the scene by non-crossable collisions volumes, which will keep players inside of the mission and won’t allow them to get outside. If you gave high mountains or other non-climbable objects in the mission, this is natural border. Anyway, if your mission ends on a pathway, you’ll need to create explicit border volume that won’t let player go further. Ideal objects for this reason are collision volumes (rectangles).
Materials
Material setup is also important. Initially, all collision objects have assigned Default material. This can be changed to other type. Some material types just mean how sounds will play on them (steps, shots, etc). Others are critical to game-play. Here we discuss most important material types:
- Ice, Snow – causes humans to create footsteps when walking on these
- Stairs – usable on steep stair surfaces, to allow for more relaxed collision detection
- AI Transparent – suitable for objects which are non-crossable, but AI can see through these (glasses, branches, etc)
- Border – used for border collision volumes discussed in previous paragraph (avoid movement through them, allows passing of shots, grenades, etc)
- Throw to pieces – when character collides with this, it dies immediately
- Killing water – for deep waters, where you want characters to drown
- Fence – same as AI Transparent, but with metal sound
- Mine field – occasional explosion, simulating mined field
- Killing spasm – used for harming objects, for example fire
Texts
Put all game texts in one text file, which should be saved as Text\AddOn.txt. This text file will contain all texts associated with the Add-on. The format of the text is: text ID number, followed by quoted text, all on one line. So if you need to provide text for particular ID, you’ll put it on single one line.
Text ID numbers to use will be mentioned later as necessary. Any text ID you use in this file cannot collide with existing in-game Ids. For this reason, the reserved range of text Ids for Add-on is 100000 – 199999.
To split text into multiple lines (for formatting in menus), use ‘\’ character as new-line character. For example “Line one\Line two” will display two lines of text.
Map
To create mission map, simply take original mission geometry, remove all details (due to speed), and put it into the Map\ subdirectory of root mission directory. Then create a dummy object named map 00, whose 2D extent (in X and Z axes) will be used for map accessibility in the map mode. In other words, create a dummy object in MAX and scale it so that when looking from top, its area covers entire area where players may operate on the map.
Do not insert any models into the map scene. You may set up any model in the game scene to appear in the map by selecting it (or multiple objects), and choose Game->Models on Map->Mark selection. This will cause that selected models will appear on map when playing the game.
Game objectives
Game objectives are the tasks which lead to mission completion. You should give player several tasks, which will be displayed as list of objectives. To do so, create detector actor on any object in scene (dummies are ideal for this purpose), and
Integration
In order to integrate your mission(s) with the game, you’ll need to provide following:
-
Mission high-quality screenshot for displaying in mission selection
menu. Place screenshots for up to six missions in this: location:
Maps.mod\GameMenu\. The name of screenshot is AddOn<x>.png,
where <x> is number of mission from 1 to 6. Also, provide black&white
version of the screenshot AddOn<x>_bw.png, which will be displayed
when mission is inaccessible yet.
- Mission short name – usually location name. Text Ids for six possible missions are 100000 – 100005.
- Mission description text, which will appear in the mission selection screen. Text Ids for six possible missions are 100010 – 100015.
Debugging
To debug your scene, use the Debug->Scene validity check menu item. When you receive a message Scene is OK in the status bar, you’ve checked for most common bugs occurring in scenes. This doesn’t guarantee your mission will be playable or without problems, it just checks for problems, which are easily detected by computer.
To debug your game-play, you may switch to game mode inside of the Editor. Use keys F6 to switch to game mode, and F5 to switch to Editor again. Be sure you save your work before entering the game mode. It is not recommended to save mission after testing it in game mode, because characters change positions, game creates new actors, etc. Always reload after testing your game in the Editor.
For faster testing your actual game-play, you may put dummy objects into the scene, which name starts with “debug”. For example, you may create a dummy named “debug_on_bridge”. Then you may teleport your active player to one of such positions by typing cheat debugport during the gameplay. This feature is available in the editor only.
To see what are your enemies and NPCs doing, you may see the game through their eyes. Type cheat setfocus and select character that you want focus on. When you switch to other player, or change camera distance, camera focuses to your active player character again.
Packing and
shipping
It is convenient to design and test your scenes with all files put directly in folders on your drive. Anyway, after you’re ready to share your mission with others, you should put it into a single file. This paragraph discusses all necessary steps which must be completed. As mentioned above, data files which the game uses, are actually non-compressed RAR archives. So you’ll need to create single file with .ADD extension, and put this into the Data\ directory, in the destination installation folder of the game.
All the directories with data files for your Add-on should be included in the package. Ideally, you’ll create a command batch file (.BAT) that will make the package for you, so that you avoid repetitive (and error-prone) task, during final testing and debugging your Add-on.
The name of your Add-on data file is up to you. Give it unique name, so that it won’t collide with possible Add-ons of other developers.
Final testing
Your Add-on should be finally tested with pure game installation, without any data files being extracted, so that you’re sure you haven’t missed any files, and all players playing your mission will have all the contents that should be present.
To test your Add-on this way, make sure all extracted or working files are removed, copy the final pack into Data\ directory, run the game (not Editor), and try to play it from within there.
Copyright (c) 2002 Lonely Cat Games.