... and 2 optional others for even more choices and fun!
This is the easy to use main management (editing) tool.
You will find it under the "Auscomp - 1st JAVA Navigator" group in the windows start menu.
First have a look at the example of how the Commander works by clicking on the "Demo" button. A file will be automatically imported. Simply hit the Preview button and see how easy it can all be.
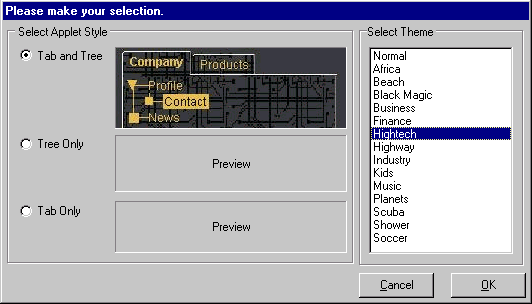
You will be asked to select between the 3 different navigation styles (Java applets) that are included in Auscomp's 1st JAVA Navigator.
There is a choice of the Tab & Tree combination, the Tree only or the Tab only.
To make construction even easier, you can now also choose one of the "ready-made" themes provided (see list below).
Once selected, the Preview panel will display a brief view of what your selection is likely to look like (the example below is the High Technology - "Hightech" theme):
If you do not specify a location, your work will automatically be saved to the "projects" sub-directory in the 1st JAVA Navigator directory by default.
This is the main control panel that you will use to construct the selected navigation system for your site.
For example:
- For the Tabs only applet - you would use the Applet, Tab and Tab Style
sections
- For the Tree only applet - you would use the Applet, Tree and Tree Style
sections
- For the Tab&Tree combination - you would use the all sections
At any stage, feel free to take a look at what you've just created by clicking the Preview button. Your work will automatically show up in your default browser.
- At this stage, it is important (and fun) to test and try out the various settings to get more familiar with the product ... after all, Auscomp has provided you with a FREE and FULLY-FEATURED evaluation copy - so make the most of it!
- Explore all of the exciting new things that you can do with it and ... be creative!
- If you get stuck at any stage, use this comprehensive on-line documentation by using the 1st JAVA Navigator (Tab&Tree) component to the left and/or the extensive Tips, Trouble shooting and Known Issues page. More often than not, there is a very simple explanation and solution to the problem.
- Another great place to get quick answers from is the Frequently Asked Questions (FAQ) section on Auscomp's web site - there are LOTS of questions answered here and it may even be quicker than waiting for a reply because of the International Time difference!
After you are happy with your work, simply hit the Save button and all necessary files will be saved into the directory that was specified earlier (back in Step 3) or to the default directory ("projects" sub-directory in the 1st JAVA Navigator directory).
If you're really happy with what you've done, let us know so that our team can have a look at it. If they like it too, you may well end up on our Top 5 list for two months!
Now you can choose to activate your new navigation system in a frame enabled system (like this on-line documentation and on Auscomp's own web site) or into a Floating Window (like Auscomp's FAQ section) by using the Deploy button.
Now, to make it all work properly, if you hit the Upload button, a report will be generated (which may be printed out for easier reference or for record keeping) which will give you a detailed report of EXACTLY which files need to be uploaded to your web server - can't get much easier than that!
Just remember:
- Upload as BINARY and NOT as ASCII files; and
- UNIX servers are CASE-SENSITIVE whereas Windows servers are NOT (so remember to correct any Typos etc or it will not be able to locate the file!)
... DONE!
You may also now choose between 3 ADDITIONAL navigation system styles to apply to your site:
It's a simple one mouse-click affair on the Generate button!!
- Tree View (JavaScript)
- Drop Down Box (JavaScript) or
- Site Map (Pure HTML)
- Try out each of the options to see what effects are available and find out which style suits your needs best!
... WE HOPE YOU AND ALL YOUR VISITORS ENJOY USING IT!!