
| Contact: Top Level | Tel: +44 (0)1453 753955 |
| Price: £23.49 (special upgrade price) | Fax: +44 (0)1453 753933 |
| System requirements: Windows 3.1 or Windows 95, 4Mb RAM | WWW: http://www.toplev.com |
| Limitations: Restricted features | E-Mail: info@toplev.com |
| UnInstall: Yes; Add/Remove software Control Panel |
|

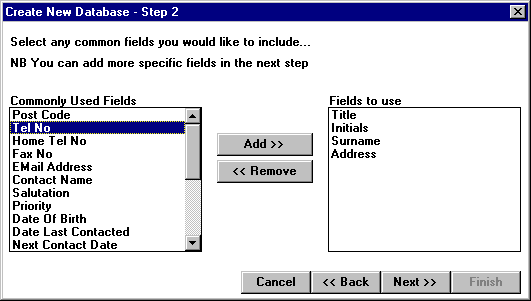
Click Form Design on the main menu. Go to File/Open and choose 'Applicat.tfm' from the forms library. FastForms 3 has many new features to distinguish it from its predecessor - for instance, notice the rounded corner box, and the shadows around fields. Another new feature is drop down listboxes, so let's add one to the form.... Click on the Title field and press 'Delete'. Now select Listbox from the Tools Menu and move the crosshair to the position of the newly deleted field. In the same way as if you were drawing a field, use the mouse to draw a listbox field. To format the listbox double click on it to produce the 'Style' dialog box. Name the field ''Title'', then click on the 'Border' tab and select dark blue from the choice of shadow colours listed. Finally, click the 'Values' tab , and under 'list data' enter the usual titles (Mr, Mrs, Ms, Dr etc), then press 'OK' to return to the form. Save the form (F4) and go to File/Close Window, which will take you back to the main menu. We will use this form again later, after we use another of FastForms new features - the Database Application. Click the Database button on the main menu to enter this application. Go to File/Create New Database. A database wizard will guide you through the process. Firstly, type a name for your database - ''Jobs'' then click on 'Create from Scratch' and press Next. We want to include several fields on our database from the list of commonly used fields. First click on 'title' then press 'add', repeat this process and add the following fields to the list on the right: initials, surname, address and tel no.
Step 3 lists the type and length of fields. We can also add more specific fields not listed in the previous step. Type 'position' under the 'Name' column. This will be a text field, however change telephone number from a text-type field to a 'number' field, by clicking on the arrow and selecting 'Number'. Press Next and Finish to create the database. Our new Jobs database will appear on the screen with the cursor flashing in the first field. The database is in 'Add' mode, so we are ready to enter records. Start by typing your details onto the first record. Press the Update button(F2) to save the record, then press the Add button (F3) to continue to add a few more records to the database. Browse through your records by clicking on the arrows in the top right of screen. We will now link our database to a specific form. Select Tools/Link Form and a dialog box will appear, press Browse to select a form from the library. Choose Applicat.tfm and press Next.
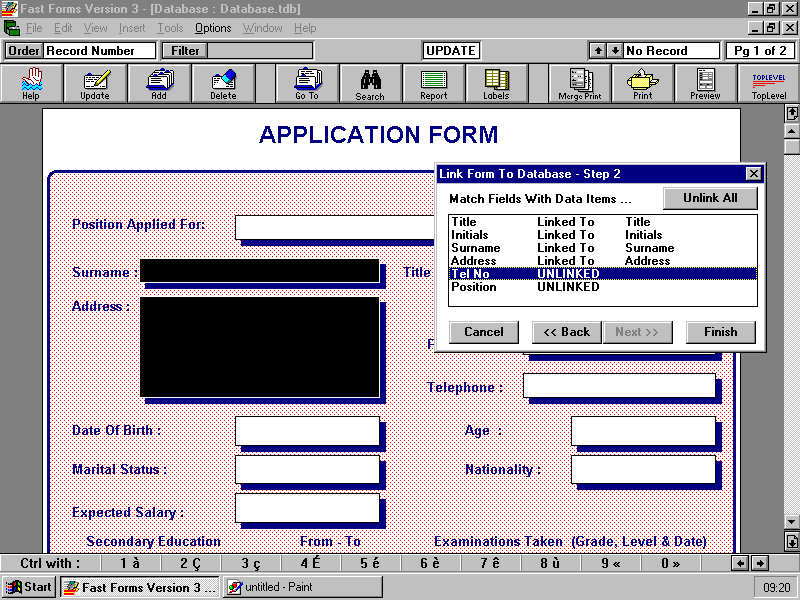
To link the data items from our database to fields on the form; click the 'title' data item so it is highlighted, then click on the 'title' field on the form. This field is now linked to the database. Continue to link the remaining data items to their corresponding fields in the same way. Press Finish when they are all linked. The application form is now linked to our Jobs database. Notice that the form in front of you is displaying data from your first database record. You can now print the form - press F10 to print the current record or press F9 to print all(or a selection) of the records. You are now ready to send a personalised job application form to a prospective employee.
