
Index:
Welcome
Disclaimer
Features
Quickstart
MapWin32 Pro documentation
The Map Editor Window
The Block Editor Window
File Menu
Edit Menu
MapTools Menu
Brushes Menu
Layers Menu
Custom Menu
Key Shortcuts
How It Works
Supported image formats (BMP, PCX, PNG, TGA)
Using Mappy as a simple map editor (.MAP format)
Important information about FMP1.0, Isometric/Hexagonal/other maps
+ Hexagonal map help
+ Isometric map help
Design Considerations
Adding functionality with Lua scripts
Using Marker Blocks
Exporting map for GBA/mobile
The Playback Libraries
The FMP file format
The MAP file format
mapwin.ini settings
Glossary
Version History
Thankyou for using MappyWin32, hopefully you will find it a
useful tool in creating your own games. This software is freely
distributable, the only restriction is that
you are not allowed to charge for this editor or distribute a modified version of this editor
without the author's consent. You may, of course, use the maps you create as you wish.
If you like it, you can make a donation at the tilemap.co.uk site,
but this is not required. The example maps provided in the MAPS folder may be
used for tests, but you must get permission for other uses.
What is it? Well, I have tried to make the most
comprehensive and powerful 2D tile map editor about. The idea is
that you make some graphic 'tiles' of a set size (such as
16 pixels wide by 16 pixels high) with some paint package like this:
This software and associated files are provided 'as is'
with no warranty or guarantees of any kind, you use them at your
own risk and in doing so agree that the author is in no way
liable and cannot be held responsible for any loss of
time/data/hair or anything else that may occur either directly or
indirectly from the use of this software or associated files.
Sorry about that, but I don't think it's fair that I get
sued for something I release for free, just remember to keep
backups and you'll be fine. I have never lost any data or files
or had Mappy screw anything up, just be aware that if it does I
can't be held accountable :)
Note: These are the features for Mappy Win32 other platforms
and versions have slight differences in features, but all make
the same FMP files...
Single FMP file format (0.5) compatible with all versions of
Mappy and playback libraries
User definable MAP file format for compatibility with other systems
Supports 8/15/16/24/32bit colour modes
Supports all resolutions
Imports BMP, PNG, PCX and TGA files
Supports still and animated tiles
Supports tile sizes of 8*8 upto 128*128, including
non-square tiles
30000 tiles, AND 2048 anims available
Can edit maps with rectangular, isometric, hexagonal and other shape tiles
Easy to use interface
Fill (with still/animated blocks, brush (multi-block) and
random from brush)
Lines
Zoom (1x, 2x and 4x)
Hotkeys and keyboard shortcuts, inc pickblock and
next/prev tile
New, Cut, Copy and Paste
Brush an area, then draw with it!
Various playback libraries to use with your games to load
and display the FMP map file
All colourdepths converting (display 8bit maps on 16bit
screens? no problem)
Import and Export individual components
Export data as text
Lua support for expanding functionality with scripts
Resize map array with recentering (nice)
Undo (and Undo-undo :)
Grid, for easy positioning/tile recognition
Onion skin transparency
Tidyup/space functions, gets rid of unused data
Map information, see exactly how much space things are
using
DirectX preview (MappyWin32 will run without DirectX
except preview), scroll around your animated map on any valid
DirectX mode (all valid modes for your system are listed),
includes parallax layer for transparency checking. On my
relatively lowly 200Mhz K6 I can run my monitor rate of 75fps in
800*600*16 with all layers and parallax
Layers, 4 for each block, 8 in the map including
transparency and depth.
Expansive and useful documentation (surely the best
feature?)
MappyWin32 runs under Windows 95, 98, Me, 2000, NT
and XP, it should also run under other OS with Windows emulation.
You will need your desktop in 15bit colour or higher
(high or true colour, the more colours the better). Extract the
files from the zipfile to your drive. Double click
mapwin.exe to start it, you can also associate the .FMP map files with
mapwin.exe if you want.
To try out and learn how to use MappyWin32 you can follow these
two quick tutorials:
Using MappyWin32
Make the window bigger by clicking the 'maximize' gadget to the
left of the 'X' close gadget in the window's titlebar. Select
'Open' from the file menu, or simply press ctrl+o, and open the MAPS
folder. You should see the file test2.fmp (or 'test2'), double click
it and it will be loaded into the map editor.
You should now see the map in the Map Editor (larger)
window, and the still blocks in the Block Editor (smaller) window.
If you have a high resolution desktop and the tiles look a bit
small, select a 'Zoom' from the MapTools menu. Click the left mouse
button over a block in the Block Editor window, you
should see a black and white rectangle appear round it,
indicating it is the active block. Now move the mouse over to the
Map Editor window and click the left mouse button to place the
block in the map. You can hold the left button down and move the
mouse to 'paint' with the block. Try scrolling
around the map with the cursor (arrow) keys, or using the sliders
at the right and bottom edges of the Map Editor window. You can
undo the last action you made by selecting Undo from the Edit
menu (or simply ctrl+z), you can undo your undo by selecting it
again.
One of Mappy's best features are animated blocks, to see
them click the right mouse button in the Block Editor window, you
should see the title of the window change, and any animated
blocks will be displayed, you can select and use them just like
still blocks, you can right click again to get back to the still
blocks. In a new project, there are no animated blocks to start
with, you should switch to the animated blocks window, and select
'New' from the Edit menu.
Handy shortcuts are to use the ',' and
'.' keys to select
the previous/next block and the 'p' key to select the block the
mouse pointer is currently over in the Map Editor window.
You can
double click the left button on a still or animated block in the
Block Editor window to edit its properties, try it on both still
and animated blocks
to see the options. You can use any of the options in the Edit
menu to manage the blocks, a new block only uses 32 bytes of
memory and ordering them does not change the graphics order.
Select the Grab New Brush option
from the Brush menu, now position your mouse over the
corner of the area you want to brush in the Map Editor window.
Click the left mouse button and hold it down and move the mouse
to the opposite corner of the area you want to grab, you should
see a 'bounding box' indicating the area. When you have the area
you want selected, release the left mouse button and name it. You can now
paste that brush anywhere you like with the left button (the
brush will not be pasted if part of it would go off the edge of
the map) the top left of the brush will be at the mouse pointer.
Note that any 'block 0' blocks in the brush will be treated as
transparent so you can have non-rectangular brushes, unless you disable
this with the option in the Brushes menu. You can also
use brushes for filling, find an area with a number of identical
blocks next to each other (the black areas are good), place the
mouse pointer over the 'starting block' and press the 'f' key,
that area will now be filled with the brush, over and over with
the top left of the brush where the mouse pointer is, try it and
see. Undo the fill with ctrl+z, now do the same, but press
ctrl+f, the area will be filled with random blocks from the
brush.
If you want to save the map, select 'Save As' from the File
menu.
Making a new FMP map with MappyWin32
When you want to make a new map, you will need to create or
obtain some tile graphics. These must be in a grid like this:
This will show how the map is layed out, and allow you
to edit that layout. Simply select a block, anim, or brush and
paint with it by clicking the left mouse button on the square
where you want to place the tile, you can alter more than one
square by holding down the left mouse button and moving the
mouse. The actions performed by the mousebuttons can be defined
by selectin 'Mousebuttons' in the Custom menu. The mousewheel
can be used to scroll the blocks in the Block editor window.
You can fill an area of blocks with either a still
block, anim block or brush (depending on what is currently
selected as your drawing item) by pressing the 'f' key (make sure
caps lock isn't on) when the mouse button is over the block you
want to start the fill with. You can also fill randomly from a
brush with Ctrl+F, you can weight blocks by having more than one
in a brush (try and see, you can undo a fill with Undo, Ctrl+Z).
Another handy shortcut is to press the 'p' key while the mouse
pointer is over the block you want to pick in the Map Editor
window, this will now be your current block/anim. You can select
the next/previous block/anim by pressing the ',' and '.' keys.
You can move the area seen in the Map Editor window by
either using the scrollbars on the right and bottom edges of that
window, or by pressing the arrow (cursor) keys, hold them down to
scroll along. When you get to the right or bottom edges of the
map you will see a grey area which cannot be modified.
Information about the block under the mouse pointer is
given in the window title bar.
This shows all the still and animated blocks that have
been created, you can toggle between the still and animated
screens by right clicking the mouse over the Block Editor window.
To select a block or anim, left click the mouse button on it, you
can now draw with it in the Map Editor window.
You can add a new block/anim, cut copy and paste
(all in the Edit menu), new and paste put the block after the
currently selected one. Each block takes only 32 bytes of space
(see Map Properties). Note that cutting a block will remove any
references to it from the map array (they will be replaced with a
reference to block 0), and pasting it will not put them back, so
it's usually best not to cut blocks you are using in the map
array. Also note that cutting a block does not remove the
graphics it was using. Using new, cut, copy and paste does not
affect the graphics you imported in any way, click on the picture
above 'BG' in a block's properties to see the actual graphics.
As long as you don't use 'Remove unused or duplicate graphics'
options the graphics will never change, allowing you to update
them from the original imported image.
Undo does not work when editing the Block
Editor.
You can see more blocks/anims by scrolling up and down
with the scrollbar on the right of the Block Editor window.
To edit a block structure, double click it in the Block
Editor window. Depending on whether it is a still or animated
block, you will be shown a dialogue giving details about it and
allowing you to change it.
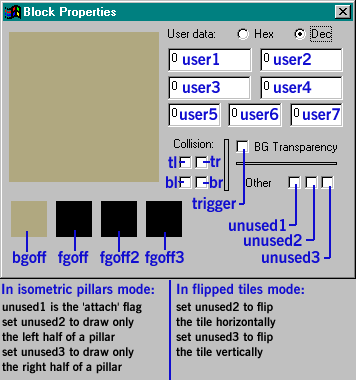
Editing Properties of a Still Block. You will be shown the
block you double clicked, along with it's properties. The numeric
information is not used by Mappy and is entirely for your own
use, as are the four collision detection, and 'other' bits. The BG
transparency box indicates whether BG transparency is taken into
account (you will nearly always check that in block 0 if you plan
to use transparency, as well as any blocks that have a
transparent colour in the BG graphic. An easy way to set this for
all blocks with some transparent pixels is to select 'Auto set
BG transparency' from the 'Useful functions' option in the MapTools
menu after you have imported your graphics). In the bottom left, you will see the
four layers of graphics that make up the block's appearance,
simply click them to pick a new graphic, BG is used as the back
layer, you will probably only want to use the first FG layer,
this allows you to draw the map in layers in the playback
libraries, sandwiching sprites between them to give depth. You
can go to the next/previous block by clicking the arrows next to
the OK button.
This has the standard file features such as Open (open
a .FMP or .MAP mapfile for editing), Save (saves current .FMP or .MAP file under
it's current name, if it hasn't been named this is the same as
Save As), Save As (requests a name to save the map, .FMP will be
added if you don't type it in then saves it), Exit (quits Mappy,
same as clicking the 'X' gadget in the window titlebar, you
will be warned if you have modified a map but not saved it), and
some Mappy specfic ones, which are:
New Map. Brings up the new map dialogue where you choose
settings for the new map, you should have carefully decided on
the values you enter here. Either the default values will be shown, or
the values for the currently loaded map (currently loaded map
will be cleared from memory if you OK from New Map), you can
modify these values to any legal value. If you are creating a
map with non-rectangular tiles click 'Advanced'.
Note: Your Windows desktop doesn't need to be in, or support,
that depth, your Windows desktop does need to be in high or true
colour though (yes, even for 8bit maps :).
Advanced dialogue:
FMP version: this allows you to specify the version
of the FMP file, you can change it in Map Properties later on.
Block gap x and y: this is the gap between blocks, if x is the same width,
the blocks will be next to each other. For isometric maps,
gapx should be the same as blockwidth, and
gapy should be the same as blockheight.
Block stagger x and y: This is the offset for every other row, for
isometric, stagger x should be half blockwidth, stagger y should be half
blockheight. You can change all these in Map Properties later on if it doesn't look right.
When you 'OK' you will be given a map
filled with one block (shown in the Block Editor 'still' window)
this is a special block, you can edit it's properties (by double
clicking) but not give it any graphics or delete or move it from
the first position. Now may be a good time to check 'Map
Properties' in MapTools to see how much space is being taken up.
Import. This is used to get your tile graphics into your
map, see supported image formats.
This contains New, Cut, Copy and Paste for use with the
blocks in the Block Editor window (see
Block Editor for how those work).
Undo is very useful, but doesn't work on everything, it
will undo everything since the last left mouse click in the Map
Editor window (including the area you can't see), especially
useful for undoing Fill or when you 'paint' by holding the
mousebutton down.
Map Properties. This allows you to put your name and a 3 line
description of the map, the length of each line is limited to 68
characters, this information is saved in the FMP file. Below is
how much memory each type of object is using in the map along
with the total space used for those objects. There are also a
variety of things you can fiddle with. The Alt Graphics: Load allows
you to add another set of graphics to support an 8bit display in
a truecolour map, if
Anim Preview is set to an 8bit mode, you can see them there... If you import
graphics, these will be freed. To make them: export tiles as a BMP, convert
to 8 bit, Load 8bit BMP as Alt graphics.
Map version allows you to select which FMP type is used, you can
freely change this at any time, FMP0.5 is most supported by
other libraries (check your playback library) but is limited
to 1024 tiles.
Colourkey allows you to choose the transparency colour for the map,
this is saved in FMP files.
You should ignore the clickmask, stagger and gap values for
normal rectangular tile maps.
A clickmask MUST be set for non-rectangular tile maps (like isometric)
you should set this to a number of a graphic tile that is a solid mask
for the shape of blocks. The gap values are the pixels between blocks,
the stagger values are the offsets of the odd rows.
Don't cache in VRAM allows you to stop a
playback lib using VRAM for certain graphics (like marker blocks), example:
1-20,28,30,35-40 would not load blocks 1 through 20, 28, 30, and 35 through
40 in VRAM, using sysmem instead. This feature requires a playback lib that supports it,
if it doesn;t the map will still work and this info will be ignored.
Anim preview (DirectX). Runs the map in fullscreen
DirectDraw using the settings from 'Preview setup'. You can
scroll around the map (starting at the point where the Map Editor
window is currently viewing) and see the animated blocks animating as
well as the transparency. Zoom and flipped tiles are not used in
this preview.
Preview setup. Select the screenmode you want to
use from the list, these are reported by DirectX so only valid
ones are shown, it defaults to whatever you set as apmode in
mapwin.ini, bpp is the depth of the map
pick whichever you like,
preferably the one your game is going to run in, beware that
running excessively high resolution modes on monitors not
designed for that mode may damage the monitor. Check the boxes
below for which block layers are drawn (the default is background
(BG) with the first foreground layer). Below are the transparency
options, check the box to enable transparency on the preview, if
you want a parallax layer (very handy for checking proper
transparency) enter the number of the GRAPHIC (this may not be
the same as the block number, 0 will be plain black or colour 0,
you can see what the graphic numbers are by editing a still
block, clicking on the BG image and looking at the list) this
will be repeated over and over in any transparent regions
(remember to check the BG transparency box, in the Block properties
editor) and move at half the speed
of the other layers creating a rather lovely effect. There is also a box
specifying the logic rate, leave this at 0 if you want the logic
to match the monitor refresh rate, or specify your own. If you are
making a game you usually can't rely on the refresh rate of the
monitor to regulate speed as it varies (so speed will vary on
different machines). Most games update internally at a set rate
(try 100fps) which unfortunately leads to jerkier movement but
at least the speed is the same on all machines.
Range Edit Blocks. Allows you to selectively
adjust a set range of block structures. It is simple to
use, type the numbers for the start and end of the range of blocks
you want to alter, then adjust ONLY the things you want to change.
If any of the checkboxes are greyed out, or the user fields are
completely blank the information in each block will be left
unaltered. For more information on these fields, see
Block Editor.
Resize Map. Allows
you to resize the map array of all layers. Before resizing it is
advisable to save the map as you can't Undo it (though you can
resize back to the original size). The Resize dialogue shows 9
buttons on the left which show which edges rows and columns will
be removed/added to, be sure that the Map Centering text at the
top shows the correct number (the default is 5, rows and columns
will be added/removed equally from all sides to make the new size
map). If you select centering as '1' (top left), columns will be
added/removed from the right and bottom edges. Select the new
size by entering the numbers in the width and height boxes, then
OK to resize, or Cancel to keep the old size.
Useful functions. Contains miscellaneous
functions:
Change block size/depth: Will destroy the current graphics
but keep all other data, you can then import the new size
graphics into the map (you can do this by exporting the current
graphics, resizing, then re-importing them.
Convert 16x16 blocks to 8x8 (GBA): 8bit only, download GBAMappy
to see how to use. Often used with the 'Export 16x16 GBA table'
custom export script.
Auto set BG transparency: Checks the BG transparency box for
every block that has any transparent colour pixels in the BG image.
Create map from big picture: Loads a large image file into the
current map (such as one exported as ?scrn.BMP), optionally
removing duplicate tiles. Select the option for full instructions.
Save FMP without graphics: Saves all information just like a
FMP file except the graphics (allowing sharing of graphics
between maps). The file is saved with a .FMA extension as
these maps are not FMP compliant. If you want to reload a
FMA file into MappyWin32 (1.4 and above only), load the
FMP with the graphics in first, then load the FMA file.
You will need to type the whole FMA name in the open
requester as FMA files are not shown (eg: level1.fma).
As only the graphics are missing, an FMA map can have
different blocks, map size, brushes, number of layers etc
to the FMP file it is using the graphics from.
In order to load an FMA file with a playback library, you
will either:
1) Modify it so the FreeAll function does not
free the graphics from the FMP file, then load the FMA
file with MapLoad, or:
2) Export the graphics as a .GFX file and modify the DecodeBGFX
function to load that after loading the FMA file, or:
3) Load the graphics from a BMP file or other.
You should consider exporting .MAR files instead as these
are supported by playback libraries.
Remove Unused or Duplicate. Useful when you have
completed a map and want to reduce its size. Make sure you have
a backup! If you select remove anims, any anims that aren't used
in the map will be removed, this probably won't save much space
on its own, but when you remove graphics you could save a lot
more, be careful, if you have made an anim sequence that is
inserted into the map in realtime by your game, it will still be
deleted if it is not in the map. Remove blocks removes any block
structures not used by the map array or anim sequences. Remove
graphics removes any raw graphics not used by block structures,
this will mean you can no longer update your graphics from your
original picture, export the blocks as a BMP if you need to
modify them after this. To check these savings, view Map
Information before and after doing this.
Show user info on tile. Lets you select
one of the Block Properties fields to show over the tile
graphic in the Map and Block Editor windows (if the field is
not 0). The value is truncated if it is too big to show on the
tile. See also: Using Marker Blocks.
Show Pillar bases only. On isometric maps
with risers, this toggles whether the whole riser is drawn
(obscuring parts of the map), or just the base.
Pillar Riser mode. Toggles riser mode,
see the Isometric section for details.
Flipped tiles mode. Toggles flipped tiles
mode, when enabled you can flip the tile graphics vertically and/or
horizontally in the block properties of each block. Most playback
libraries do not support this mode, used mainly for GBA development
and MappyGL. Flipped tiles
mode is not saved in the map file, if you use flipped tiles,
you can set this mode on by default in the mapwin.ini file.
Grid. This toggles between 'off', 'on1'
which is the default and highlights the block in the Map Editor
window the mouse cursor is over, and 'on2' which also puts a border
around the blocks in the Block Editor window. If you want to
grid all the blocks in the Map Editor window, see the
Using Marker Blocks section.
Zoom (x 0.25, x 0.5, x 1, x 2, x 4).
Zoom shows things at a quarter normal size at Zoom x 0.25,
half normal size at Zoom x 0.5, normal
size at Zoom x 1, twice normal at Zoom x 2, and four times
normal size at Zoom x 4.
Often you will have 'objects' that consist of several
blocks, maybe a house or road or something, there is an easy way
to put these in. First, put the blocks in the Map Editor as they
are supposed to be layed out, then
select Grab New Brush from the Brush menu, move the mouse pointer over
one corner of the object you want to pick up as a brush, then
hold down the left mouse button and move the mouse pointer to the
opposite corner, you will see a bounding box as you do this.
Release the left mouse button to finish picking the brush. You can
name/rename a brush at any time by selecting Rename Current Brush. Now
you will be able to paste the whole object anywhere on the map
with a single click, the block the mouse pointer is over will be
the corner of the brush specified by 'Handle'. You can reselect
the brush at any time by selecting it from the Brushes menu, they
are also saved with the map so you can use them when you load it
next time. You can Fill with a brush as
well, either tiling, or randomly, see Map Editor
Window. If you want to save a bit of space (and it will be a
very small amount) choose the Destroy All Brushes option.
Grab Brush. Works like Grab New Brush,
except it will replace the currently selected brush.
Grab brush from block sequence. Allows you
to make a brush from consecutive block structures without having
to get them from the map.
Disable brush transparency. When selected,
means that block 0 parts of the brush will overwrite when pasted
rather than not affecting the map.
Handle. Selects which corner of the brush
is under the mouse pointer when it is placed in the map (useful
for pasting the brush partially on the map).
Brush. A list of the 16 brushes that can
be created per map. Selecting a brush lets you paste it in the
Map Editor window.
Rename current brush. Lets you rename
the currently selected brush.
Destroy all brushes. Destroys all brushes
in the map saving a (very small) amount of space.
There are two different layer systems in Mappy, one is
Block Layers, which are the four layers associated with Block
Properties, the other is Map Layers, which is what this menu
manipulates. Map Layers are identical in size and shape to the
numbers you specified in New Map's map width and map height. The
idea is you can use a layer for games objects (like pickup items)
or perhaps changes in a level when a lever is pulled in the game.
The options in this menu are fairly self explanatory. If you just
want to do a load of levels for a game with the same graphics and
blocks, you can export the map array (the current layer) as a .MAR
file and this
will be much smaller than a whole .FMP file.
You can export and import layers as .MAR files, but
the map you are working on MUST have identical blocks and be the
same size. This is handy if you are doing a 100 level game as
Mappy only handles 8 layers internally. Most playback libraries
have a 'MapLoadMAR' function or similar to load new levels after
loading the main FMP file for unlimited layer support.
Add Layer. Adds a new layer and makes it
the current layer.
Duplicate Layer. Adds a new layer, copies
the current layer to it and makes the new layer the current layer.
Delete Layer. Deletes the current layer.
Clear Layer. Clears the current layer to
block 0. You can fill the layer with a different block with the
'f' key.
Slide layer. Slides only the current layer
in four directions, with optional wrapping, you can use 'undo'
afterwards if you make a mistake.
Adjust values. (advanced), changes the
block numbers in the current layer by a requested amount.
Remove marker graphics. Deletes graphics
used by blocks on this layer, see also
Using Marker Blocks.
Layer (0 to 7). Select which layer to
edit in the map.
Onion Skin. Allows you to see transparently
through a layer to one other selected layer. It's best to keep this
feature off if you aren't using it. The current layer (ie the one
which has the tick next to it in the layers menu) is the top
layer which will be the one altered. The background layer is
selectable in the Onion Skin dialogue and will be shown behind
the current layer, you can optionally make this appear darker so
the current layer stands out more. The background layer is drawn
as a guide and will not be altered when you are editing the
current layer. Remember to switch it off when you've finished,
and selecting a layer that doesn't exist for the background is
not advisable :) Loading a map will switch off onion skin.
Mousebuttons. You can define which action
each button performs. Drag map allows you to scroll the map
by holding the button and dragging the mouse over the Map Editor
window. Placer.lua runs the Placer.lua script in the luascr folder.
Lua scripts. Newly added in 1.3.22, you can write scripts to perform
functions in the editor such as exporting/importing graphics, maps
and other data from custom formats, performing a custom task and
many other things. The scripts are written in a language called LUA
(see www.lua.org), see the copyright notice in the luascr folder.
The scripts must be put in the luascr folder, and you need to set
the LUA values in the mapwin.ini file to add them to the Custom menu.
Alternatively, you can drag and drop a file ending with '.lua'
onto MappyWin32 to run it.
I have included some example scripts in the luascr folder, look
at them in a text editor
to see how they work, I am a novice with Lua, so they are quite
basic. Load a test map and run them to see what they do, most of them
give a brief summary of what they so before they start.
You do not need to restart Mappy if you modify a script.
MappyWin32 extends LUA with these functions (don't forget
to prefix functions and values with 'mappy.' see the .lua files in
the luascr folder):
getValue (VALUE_ID)
where VALUE_ID is one of:
MAPWIDTH,
MAPHEIGHT,
BLOCKDEPTH,
BLOCKWIDTH,
BLOCKHEIGHT,
NUMBLOCKSTR,
NUMBLOCKGFX,
BLOCKGAPX,
BLOCKGAPY,
BLOCKSTAGGERX,
BLOCKSTAGGERY,
CLICKMASK,
TRANS8,
TRANSRED,
TRANSGREEN,
TRANSBLUE,
CURLAYER,
CURBLOCK,
CURANIM,
CURBRUSH,
MOUSEBLOCKX,
MOUSEBLOCKY,
GETBLOCKMODE,
PALETTEARGB+index
setValue (VALUE_ID, SETVALUE)
where VALUE_ID is one of:
TRANS8,
TRANSRED,
TRANSGREEN,
TRANSBLUE,
PALETTEARGB+index
getBlock (X, Y [,L])
where X is the x coord in blocks,
and Y is y coord in blocks, L is the optional layer number, omit it for current layer
setBlock (X, Y, B [,L])
where X is the x coord in blocks, and Y is y coord in blocks, and B is the block index,
L is the optional layer number, omit it for current layer (see 'Solid rectangle.lua' for an example)
getBlockValue (B, VALUE_ID)
where B is the block index, and VALUE_ID is one of:
BLKBG,
BLKFG1,
BLKFG2,
BLKFG3,
BLKUSER1,
BLKUSER2,
BLKUSER3,
BLKUSER4,
BLKUSER5,
BLKUSER6,
BLKUSER7,
BLKFLAG1,
BLKFLAG2,
BLKFLAG3,
BLKFLAG4,
BLKFLAG5,
BLKFLAG6,
BLKFLAG7,
BLKFLAG8
setBlockValue (B, VALUE_ID, VALUE)
where B is the block index, and VALUE_ID is one of:
BLKBG,
BLKFG1,
BLKFG2,
BLKFG3,
BLKUSER1,
BLKUSER2,
BLKUSER3,
BLKUSER4,
BLKUSER5,
BLKUSER6,
BLKUSER7,
BLKFLAG1,
BLKFLAG2,
BLKFLAG3,
BLKFLAG4,
BLKFLAG5,
BLKFLAG6,
BLKFLAG7,
BLKFLAG8
and VALUE is the value to write (flags are 0 or 1) see 'Tile graphic test.lua'
copyLayer (SOURCE, DEST)
where SOURCE is the layer to copy from (0 to 7 or MPY_UNDO), and DEST is the
layer to copy to (0 to 7 or MPY_UNDO) if you are changing the current layer, use:
mappy.copyLayer(mappy.getValue(mappy.CURLAYER),mappy.MPY_UNDO)
to enable undo.
updateScreen ()
call this to refresh the display after altering a layer
createBlock (B)
where B is the block index to insert the new block at
deleteBlock (B)
where B is the block index to remove
createGraphic (G)
where G is the graphic index to insert the new graphic at
deleteGraphic (G)
where G is the graphic index to remove
In the following A is Alpha, R is Red, G is Green, B is Blue, all values between
0 (none) and 255 (max), 0 Alpha is transparent, 255 is solid.
A,R,G,B = getPixel (X, Y, G)
where X, Y is pixel coord within the graphic, G is the graphic index
setPixel (X, Y, G, A, R, G, B) or
setPixel (X, Y, G, INDEX)
where INDEX is the palette index 0 to 255)
R = msgBox ("TITLE", "MESSAGE", TYPE, ICON)
where TYPE is one of:
MMB_OK,
MMB_OKCANCEL,
MMB_YESNOCANCEL,
and ICON is one of:
MMB_ICONNONE,
MMB_ICONINFO,
MMB_ICONQUESTION,
MMB_ICONEXCLAMATION
returns one of:
MMB_CANCEL,
MMB_YES,
MMB_NO
R, "FILENAME" = fileRequester ("PATH", "DESCRIPTION", "EXTENSION", TYPE)
where PATH is the starting folder (try "."), DESCRIPTION is what
appears in the 'Save as type' box, EXTENSION is a properly formatted mask
for file extensions (ie: "*.FMP" or "*.FMP;*.MAP"). And TYPE is either
MMB_OPEN or MMB_SAVE
returns R, either MMB_OK or MMB_CANCEL, also "FILENAME"
R = doDialogue ("TITLE", "MESSAGE", "STRING", TYPE)
where TYPE is either MMB_DIALOGUE1 or MMB_DIALOGUE2, type 1 returns
MMB_OK or MMB_CANCEL and one string, type 2 returns MMB_OK or MMB_CANCEL
and as many strings as there were commas plus 1 (ie: hello,1,2,3 would
return four strings "hello" "1" "2" and "3")
R = shiftVal (VALUE, SHIFT) negative shift is left, positive is right
R = andVal (VALUE1, VALUE2)
R = orVal (VALUE1, VALUE2)
This is a list of shortcut keys, excluding those listed next
to items in the menus (see the menus for these):
f = fill area with current block/brush (from mousepointer)
ctrl+f = fill area with current brush randomly (from mousepointer)
l = draw a line from last placed block to mousepointer (8 directions)
o = toggle picklayer (isometric)
p = pick (select) current block/anim from under mouse pointer
, = (comma) select previous numbered block/anim
. = (fullstop) select next numbered block/anim
cursor keys = scroll map
You can also set the function keys and number keys (main keyboard)
to any function you want, you will need to change the values in the
mapwin.ini file to any of these values (so keyF2=400
will run the first lua script in the custom menu when F2 is pressed,
keyF3=124 will change to layer 1 when F3 is pressed etc):
LUA01 400,
LUA02 401,
LUA03 402,
LUA04 403,
LUA05 404,
LUA06 405,
LUA07 406,
LUA08 407,
LUA09 408,
LUA10 409,
LUA11 410,
LUA12 411,
LUA13 412,
LUA14 413,
LUA15 414,
LUA16 415,
TOOLSAVENOGFX 177,
FILEEXPORTTEXT 176,
CUSTOMBUTTONS 175,
TOOLIMPORTBIG 174,
TOOLUSERINFO 173,
LAYERDUPLICATE 172,
TOOLFLIPTILES 171,
TOOLZOOM025 170,
TOOLZOOM05 169,
TOOLRESIZETILES 168,
TOOLAUTOBG 167,
TOOLLINE 166,
BRUSHGRABNEW 165,
LAYERADJUSTVALUES 164,
LAYERREMOVEMARKERS 163,
BRUSHHANDLEBR 162,
BRUSHHANDLEBL 161,
BRUSHHANDLETR 160,
BRUSHHANDLETL 159,
TOOL16X16TO8X8 158,
LAYERSLIDE 156,
PICKLAYER 155,
TOOLPILLARS 154,
TOOLREVEAL 153,
FILEIMPORTALT 152,
BRUSHRENAME 151,
BRUSHGRABBS 150,
BRUSHGRABNT 149,
TOOLRANGE 148,
LAYERCLEAR 137,
LAYERONION 147,
TOOLZOOM4 146,
TOOLZOOM2 145,
TOOLZOOM1 144,
TOOLREMOVEUNUSED 141,
BRUSHDESTROY 140,
TOOLANIMSETUP 139,
TOOLANIMPREVIEW 138,
EDITUNDO 135,
TOOLFILLRANDOM 210,
TOOLFILL 209,
TOOLINFO 134,
TOOLGRID 208,
FILEEXPORT 133,
TOOLRESIZE 132,
LAYER7 130,
LAYER6 129,
LAYER5 128,
LAYER4 127,
LAYER3 126,
LAYER2 125,
LAYER1 124,
LAYER0 123,
LAYERDELETE 122,
LAYERADD 121,
PICKBLOCK 207,
BLOCKNEXT 206,
BLOCKPREV 205,
ARROWRIGHT 203,
ARROWLEFT 202,
ARROWDOWN 201,
ARROWUP 200,
HELPABOUT 120,
HELPCONTENTS 119,
BRUSH16 315,
BRUSH15 314,
BRUSH14 313,
BRUSH13 312,
BRUSH12 311,
BRUSH11 310,
BRUSH10 309,
BRUSH9 308,
BRUSH8 307,
BRUSH7 306,
BRUSH6 305,
BRUSH5 304,
BRUSH4 303,
BRUSH3 302,
BRUSH2 301,
BRUSH1 300,
BRUSHGRAB 110,
EDITPASTE 109,
EDITCOPY 108,
EDITCUT 107,
EDITNEW 131,
FILEEXIT 106,
FILEIMPORT 105,
FILEIMPORTAT 136,
FILESAVEAS 104,
FILESAVE 103,
FILENEW 102,
FILEOPEN 101
I have designed Mappy to hopefully be expandable,
produce small mapfiles with lots of features, and most
importantly be fast and easy to playback. The FMP format (how the
maps are stored) is a 'chunk' based format which allows all the
information for the map (graphics, array, anims, block data etc)
to be stored in a single file, you can also add your own chunks
to this file if you want, more details in FMP
file format.The playback libraries
then provide functions to load and play the map within your game.
MappyWin32 can also read and write custom MAP formats, see
Using Mappy as a simple map editor and
export map information as text for GBA etc.
The map editor comes in several versions, this
documentation is concerned with the Win32 version. To make a FMP map
from scratch, you will need to make, or get some 'tile graphics'
(if you don't know what some of these terms mean, see the glossary) and
import them into a map (see next section). It is important to be
aware of the hierarchy of the objects within Mappy, you have the
top level which is the Map Array
(this is shown in the Map Editor window), the elements in that
are short int offsets to either Block
Structures if they are positive, or Anim
Structures if they are negative, Anim
Structures contain offsets to Block
Structures, Block Structures
have 4 offsets to the Graphics Blocks
(amongst other things).
MapArray ------> Block Structures --------> Graphics Blocks
......\............................/
........\Anim Structures/
That's about as much as you need to know if you don't intend adding your own objects, linked lists etc and are going to use the playback libraries.
MappyWin32 can import the following graphic formats:
8bit (paletted) maps:
BMP - 8bit (uncompressed)
PCX - 8bit
PNG - 4bit and 8bit (4bit is converted to 8bit on importing)
TGA - 8bit
Transparency is by a nominated palette index in MapTools:Map Properties
15/16/24/32bit (truecolour) maps (graphics are converted to the map depth on importing):
BMP - 8bit (uncompressed) and 24bit
PCX - 8bit and 24bit
PNG - 4bit, 8bit, 24bit, 32bit
TGA - 8bit, 24bit, 32bit (with alpha on 32bit maps)
Transparency is by a nominated RGB value in MapTools:Map Properties
Alpha channel is only supported in 32bit maps, and where a playback
library supports it (eg: MappyGL). Alpha channel is not shown in MappyWin32.
Mappy is designed for creating and editing FMP maps, these have all
the features listed in the features section, and this
is the format supported by the playback libraries. However, sometimes you may
want to use a simpler format, and in Mappy this is MAP.
New in version 1.2 of MappyWin32 is the ability to edit
'simple' maps. These maps lose nearly all the features of FMP, but
you can use them without a playback library, often with the built-in
functions of other packages. These maps have the .MAP extension,
rather than .FMP, and only contain the width and height of the map array
(optional) and the map array itself in a format of your choosing. When editing
a MAP you should not use features of Mappy that can't be saved in a .MAP
(such as animated blocks and block properties) as these will be lost
on exit. To configure the format of the .MAP files see the
MAP format section.
To create a new simple MAP, ensure you have set the correct format (see
mapwin.ini) and use New Map from the File menu. Next,
select Import from the File menu, and choose your image file with the blocks in.
You can now edit the map. To save a
MAP rather than a FMP, simply select 'Save as' from the
File menu, but type the name to save with a .map extension, for example
level1.map you will be notified you are saving a MAP. That's it!
You can now use the 'Save' option to save your map with the same name. Please
note that if you have a negative adjustment when you save the map, any blocks
that would be made negative become 0, for example, with -1 adjustment, block 0
will not change on save, all others will become 1 less. On load, all become +1
so there will be no block 0. This may sound confusing, but really it just means
block 0 will become block 1 so don't be surprised when you reload the map (block
0 is not valid with -1 adjustment) try it and you'll see... If you want to avoid
such confusion, simply fill the map with block 1 at the start.
Using the .map format you can create files compatible with CDXMap, CDXIsoMap,
and many other custom formats.
To load a .MAP, simply select Open from the File menu and open it. For the
tiles, Mappy will try to load the mapdefBMP specified in mapwin.ini, if that
doesn't exist, it will try the map name with a .BMP extension (so
level1.map will try level1.bmp in the same folder),
if these don't exist it will ask you for a BMP file to use.
Most of the rest of this documentation is to do with FMP files, which have
much more advanced features, so if you are just doing a MAP they are not relevant.
If neither .MAP or .FMP are suitable, you can write a
lua script to import and export data in a custom format.
The difference between this and the older FMP format is that this allows up to 30000 blocks, rather than 1024. Also, wherever a value was saved as a byte offset, it is now a 'unit' offset. The downside is you need a playback library that supports FMP1.0. You can freely change between FMP versions in MapTools>Map Properties as long as you have 1024 blocks or fewer.
This is a new feature added in version 1.3 of MappyWin32. If you are
making a map with non-rectangular tiles there are a few things you should be
aware of. Firstly, they are always drawn transparently (obviously), so if you use
block 0, this will leave trails when you scroll in Anim Preview or a playback library, so
it is best not to use block 0, fill the map with block 1 at the start. Next, you will need a playback
library that supports FMP1.0 (this should be clearly stated in the playback library),
even though you can save as FMP0.5. The 'clickmask' MUST be set in MapTools>Map Properties.
This should be the number of the graphic to detect transparent areas which allows the
editor to let you click tiles pixel-perfectly, normally 1 or 2. If you are editing a
.MAP rather than a .FMP, you should set the values correctly in
mapwin.ini for stagger and clickmask. The Block Parallax
functions are not supported. Non-rectangular tiles also take longer to draw.
As from version 1.3.1 Mappy now supports true isometric. This means that you can have
scenery that appears to rise out of the ground, and will be properly depth sorted
with both other scenery and sprites etc you may have in your game. In order to do
this, there is now a new mode which you must set by selecting MapTools:Riser mode.
To make a pillar you must first create a new block (Ctrl+N),
then select a BG graphic as usual, but the FG fields now work differently.
FG1 will overlay BG, FG2 will appear immediately above FG1, and the FG3 will
appear above FG2 (rather than overlaying it). What's that? It's not tall enough?
That's OK you can create a chain of blocks to stack on top of each other which
will be treated as just one pillar. To do this, simply check the left most of
the three 'other' boxes and the following block will be used to continue the
pillar. Any blocks which are attached will treat BG as an FG field. Attached blocks
will have a red border in the Blocks window (if Grid is on), indicating you
shouldn't use them directly.
Isometric can be quite tricky to do, so I'd recommend looking up some information
about it on the 'net. Not all block sizes tile properly, 64x31 with block gap
64x32 and block stagger 32x16 works well. I'll probably do a proper Mappy
Tutorial for Isometric at some point in the future...
Version 1.3.6 now allows you to draw the left or right half of pillars by checking
the 2nd (for left) or 3rd (for right) boxes of the 'Others' in block properties.
See iso_lr.fmp for an example, and iso_lr.bmp (in maps) to see the graphics I used.
This is common for isometric as it vastly reduces overlapping.
Also in 1.3.6 you can now specify a 'picklayer' in mapwin.ini
to allow easier picking of pillars (the blocks window is a bit confusing). Create
the picklayer just like a normal layer (in layers menu) and place your pillars on it.
Change back to your original layer, then just
press 'o' (the letter, not zero) to toggle between current layer and picklayer, move
mouse to base of pillar you want then press 'p', then 'o' again to return.
I added Isometric to MappyWin32 as it was requested and easy to do, however there
are a couple of things which may be worth noting, and if they are a problem, you
should perhaps try a different isometric editor. The first is that the isomaps
are stored staggered, rather than the more common and easier to use rotated diamond
shape maps which means pathfinding etc in games is trickier to implement. You
could write a lua script to save as a diamond shape map. The
second is that the pillars are made out of block sized parts.
Here is some brief information on using the staggered row maps produced by Mappy.
A staggered row map has all the odd rows offset by an x and y stagger value which
allows you to make hexagonal and isometric maps. This document is most helpful
if you are using a 'sprite array' see Mappy Tutorial 1, or the isometric examples
in MappyAL or MappyDX for more info on sprite arrays.
First, hex maps, here is a diagram
showing how to get to an adjacent hex from a hex at x, y (block coords, as shown in
Mappy's titlebar). There are two diagrams, use whichever your hexes resemble:
So, to get from x, y to the adjacent hex to the right and above, use a bit of code
like this:
int a = 1-(y&1);
x = (x-a)+1;
y = y-1;
To convert your block coords to pixel coords, use:
px = x*mapblockgapx;
py = (y/2)*mapblockgapy;
if (!(y&1)) { //an even (not staggered) row
// start of the map (0,0) is offset by the stagger values
px -= mapblockstaggerx;
py -= mapblockstaggery;
}
px += mapblockwidth/2; // centre of block
py += mapblockheight/2;
So now if you draw a pixel at px-scrlx, py-scrly (where scrlx and
scrly are the coords you pass to MapDraw) it should be in the centre
of the block.
The most common type of isometric map is the rotated/diamond type, but Mappy
produces a staggered row isometric map. If you really want to use a rotated/diamond
type you can change the playback libs to convert them on loading. Here's how they
compare:
To move one block in any direction use the following guide:
So, to get from x, y to the adjacent iso to the right and above, use a bit of code
like this (same as for the hex maps):
int a = 1-(y&1);
x = (x-a)+1;
y = y-1;
To convert your block coords to pixel coords (same as for the hex maps), use:
px = x*mapblockgapx;
py = (y/2)*mapblockgapy;
if (!(y&1)) { //an even (not staggered) row
// start of the map (0,0) is offset by the stagger values
px -= mapblockstaggerx;
py -= mapblockstaggery;
}
px += mapblockwidth/2; // centre of block
py += mapblockheight/2;
So now if you draw a pixel at px-scrlx, py-scrly (where scrlx and
scrly are the coords you pass to MapDraw) it should be in the centre
of the block. If you are using a sprite array MapDrawRow is usually better.
Before spending hours on a huge project it is important
to think about various aspects of it, what size are the tiles
going to be? What resolution(s) and colour depth(s) is the game
going to run in? What sort of view is it going to have (overhead,
side, oblique, isometric)? How are the other game objects going
to interact with the map? If you haven't done many tile based
games before, it may be best to do a very simple pacman or
shootemup project, just to get the hang of things.
I would recommend
that the width of the tile is a multiple of 4 (better memory
alignment), try 16pixels wide by 16pixels high for low res games
(320*240, 320*200) or 32*32pixels for 640*480 screen resolutions.
Remember that computers are advancing all the time, try to
support multiple colour depths and resolutions (if you think it's
worth it), also consider doing your map in 24bit colour even if
you are aiming for a 16bit screen, with an option to select any
high colour depth, MappyDX supports colour conversion, check the
docs for the other libs, of course, 24bit colour uses more disk
space than 16bit. If you are aiming for a lowspec machine with a
low resolution (such as VGA 320*200) use the Zoom option to get a
better idea of the graphic size in Mappy, also if you know you
aren't going to be able to access the video acceleration on the
videocard (for example using VESA under DOS) bear in mind there
will be a huge performance hit (the Anim Preview in MappyWin32
uses DirectDraw blitter acceleration found on almost all graphic
cards)...
The FMP file is ready to use from the first time you save
it, so it makes sense to develop your game code at the same time
as the map so you can see how things work and how fast they go,
also remember to adjust the preview setup in MappyWin32 to the
screen res. you are going to use...
When making your graphics for tiles, use a picturesize
that is a multiple of the tilesize, for example 32*32 and 16*16
tiles fit nicely on a 640*480 or 320*240 picture.
These are blocks which can be used to identify
properties in the map. You can use the fields in Block
Properties to indicate what a block does, which is
parsed by your game. Usually you make some tile graphics
with symbols on them for marker blocks, such as an arrow
pointing left to show this block would push you left,
or a start location graphic. Use the transparency colour
to let you overlay them on other tiles.
Normally, you would not want these symbols to be
visible in your game, just the editor. A good way to do
this is to use the FG3 field in a block's properties,
which will show up in the editor, but not in your game
if you don't draw the FG3 field. Alternatively, you
can make a new layer (from the Layers menu), use onionskin
and put your marker blocks on this 'object layer'. Your
game can then parse this layer to find where objects start.
When you finish your map, you can remove these marker
graphics with 'Remove marker graphics' from the Layers menu
if you want.
Another way to see what properties a block has is
to use 'Show user info on tile' in the MapTools menu.
This will overlay one of the block properties fields
on the tile.
Tip for a grid overlaying your whole map: Make one
of your tile graphics the transparent colour, with a dashed
line on the right and bottom edges. In your map, use 'Range
Edit Blocks' from the MapTools menu, and set the FG2 field
to the graphic number for all the blocks. To remove the
grid, Range Edit the FG2 field back to 0.
Tip to find what graphic number a tile is: Click
the icon above 'BG' in a block's properties, find the
graphic you want and click it, note the number and click
'cancel' so you don't change the block.
Tip: Creating new blocks (ctrl+n) uses only 32 bytes
per block, you can edit the properties and share graphics
with other blocks.
See 'Mappy Tutorial 1' for more information about
marker blocks, it can be downloaded from www.tilemap.co.uk
Download GBAMappy at www.tilemap.co.uk for full examples, sourcecode and tutorial on how to do this. In brief:
Remember, setting flippedtiles=1 in mapwin.ini (remember to restart mappy) or selecting 'flipped tiles mode' from the MapTools menu lets you use flipped tiles
in the 'Block Properties' dialogue (copy a block with ctrl+c then double click it and change it):
Also, remember, MapTools:Anim Preview will not show the tiles flipped
You can change the csvadjust value in mapwin.ini to adjust numbers up and down
Make a FMP map in 8bit with either 8x8 or 16x16 tiles.
SAVE the original FMP map, you will probably want to keep this for further editing etc
If you used 16x16 tiles, and you want to have an 8x8 map, when you want to export use Maptools:Convert 16x16... (may take several seconds).
You can keep your map as 16x16 though if you want, each graphic tile will then be exported as 4 consecutive 8x8 tiles in blockgfx (so for each tile 4 graphics will need to be set)
I found keeping 16x16 tiles to take up the least space in most cases as an 8x8 map requires 4 times the memory for the array
Select MapTools:Remove Unused or Duplicate, if you have flippedtiles=1 in mapwin.ini even flipped duplicates are removed and flip bits set which can save a lot of tiles if you have planned your graphics
Select File:Export: and tick 'Data as text' then OK
Select preferred options then OK, note the filename ending in .txt
Some of the following information is as yet untested, so maybe some mistakes:
Copy the .txt file and gbamappy.h to your source directory
You can now add this include to your GBA source file:
#include "mapdefs.h"
#include "filename.txt"
If you chose 2D array and have no anims you can access the map like this (maparray will have a layer number after it if you chose 'all layers' eg: maparray0[y][x]):
tileindex = blockstr[maparray[y][x]].bgoff;
If you don't export block structures, the bg field will be used in maparray (Auto resolve BG), you can use maparray[y][x] as your tileindex
If you enable 'merge flipbits' these will be merged to bits 10 and 11 of the tile fields of the block structures, or if you don't enable the block structures the flip bits will be merged with the BG field and written into the maparray
Tip:You could specify the bank number in a user field to choose a different colour set for a tile with same graphics
Tip:If you uncheck the 'Anim and Block structure data' box, the maparray will autoadjust to store the tileindex (with flipbits if you also check 'merge flipbits' and bank number if 16 colour tilesfrom the User7 field)
If you have animations, use this
if (maparray[y][x]<0) tileindex = blockstr[animseq[animstr[-maparray[y][x]].ancuroff]].bgoff;
else tileindex = blockstr[maparray[y][x]].bgoff;
If you want code to get the map to animate, adapt the MapUpdateAnims function from MappyAL (easy)
256 colour tiles: tileindex*64 is the byte offset for the tile graphics in blockgfx[] (as each tile graphic is 64bytes)
16 colour tiles: tileindex*32 is the byte offset for the tile graphics in blockgfx[] (as each tile graphic is 32bytes)
flip information is held in the unused2 (fliph) and unused3 (flipv) fields of blockstr[?]
Important. Although the blockgfx are saved as unsigned char, you need to write them to GBA video memory 16bits at a time, cast it to unsigned short.
I made a test GBA application with devkitadvance and it seemed to work fine. If any GBA developer would like to provide a proper example it would be appreciated. Also note the utility FMP2GBA available from www.gbadev.org
A large part of Mappy are the playback libraries, these allow you to easily load, manipulate, display, animate and scroll maps stored in .FMP files with a few simple function calls. You can get these from the Mappy Homepage, all source is supplied so you can modify them as you like. At the time of writing, there are MappyDX, for C++ compilers with the DirectX SDK, this editor uses a modified version for its Anim Preview, MappyAL (older versions were called MappyPB), MappyJV, MappyGL, CDXMappy and SDLMappy and many others. Visit www.tilemap.co.uk for a full list. You do not have to use these libraries, you could write your own, but they are very convenient.
The playback libraries are also an excellent way to add more abilities to the editor. For example, you could build a sprite editor with them for your game.
This is technical information about the FMP file structure.
You do not need to know this if you are using the playback libraries
The first 12 bytes are as follows:
4bytes ASCII = 'FORM'
long int = size of file less header (which is filesize-8)
4bytes ASCII = 'FMAP'
NOTE: The chunk size long ints like the one above are stored in Motorola
format, NOT Intel. You will have to byteswap to get the correct value, ie:
Bytes 1,2,3,4 need to become 4,3,2,1.
The chunks in the file follow on one after the other, and consist of an 8byte
header, and the information specific to that chunk. See how the playback source reads
in the information. The chunks can be in any order, and some chunks may not
be used in a particular file. Also, don't rely on chunks being a certain size, for
example the MPHD is now 4 bytes bigger than in the last version
Chunk header:
4bytes ASCII = ChunkID (example: 'MPHD')
long int = size of chunk data less header
These are the chunks as of V1.2:
ATHR - Up to 4 ASCII strings of author information, separated by 0 values,
always an even size.
MPHD - Map header, see struct in the editor source download
EDHD - Editor information, see struct in mappy.c
CMAP - Colour palette for 8bit maps, red byte, green byte, blue byte for
however many colours are needed (so usually 256*3 bytes).
BKDT - Block data. Contains BLKSTR structures for however many block
structures were made.
ANDT - Animation data. Contains ANISTR structures for however many
animation structures were made, and also animation data.
BGFX - The raw graphics in whatever format the map is in. Examples: 8bit:
mapwidth*mapheight bytes per block, in forward format *numblocks
16bit: mapwidth*mapheight*2 bytes per block, each word contains
5 bits red, 6 bits green, 5 bits blue.
BODY - An array of short ints containing positive offsets into BKDT, and
negative offsets into ANDT.
LYR? - Where ? is an ASCII number form 1 to 7. These are the same size and
format as BODY, and allow object layers to be used.
You can add your own chunks to a map file, if you load it into mappy,
when you save it, those additional chunks will be saved in the file, but
not necessarily in the same place as before.
FMP1.0 notes:
This is very similar, but the values in all the chunks refer to units rather than bytes,
ie. in BODY 0,32,64,96 would be 0,1,2,3 in FMP1.0.
MAP is a user definable format which you can use for basic maps. To
define the format you need to change the maptype line in the
mapwin.ini file to how you want it. It is also recommended to change importskip=0.
The values are between the quotes and the
default: "LW4H4A4-1" is the usual format for CDX maps. What is this
cryptic rubbish? The first letter is either L or M and specifies the endianness
of the MAP file, for Intel this is L, for Motorola M. The next parts are letters
followed by numbers, currently you can have:
W = Width of map in blocks, the next number is size of this field in bytes
H = Height of map in blocks, the next number is size of this field in bytes
A = map array, the next number is size of each cell in bytes, the number after
that is the adjuster, if the blocks look wrong, you can adjust them up or down
to match them up, -1 normally compensates. The array is stored in plain number=block
form and all layers will be saved consecutively.
So, for example, if I ONLY wanted the map array in bytes I might use
"LA1-1". This means L=Intel format, A1-1=Array 1 byte per cell,
with -1 adjustment. If I wanted to be strange I could have "MW2W4H4H2A20"
which is M=Motorola format, W2=Width as 16bit, W4=Width as 32bit, H4=Height as 32bit,
H2=Height as 16bit, A20=Array 16bits per cell, 0 adjustment.
It is very important to set the other 'map' values correctly in the
mapwin.ini file.
maptype = "LW4H4A4-1"
It is vital to set mapdefw to the width of your map (in blocks) when working with MAP files which DON'T contain map width (W)
mapdefw = 100
It is vital to set mapdefh to the height of your map (in blocks) when working with MAP files which DON'T contain map height (H)
mapdefh = 100
It is vital to set mapdefbw to the width of your tiles (in pixels) when working with MAP files, the exception is when it is 0 where a requester will be used every time a .MAP file is opened
mapdefbw = 32
It is vital to set mapdefbh to the height of your tiles (in pixels) when working with MAP files
mapdefbh = 32
It is useful to set mapstaggerx to the odd row offset (in pixels) when working with Isometric MAP files
mapstaggerx = 0
It is useful to set mapstaggery to the odd column offset (in pixels) when working with Isometric MAP files
mapstaggery = 0
It is useful to set mapclickmask to the block for the mask when working with Isometric MAP files
mapclickmask = 0
If you want to, set this to your tiles bitmap for MAP files, see
Using Mappy as a simple map editor
mapdefBMP = "nodefault.bmp"
The mapwin.ini file is in the same folder as the mapwin.exe file (the MappyWin32 map editor). Use Notepad or another plain text editor to change the values of the settings then save, normally you can double click .ini files to edit them (if the '.ini' part of the name is hidden, this is the file called mapwin with an icon that looks like a document with a gear in the corner). You must restart MappyWin32 to use the new settings (not the whole computer, just Mappy). mapwin.ini is now fully documented so read it for more information.
Anim Structure a 16 byte structure and
associated list of frames (Block Structure offsets) of unknown
length
Block I have tried to make 'block' mean
the block structures for this documentation
Block Editor The window that allows you
to select and edit both still and animated blocks. Right clicking
the mouse on it toggles between still/animated
Block Structure a 32 bytes structure
that acts as information about a particular block, it is
referenced by the Map Array and Anim Structures, and in turn
references the raw Tile Graphics
BMP Standard Windows graphic file format,
MappyWin32 only imports and exports 8bit and 24bit uncompressed
versions (Other colour depths are imported/exported as 24bit)
currently
FMP Flexible MaP format, a collection of
all the information needed to render and animate a map for a
game.
FMA A FMP file, but without the graphics
(BGFX).
MAR A map array file.
MAP MAP format, a very basic user defined
format for compatibility with other systems
Graphics Blocks See 'Tile'
Map Array an array of short int (16bit)
values that reference Block Structures (when positive) and
Anim Structures (when negative). There can be up to 8 layers of
this array by using the Map Layers
Map Editor The window where you fill in
the map array using the various tools provided
Map Layers There can be up to 8 layers of
the map array for objects, ingame changes, etc. Normally you
would only have 1 or 2 layers. These can be selected and changed
in the Playback Libraries
Mappy A 2D tile map editor with lots of
features, this is the Win32 version but there is also a DOS and
WinAllegro version
Playback Library these are available
separately for free at the Mappy homepage, there are several
versions for different platforms, they provide an easy way to
access the map in your game
Tile I have tried to make 'tile' mean the
raw graphics the block structures use for this documentation
Tile Graphics All the graphics
information for the map
1.4
Convert 16x16 blocks to 8x8 now orders blocks differently in flipped tiles
mode (for island16b in GBAMappy release 2)
Export GBA 16x16 table LUA script corrected (again)
New copyLayer and updateScreen functions available to lua scripts
Some Lua scripts modified to support undo and screen update
New Lua script 'Show mouse coords'
You can now drag and drop .lua scripts on the editor to run them
You can set wlayout to -1 in mapwin.ini to stop windows autoresizing
New Map now goes straight to easy map dialogue
Import now uses default options (change with 'simpleimport' in mapwin.ini)
Added 'Save FMP without graphics' to Useful functions
Documentation updated
1.3.27
Autofringe LUA script modified with different order blocks (see GBAMappy)
Export GBA 16x16 table LUA script corrected
Map limits removed (now warnings)
textfile blockgfx export fixed for bitdepths above 8
textfile cmap type fixed
1.3.26
Stopped drag and drop renaming the map with non-map files
Fixed Custom menu names on scripts over 8
Fixed 16 colour tiles GBA text output (was reversed)
Fixed remove unused/duplicate with flipped tiles
PNG support for 4,8,24 and 32 bit PNG files
New option File:Export textfile
Textfile output updated
New Lua scripts:
*Autofringe by Robert Edwards (use a 32x32map made with images/fringe.tga)
*Read textfile
*Export GBA 16x16 table (for use with forthcoming GBAMappy)
1.3.25
Bugfix release to fix reading of mapwin.ini
1.3.24
MapTools:Show info on tiles now works (select it and see)
Map name in titlebar (tbarname in mapwin.ini)
.CSV values now taken from BG by default (csvusebg in mapwin.ini)
Number keys now work like functionkeys (see mapwin.ini)
Map Editor window now updates while dragging scrollbars (thumbtrack in mapwin.ini)
New example LUA script 'Merge layers.lua' (custom menu)
Placer.lua can be used for placing blocks
Can set mousebutton behaviour in custom menu (including drag map)
Mousewheel now scrolls blockwindow (unpressed), and current block (pressed)
Remove duplicate is much faster and 'MapTools: Import big picture' improved
Other tweaks and fixes
1.3.23
Added showuser to the mapwin.ini file, you can now view a user field
overlaying the blocks in the map window (useful for markers)
Right mousebutton now sets block 0 in the map window
Robert Edwards kindly contributed a random distribution LUA script
(more lua scripts please :)
Block number now shown in blocks window titlebar
MapTools: Import big picture and convert to map (make a new map, then select
it for instructions)
You can now map Functionkeys to most MappyWin32 functions (Zoom, save etc)
1.3.22
Added 'drag and drop' support (Opens .FMP and .MAP, imports .BMP, .PCX and .MAR)
Added LUA script support (see Custom Menu) this makes the EXE much bigger though
1.3.21
Flipped tiles now work with onionskin mode
Block Properties now show mode specific boxes in flippedtiles or isopillars mode
Flipped tiles mode can now be toggled in the MapTools menu
Added 'Duplicate Layer' to Layers menu
Now compiled with mingw 2.0 (www.mingw.org)
A few minor fixes
1.3.20
Zoom 0.5 and 0.25 added (may be quite slow and have some visual artifacts)
You can set amount for graphicsmem in mapwin.ini
Layer number now shown in titlebar (toggle with tbarinfo in mapwin.ini)
Exporting a map array in a .txt only multiplies values by 4 with a 16x16 map when block graphics (for GBA) is also checked
Dialog options in export .txt are remembered for the session
Export .CSV re-added
Can now double click .MAP files if you associate them with MappyWin32 (just like FMP files)
1.3.19
'Resize Map' moved from Edit menu to MapTools menu
'Auto set BG transparency' moved from Range edit blocks to MapTools menu
'Change block size/depth' added to MapTools menu
Can now export 16 colour GBA tiles (see 'Exporting map for GBA')
NOTE: on exporting a 16x16 map with merged bits bgoff is now multiplied by 4
1.3.18
lines can now be drawn with anims
file: export: arrays as text, take bg as index when no structures exported
fix backups
wnesmode show vertical wall positions in red (for use with 3d playback libs like MappyGL)
1.3.17
Can draw lines by pressing 'l'
Can Import .MAP files as layers
Two new ini file options, backups and hexordec
32 bit maps now use alpha channel (32 bit TGA only, alpha not rendered in editor)
flipbits can now be merged in export .txt
1.3.16
Fixed problem with brushes introduced in 1.3.15
Changed brush grabbing and menu display a bit
1.3.15
Brush handles (4 corners) and paste off edges
Should now have 'correct' folder for file dialogues
Layers: Adjust Values useful for removing marker blocks in .MAPs
Layers: Remove Marker graphics useful for removing marker blocks in .FMPs
Layers that don't exist now appear grey in menu
A few doc updates (inc hex/iso howto)
Save/Load multiple layers in .MAP files
1.3.14
Fixed export map as big screen BMP (8bit) also exact index (8bit)
Can now export from .MAP files
If you set mapdefbw=0 in mapwin.ini a requester is used every time a .MAP is opened
1.3.13
Added const keyword option to export data as text
corrected maparray type to short in export data as text
Busy cursor for long operations
1.3.12
Lots of GBA goodies, including convert 16x16 map to 8x8 (see
'Exporting map for GBA' in the docs)
some doc updates
some tweaks and fixes
remove unused/duplicates improved
mapwin.ini has useful comments in now
1.3.11
used MemProof (www.automatedqa.com) to find and fix resource leaks:
Added a couple of ReleaseDC() calls
Removed -fomit-frame-pointer (caused exceptions in memproof, though was probably ok)
File Export ?scrn.bmp will now produce an 8bit BMP file for 8bit maps
1.3.10
new wlayout in mapwin.ini, when '1' block ed window is on left, map ed on right
fixed PCX import (again), last graphics line wasn't imported
Exporting a CSV now produces enough data for GBA developers (more docs soon)
You can now 'screenshot' the entire current layer in export (inc onionskin)
Some bugs fixed, some added ;)
1.3.9
Fixed logical update rate in anim preview
Added simpler 'New Map' dialogue
Changed URL and email in About box
Added TEST2.FMP map
Included blprop.gif which gives labels and iso/flip info
New grid style (to revert to old style, change 'grid = 2' in mapwin.ini)
(This now means changing grid in menu or Ctrl+g toggles between 3 styles)
New import style (to revert to old style, change 'importskip = 1' in mapwin.ini)
(This is the most intuitive I can think of, 1st block is skipped if black, all
blocks thereon are imported until all following blocks are black)
You can now use flipped tiles (change 'flippedtiles = 1' in mapwin.ini)
IMPORTANT: You must set 'flippedtiles = 0' to work with isometric pillar maps,
flipped tiles are also unsupported by the playback libraries and anim preview
and are mainly for GameBoy developers.
1.3.8: Increased number of brushes to 16
1.3.7: Slide layers, increment in range edit, import requester fix
1.3.6: Split layer support, pick layer
1.3.5: Unknown
1.3.4: Added PCX support
1.3.3: Isometric grid, isometric onionskin
1.3.2: Auto resize windows
1.3.1: Added pillar support
1.3
Fixed some bugs in the .MAP loader
Transparent BG colour is now drawn as black (not 8bit)
Support for Isometric/Hexagonal/other shaped tiles
Fixed wrong colour 'DirectX feature' in 8bit Anim Preview
You can add an alternate 8bit graphics set to 15/16/24/32 bit maps
15/16bit to 8/24/32 bit is now 100% accurately scaled
Added auto-set BG transparency to Range Edit Blocks
You can now edit block properties in signed decimal as well as hexadecimal
Added FMP1.0 file format
Changed 'Map Information' to 'Map Properties' and moved colourkey and other things there
Upped limit for blocks to 30000 (from 1024), requires FMP1.0
1.2
Now supports swapped mousebuttons
Fixed remaining alignment problems with BMP padding
You can now use any colour index (0-255) for 8bit transparency
Changed animprev.cpp to animprev.c, so source is now all in C
Compiled with mingw compiler (www.mingw.org, smaller exe)
Added user definable .MAP format
You can now name brushes
Various mapwin.ini additions
Colourkeys are now stored in FMP and can be changed from MapTools menu
More options for Range Edit Blocks
1.1
Expanded max number of graphics for anim preview (now 4096)
Fixed outline when grabbing a brush in zoom mode
Upped graphics buffer from 2Mb to 4Mb
Added a few options to do with brushes
Tidied up display functions to cope with non-multiple of 4 graphics
Added more information to map window titlebar
Block Editor window now displays more than one column of blocks
1.0
Finally got rid of the bug that meant if you clicked LMButton in Mappy,
but released it outside the window it wasn't detected and stayed on
Added Range Edit Blocks to MapTools (apply changes to many blocks at once)
Added Clear Layer function to Layers
Added Import At function to File
Added ability to re-import .MAR files
Added Logic FPS setting to anim preview
You can now import Map Arrays (.MAR) with Import
1.0BETA3
Have altered menus and dialogues to be more 'Windows-like'
Loading and saving now preserves unknown chunks
Improved documentation about 'edit menu'
Onion Skin feature (see Layers Menu)
1.0BETA2
Altered info in 'About' box
Import now warns of incorrect bitdepth
You can now undo after using arrow keys
Menu functions now don't crash when no map is loaded
High/TrueColour transparency colour is now selectable via .ini file
4x Zoom added
You can now associate .FMP files with Mappy and double click them to start
DirectX preview now works properly in High/TrueColour
DirectX Preview colour depth default is the depth of the map
Fixed Map Information, Layers were being ignored
This documentation is for Mappy Win32 version V1.4 by Robin Burrows 30/12/2003.