Scheduler Tutorial - Step 2
|    |
Scheduler Tutorial - Step 2: Finish Setup and Start Running it
A. What will we do?
Ok, now that we have the timing down. Let's decide what we're going to schedule here. You should know this before scheduling any task really.
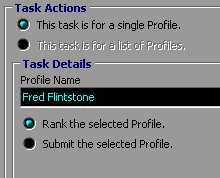
In the Deluxe edition, scheduling a Profile List is not available. Click on the Select Profile button and pick your Profile from the list. We will set this first task to run a Ranking on your Profile.
All that's left to do here is click on the Save button up top. Do so now.
B. First Run
You will see that your first task is in the pending task list. You can turn the scheduler on now and wait for it to run.

Click on the Turn Scheduler On button and wait for your task to activate. If the time you set your task to run first at has passed, it will run automatically. You will see a small change in the pending task list as your task queues up and starts to run. Along the very bottom of the screen, you will see the progress of the task as it runs and you will see which task is currently being run.

When the Scheduler is turned on, you will see two new buttons across the top. Run Task Now will do just that (go for it!). Stop will cancel the currently running task.
This is probably a good time to set up the schedule for your Profile. You should make one to Submit and another to Rank. You should probably schedule them both to run once a week or more. Don't worry about over-submitting as the Rules Checking in AddWeb will prevent your Profile from submitting to an engine too often.
Once you are done with this, you may wish to look into the Reporting Tutorial or browse the FAQs.
AddWeb
Website Promoter 4
Copyright ⌐2000, Cyberspace Headquarters, LLC. All rights reserved.
For sales questions, please send E-mail to the Cyberspace HQ Sales Department.
For support questions, please visit the AddWeb Support Web Page.