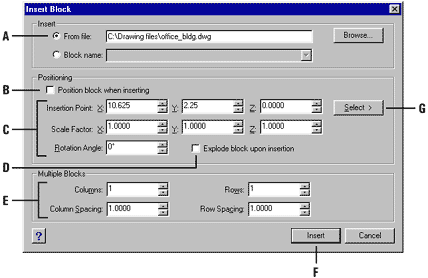
- Choose Insert > Block.
- On the Draw 2D toolbar, click the Block tool (
 ).
). - Type ddinsert and then press Enter.
You can insert blocks and other drawings into the current drawing. When you insert a block, it is treated as a single entity. When you insert a drawing, it is added to the current drawing as a block. You can then insert multiple instances of the block without reloading the original drawing file. If you change the original drawing file, those changes have no effect on the current drawing unless you redefine the block by reinserting the changed drawing.
When you insert a block or drawing, you must specify the insertion point, scale, and rotation angle. The block's insertion point is the reference point specified when you created the block. When you insert a drawing as a block, the program takes the specified insertion point as the block insertion point. You can change the insertion point, however, by first opening the original drawing and redefining the block.
 ).
).TIP You can also use the IntelliCAD Explorer on the Settings menu to insert blocks. Using IntelliCAD Explorer, you can also insert blocks from another drawing into the current drawing. Both drawings must be open at the same time to do this.
 ).
).NOTE You can specify the insertion point, scale factors, and rotation angle in the Insert Block dialog box before inserting the block. You can also control whether the block is exploded back into its original component entities after insertion. Under Positioning, clear the Position Block When Inserting check box, and specify the appropriate coordinates. If you want to explode the block immediately, select the Explode Upon Insertion check box.

Tell me about...