


Prior to setting up the Internet service for a specific user, the service must be setup for the workgroup. For more information on this, see Configuring the Internet Mail service . Before a user can send and receive Internet mail, the mail service must also be activated for that particular user. This can be done from the user's property sheet. Bring up the User property sheet by clicking the right mouse button on the relevant user in the right hand list and selecting Edit… from the context sensitive menu. Select the Services tab.
All installed mail services are shown in the Services list. There is a check box to the left of each service. Checking one of the check boxes will activate the associated service for the user. Check the check box to the left of the Internet service and press the Settings… button. The mail service's User Settings dialog box will be displayed.
Address Page
The settings in the Address page determine the user's e-mail address. An e-mail address is of the following form:
mailbox@workgroupaddress.com
The Internet service lets you specify one or more addresses for the workgroup. The address page in the User Settings dialog box lets you select one of these addresses along with a mailbox name in order to fully specify the user's e-mail address.
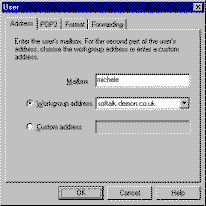
For example, your workgroup may be configured with the following addresses:
company.com
company.org
mycompany.provider.com
If you specified 'john' as the mailbox name for the user, then mail coming to the following addresses would be delivered to the user:
john@company.com
john@company.org
john@mycompany.provider.com
Selecting a workgroup address in the Address page determines the sender address of all messages sent by this user. Although the user will receive mail addressed to any of the three addresses above, he may wish to be addressed as john@company.com in which case company.com should be selected from the Workgroup Address drop down list.
POP3 Page
The POP3 page lets you specify details of a POP3 account that is specific to this user. If your workgroup receives all of its mail via SMTP or via a multiple POP3 mailbox then this page must be left blank. However, if mail for this user is received via a single user POP3 account then you should specify the login name and password for the POP3 account.
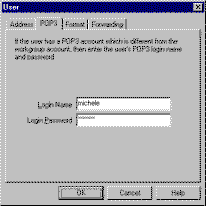
For more information on POP3 and SMTP see POP3 and SMTP Capabilities.
Forwarding Page
The forwarding page of the User Settings dialog box lets you configure mail redirection for this user. The redirection is handled by the mail gateway machine as soon as the message is received from the Internet.

You may choose between:
· No forwarding
· Forwarding to a local user
· Forwarding to an e-mail address.
To forward to a local user, select the Forward To User radio button and select the relevant user from the drop down list. To forward to an e-mail address, select the Forward To Address radio button and enter the relevant e-mail address.
Checking the Keep a Copy check box ensures that the user gets a copy of the message before it is forwarded.