


To print the Group Chart View, select Print Chart from the File/Print menu. The Print Group Chart dialog box is displayed.
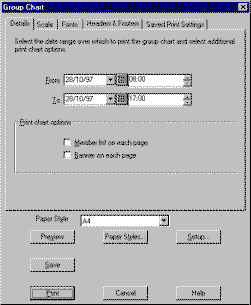
The fields and buttons in the Details page of the Print Group Chart dialog box are summarised in the table below:
| Field | Description |
| From, To | The From and To fields represent the time range that will be printed. These fields are initially set to the time range shown in the Group Chart window. If you wish to print appointments for the group over a different time range then specify the start and end times in these fields. |
| Member list on each page | Checking this check box ensures that the list of group members is displayed down the left margin of every sheet printed. |
| Banner on each page | Checking this check box ensures that the time banner is displayed along the top of every sheet printed. |

The Scale page also lets you choose which scale will be used to display the time banner. You may choose between labelling the time banner every 15 minutes, 30 minutes, 1 hour, 3 hours, 6 hours, 12 hours, day, week or month. Alternatively, you can specify an auto setting where OfficeTalk will choose a suitable scale.
The Fonts page lets you choose suitable fonts for the following:
| Font | Description |
| Banner Font | The font for the Time Banner |
| Name Title Font | The font for the header above the member list |
| Name Font | The font for the list of members. |
| Appointment Font | The font for the appointments drawn in the Chart view. |
OfficeTalk provides common print functionality in the Print Chart dialog box, including
Defining headers and footers
Printer setup
Page Style Selection
Saved Print Settings
Preview capability
For more information on this common print functionality, see Printing.