


OfficeTalk lets you print out mail messages by selecting Print Mail from the File/Print menu. When you select this, the Print Mail dialog box is displayed showing the Details tab.
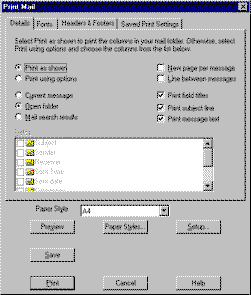
You may choose between printing the currently selected message, the currently open folder or the search results in the Search Mail dialog box. You can do this by selecting one of the Current message, Open folder and the Mail search results radio button.
By default, in addition to printing the body of each message, OfficeTalk also prints out the contents of each of the fields currently displayed in the Mail window. You may specify different fields to be printed by selecting the Print using options radio button. When you do this, the Fields list becomes enabled, allowing you to select the relevant check boxes next to each of the fields that you wish to print.
The Details tab of the Print Mail dialog box contains several other options used when printing mail. These are described in the table below:
| Check box | Description |
| New page per message | Starts a new page for each message. |
| Line between messages | Draws a horizontal line separating each message. |
| Print fields titles | Prints the title of each field printed above the contents of each field. |
| Print subject line | Prints a separate subject line for each message. The default is to print a separate subject line. |
| Print message text | Prints the message body text for each message. The default is to print the message body text. |
| Button | Description |
| Title Font | The font used to draw field titles. Relevant only if the Print Field Titles check box is selected. |
| Field Font | The font used to draw field information. |
| Group Header Font | The font used to draw group headers. |
| Subject Font | The font used to draw the subject line. Relevant only if the Print subject line check box is checked. |
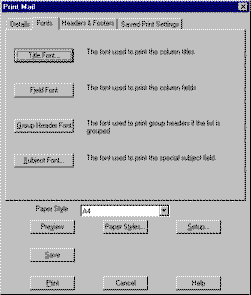
Note: There is no button to choose the font of the mail body text since this is rich text and is therefore already formatted.
OfficeTalk provides common print functionality in all Print dialog boxes. This functionality includes:
Defining headers and footers
Printer setup
Page Style Selection
Saved Print Settings
Preview capability
For more information on this common print functionality, see Printing.
Once you have selected the required options in the Print Mail dialog box, press the Preview button to check the appearance of your print out and then send it to the printer by pressing the Print button.