


Selecting the Internet Service and pressing the Settings… button will display the Internet User dialog box, showing the Address page.
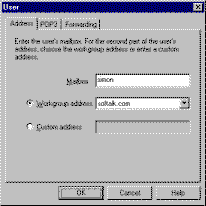
The Address page lets you specify your mailbox name. The name you enter in the Mailbox field specifies your full Internet address within the workgroup and determines the mail that is directed to your Incoming Mail folder. For example, if the workgroup address has been set up by a Supervisor as company.com and you specify your mail box name as John, then you will receive all mail received for john@company.com. If a supervisor sets up an additional workgroup address, thiscomp.com, then you will receive mail sent to both john@company.com and john@thiscomp.com.
Note: It is not possible for two users to share the same mailbox name. If you enter an exiting mailbox name into the mailbox field then OfficeTalk will warn you of the problem and will not let you save your changes.
The Workgroup address and Custom address radio buttons let you specify your e-mail address as seen by recipients of your mail. For example, a Supervisor may set up two workgroup addresses, company.com and thiscomp.com, say. Selecting thiscomp.com from the drop down list will specify your out-going e-mail address as john@thiscomp.com. It will not affect what mail you receive. Alternatively, you may enter a custom workgroup address by selecting the Custom address radio button and entering, for example, myhome.com. This will specify your out-going e-mail address as john@myhome.com. Note that when recipients of your mail reply to subsequent messages sent by you, they will send the mail to this address so you should ensure that the address entered corresponds to a valid e-mail address.
The POP3 page lets you specify your own POP3 details if relevant. If the workgroup receives mail using SMTP rather than POP3 or receives mail via one multiple user POP3 mailbox using a single POP3 login name and password then you should leave this page blank.
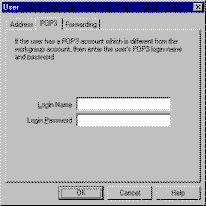
If your company collects mail for each of its users from a series of single user POP3 accounts then the details of your POP3 account should be entered into this page. If this is the case, specify the login name and password for the POP3 account used to collect mail for you.
The Format page in the Internet User dialog box is only available if you have specified the Internet Mail service as your default mail service. This page lets you specify whether mail attachments sent to you by other OfficeTalk users should be MIME encoded or UU encoded. This is useful only if you plan to receive mail sent to you from other users using a mail client other than OfficeTalk which may recognise only one of the encoding formats.

Additionally, you may specify whether you are to receive messages in plain text format or in the original rich text format.
Note: If you choose rich text format and you receive your Internet mail using a client other than OfficeTalk, then you will receive the message in plain text along with an attachment containing the rich text version of the message. You will need a rich text viewer, such as Wordpad, in order to be able to successfully read the rich text message attachment.
The Forwarding page is useful if you wish to auto forward mail arriving for you to another user or address. This functionality is particularly useful if, for example, you are going away on holiday and will not be logging into OfficeTalk during that time and want your mail to be forwarded to a colleague or assistant.

To forward your mail to another user, select the Forward to user radio button and select the appropriate user from the drop down list. To forward your mail to an external e-mail address, select the Forward to address radio button and specify the required address.
Checking the Keep a copy check box will ensure that you receive each incoming message as well as the user or address specified.