


To customise the main toolbar, do the following:
Click anywhere in the main toolbar using the right mouse button and select Customise… from the context menu. The Customise Toolbar dialog box is displayed.
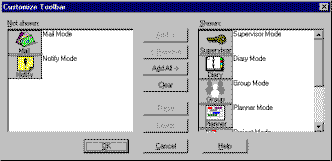
The right hand list will contain a list of the buttons already shown in the toolbar. You can change the order in which these buttons are shown by selecting a button whose order you wish to change and pressing either the Raise or Lower buttons accordingly.
The left hand list contains a list of buttons which are not currently shown in the toolbar. You may show any of these buttons in the main toolbar by selecting the appropriate button(s) and pressing the Add button.
You may hide buttons that are currently shown in the main toolbar by selecting the relevant button(s) from the right hand list and pressing the Remove button.
By default, only mode buttons are shown in the main toolbar. OfficeTalk lets you add buttons which represent files or executable programs. You can do this by dragging the file or program, that you wish to add, from the Windows Explorer and dropping it onto the main toolbar. The file or program is then shown in the main toolbar as a button and is added to OfficeTalk as a Tool. The program or file may be started by clicking on the button.
You may edit the properties of the tool or delete the tool by accessing Customise from the Tools menu from within any mode. For more information on tools, see Customising the Tools Menu, below.