


To create a new planner, do the following:
Press the  button located in the Planner mode shortcut bar. The Planner property sheet is displayed, showing the Details page.
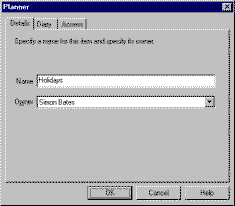
Specify a name for the planner, for example, 'Holidays Planner'. Also specify the owner of the planner. When you create a planner, OfficeTalk automatically makes you the owner of the planner. This means that only you, any supervisors and any users belonging to security profiles, which have sufficient access to you, are able to view, edit or delete the planner or the bookings contained within it. The planner will not be visible to any other users unless you specify otherwise.
Note: Supervisors may only edit or delete your personal planners from within Supervisor mode. Supervisors have no access to any private planners that you create.
You may specify another user as the owner of the planner. Doing this will give the new owner full access to the planner and will limit your access to it as soon as you press the OK button. You must have at least create general access to any user that you select.
The Diary tab lets you choose whether or not to show through or block out certain users' diaries. For more information, see Showing a Planner in Your Diary.
Select the Access tab. From here you can specify the access rights that each user has to the planner. By default, the planner is marked as personal which means that all users that have general access to you will have the same access to this planner. For further information on granting access rights, see Administering Access Rights.
To create the planner, press OK on the Planner property sheet. The new planner will be selected into planner mode. The next step is to create some planner keys and then add planner bookings to the planner window.