


OfficeTalk lets you set up one or more categories which may be used to classify your letters. To mark a letter as belonging to a particular category, do the following:
Bring up the Letter dialog box by double clicking on the relevant letter from the history window in either Company or Contact view, or from within History View.
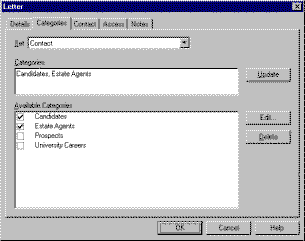
Select the Categories page. The Categories page will display a list of Contact Categories in the bottom window. Each category has a check box to the left of the description.
Select one or more check boxes representing the classification of the letter into the relevant categories.
Press OK to save your changes.
You may add your own private categories by typing the name of the category into the Categories window in the Categories page and pressing the Update button. The new category will appear, checked, in the bottom window. Press OK to save your changes.
If you wish to add the letter to categories in another category set, for example, the Diary category set, then select the Diary category set from the Set drop down list. The list of available categories in that category set will appear in the bottom window. Select one or more categories and press OK to save your changes.
For more information on Categories, see Using Categories.