
![]() If you are going to be adding graphics and/or sounds to an AppletSet'r
pop-up menu, you will need to open the .html file used to display the PageCharmer
applet and corresponding AppletSet'r.
If you are going to be adding graphics and/or sounds to an AppletSet'r
pop-up menu, you will need to open the .html file used to display the PageCharmer
applet and corresponding AppletSet'r.
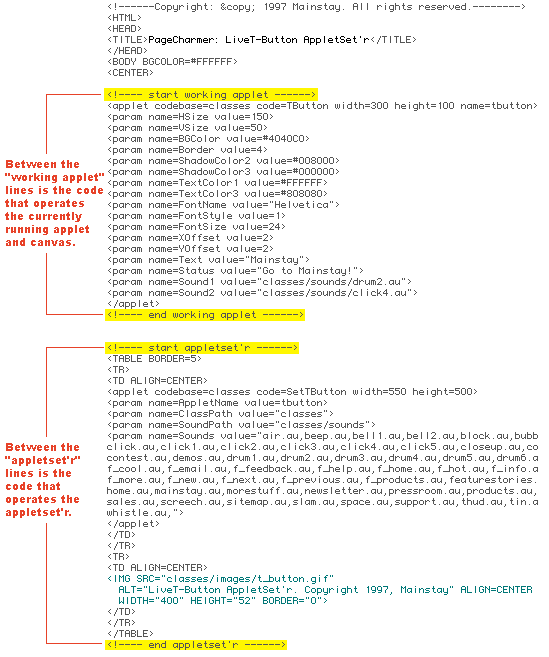
![]() In order to make this process easier "note lines" have been
added to the HTML code of all the PageCharmer files you can edit. These files can
be found in the directory named "Data" located within the PageCharmer directory
on your hard drive. The files are named: "liveg_button.html, livegt_button.html,
etc. Below is an example of what you will see once you have opened a file in a Web
page layout editor such as Microsoft FrontPage, Adobe PageMill, Claris HomePage,
Net Objects Fusion, etc., or in a word processor.
In order to make this process easier "note lines" have been
added to the HTML code of all the PageCharmer files you can edit. These files can
be found in the directory named "Data" located within the PageCharmer directory
on your hard drive. The files are named: "liveg_button.html, livegt_button.html,
etc. Below is an example of what you will see once you have opened a file in a Web
page layout editor such as Microsoft FrontPage, Adobe PageMill, Claris HomePage,
Net Objects Fusion, etc., or in a word processor.
![]() If you would like to add images that you've created (or downloaded from
the Graphic of the Week)
to any of the AppletSet'rs that use images, you will need to open the .html file
used to display the PageCharmer applet and corresponding AppletSet'r in a Web page
layout editor such as Microsoft FrontPage, Adobe PageMill, Claris HomePage, Net Objects
Fusion, etc., or in a word processor.
If you would like to add images that you've created (or downloaded from
the Graphic of the Week)
to any of the AppletSet'rs that use images, you will need to open the .html file
used to display the PageCharmer applet and corresponding AppletSet'r in a Web page
layout editor such as Microsoft FrontPage, Adobe PageMill, Claris HomePage, Net Objects
Fusion, etc., or in a word processor.
![]() These files can be found in the directory named "Data" located
within the "PageCharmer" directory on your hard drive. The files are named:
"liveg_button.html, livegt_button.html, etc. First, make sure to put the images
into the "images" directory located within the "Data" directory.
Then, add the names of the files to the area of the .html file highlighted below:
These files can be found in the directory named "Data" located
within the "PageCharmer" directory on your hard drive. The files are named:
"liveg_button.html, livegt_button.html, etc. First, make sure to put the images
into the "images" directory located within the "Data" directory.
Then, add the names of the files to the area of the .html file highlighted below:
Tip: Place the files in alphabetical order for quick reference. At this time consider taking out any of the images that you don't think you will ever use. This will save you time when selecting images from the pop-up menus. Create a folder in the "Images" folder titled "unused images"and place them there for safe keeping.
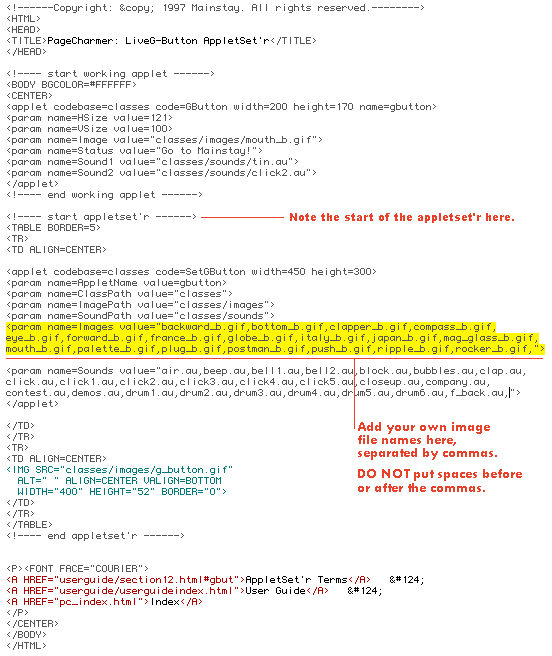
Note: Due to a bug in Microsoft Explorer 4.0 for Macintosh, the list of .gif files must remain on one line. Any return character will add a space which restricts the image preceded by the return character. These images will show-up in the appropriate AppletSet'r pop-up menu with a comma before the name; however they are not able to be selected for use in the applet. If you somehow introduce return characters into the list of files, do the following to fix the problem. Open the appropriate .html file for that AppletSet'r, found in the "Data" directory in the "PageCharmer" directory on your hard drive. Take out all of the return characters, then Save and reopen this file.
![]() If you would like to add sounds that you have created to any of the AppletSet'rs
that use sounds, you will need to open the .html file used to display the PageCharmer
applet and corresponding AppletSet'r in a Web page layout editor such as Microsoft
FrontPage, Adobe PageMill, Claris HomePage, Net Objects Fusion, etc., or in a word
processor.
If you would like to add sounds that you have created to any of the AppletSet'rs
that use sounds, you will need to open the .html file used to display the PageCharmer
applet and corresponding AppletSet'r in a Web page layout editor such as Microsoft
FrontPage, Adobe PageMill, Claris HomePage, Net Objects Fusion, etc., or in a word
processor.
![]() These files can be found in the directory named "Data" located
within the "PageCharmer" directory on your hard drive. The files are named:
"liveg_button.html, livegt_button.html, etc. First, make sure to put the sound
files into the "sounds" directory located within the "classes"directory. Then, add the names of the files to the area of the .html file highlighted
below:
These files can be found in the directory named "Data" located
within the "PageCharmer" directory on your hard drive. The files are named:
"liveg_button.html, livegt_button.html, etc. First, make sure to put the sound
files into the "sounds" directory located within the "classes"directory. Then, add the names of the files to the area of the .html file highlighted
below:
Tip: Place the files in alphabetical order for quick reference. At this time consider taking out any of the sounds that you don't think you will ever use. This will save you time when selecting sounds from the pop-up menus. Create a folder in the "Sounds" folder titled "unused sounds"and place them there for safe keeping.
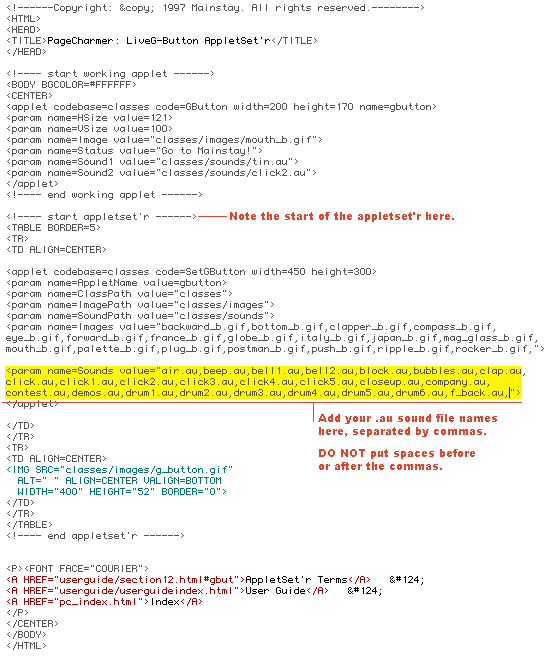
Note: Due to a bug in Microsoft Explorer 4.0 for Macintosh, the list of .au files must remain on one line. Any return character will add a space which restricts the sounds preceded by the return character. These sounds will show-up in the appropriate AppletSet'r pop-up menu with a comma before the name; however they are not able to be selected for use in the applet. If you somehow introduce return characters into the list of files, do the following to fix the problem. Open the appropriate .html file for that AppletSet'r, found in the "Data" directory in the "PageCharmer" directory on your hard drive. Take out all of the return characters, then Save and reopen this file.
![]() Whether you use a Web page layout editor such as Microsoft FrontPage,
Adobe PageMill, Claris HomePage, Net Objects Fusion, etc., or you are using a word
processor to edit your HTML code by hand, you will need to make sure the PageCharmer
HTML code is inserted into your Web page correctly. Once you've customized the applet:
Whether you use a Web page layout editor such as Microsoft FrontPage,
Adobe PageMill, Claris HomePage, Net Objects Fusion, etc., or you are using a word
processor to edit your HTML code by hand, you will need to make sure the PageCharmer
HTML code is inserted into your Web page correctly. Once you've customized the applet:
![]() When using a Web page layout product it is always possible to add your
PageCharmer Designer Applets to your working Web page. You can easily add PageCharmer
applets to your Web pages after creating them with the corresponding AppletSet'r.
Start off by copying the generated HTML code displayed in the AppletSet'r window.
Then open your Web page, and paste the PageCharmer HTML code
in the spot that you want the applet to appear on your Web page.
When using a Web page layout product it is always possible to add your
PageCharmer Designer Applets to your working Web page. You can easily add PageCharmer
applets to your Web pages after creating them with the corresponding AppletSet'r.
Start off by copying the generated HTML code displayed in the AppletSet'r window.
Then open your Web page, and paste the PageCharmer HTML code
in the spot that you want the applet to appear on your Web page.
![]() Since Front Page is one of the most widely used Web page layout editors
on the market today, step-by-step instructions pasting a PageCharmer applet into
FrontPage for Windows has been provided below: Remember no matter what Web page
layout editor you're using, PageCharmer applets can be added to it. For instructions
on any other product please refer to that product's User Guide.
Since Front Page is one of the most widely used Web page layout editors
on the market today, step-by-step instructions pasting a PageCharmer applet into
FrontPage for Windows has been provided below: Remember no matter what Web page
layout editor you're using, PageCharmer applets can be added to it. For instructions
on any other product please refer to that product's User Guide.
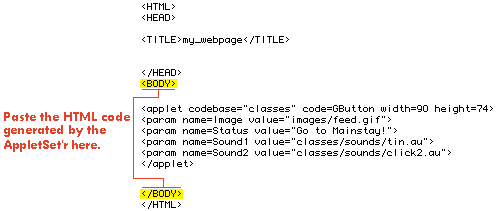
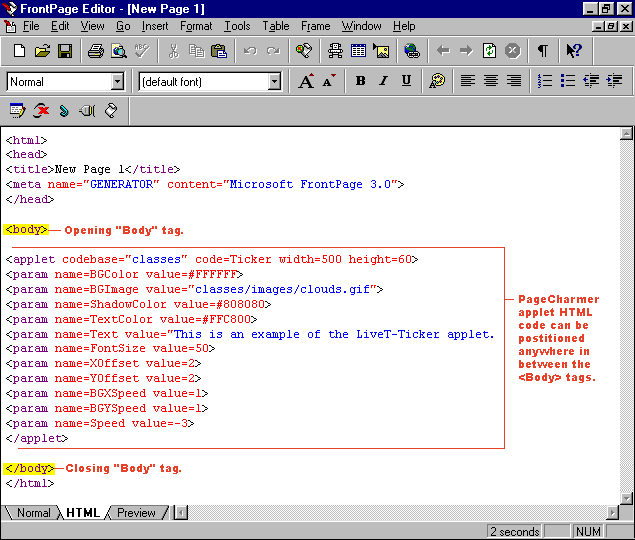
After copying the generated HTML code from PageCharmer you're ready to paste it into your Web page. For a review of this refer to any of the Step-by-Steps Instructions. Once you have copied the HTML code, open FrontPage for Windows. At the bottom of the window are three tabs, press the "HTML" tab to view the HTML code. Then paste the HTML code anywhere between the "<BODY>"and "</BODY>" tags as shown below.
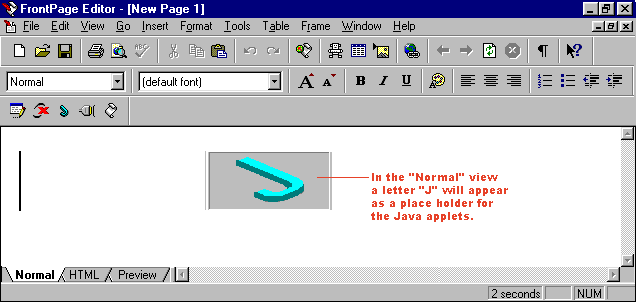
Press the "Normal" tab to view where the applet in positioned in your Web page. Now is the best time to reposition the applet until the desired look and feel is achieved. The letter "J" will appear as a place holder for the applet since FrontPage 3.0 is not capable of displaying a Java applet directly.
Note: Although FrontPage allows Java applets to be resized by selecting the "J"and dragging a corner, PageCharmer applets should be modified using the AppletSet'r or with the HTML code as shown above.
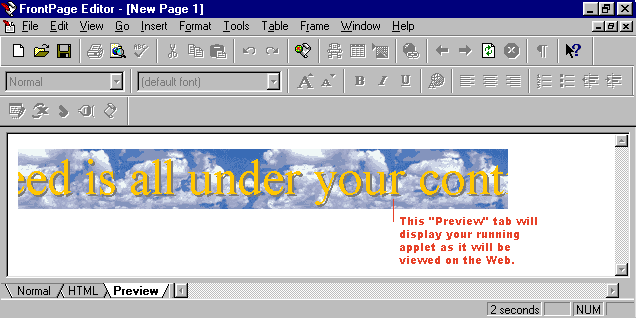
Now to see how your applet will run on the World Wide Web, press the "Preview"tab at the bottom of the window. Make sure to upload all of the .class, .gif, and .au files onto your server before selecting "Preview". If this is not done a static gray shape will appear in the browser window where the applet should appear.
![]() While most everyone these days uses a Java-capable browser, not everyone
may have Java turned "on." Therefore, it's a good idea to create a text
alternative that will be displayed where your PageCharmer applet is supposed to appear.
This is very easy to do.
While most everyone these days uses a Java-capable browser, not everyone
may have Java turned "on." Therefore, it's a good idea to create a text
alternative that will be displayed where your PageCharmer applet is supposed to appear.
This is very easy to do.
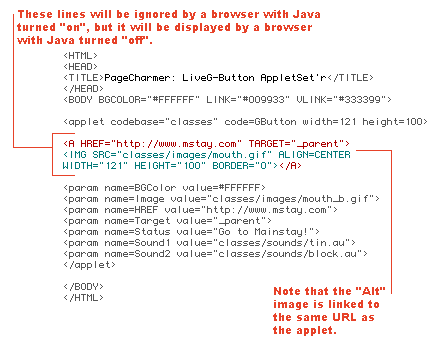
![]() When a Web browser displays a Web page, it reads the HTML code in the
Web page sequentially. When the browser encounters an "<APPLET..." tag,
it ignores everything but the "<PARAM..." tags until it reaches the
"</Applet>" tag. Browsers with Java turned "off" (and browsers
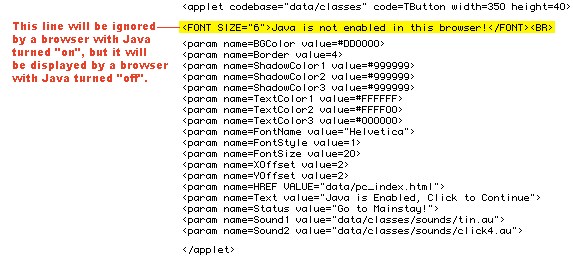
that are not Java-capable) will ignore the "<APPLET..." and "<PARAM..."tags and instead process any embedded tags it recognizes. Thus, tags placed within
the "<APPLET..." and "</APPLET>" tags that are not "<PARAM..."tags are considered alternative HTML.
When a Web browser displays a Web page, it reads the HTML code in the
Web page sequentially. When the browser encounters an "<APPLET..." tag,
it ignores everything but the "<PARAM..." tags until it reaches the
"</Applet>" tag. Browsers with Java turned "off" (and browsers
that are not Java-capable) will ignore the "<APPLET..." and "<PARAM..."tags and instead process any embedded tags it recognizes. Thus, tags placed within
the "<APPLET..." and "</APPLET>" tags that are not "<PARAM..."tags are considered alternative HTML.
The example below illustrates where to place alternative HTML code in a typical PageCharmer applet.
![]() After carefully designing your Web page its no wonder you want every viewer
to experience your intended look and feel. Using image alternatives will allow for
that. While most everyone these days uses a Java-capable browser, not everyone may
have Java turned "on." Therefore, it's a good idea to create an image alternative
to be displayed where your PageCharmer applet is supposed to appear.
After carefully designing your Web page its no wonder you want every viewer
to experience your intended look and feel. Using image alternatives will allow for
that. While most everyone these days uses a Java-capable browser, not everyone may
have Java turned "on." Therefore, it's a good idea to create an image alternative
to be displayed where your PageCharmer applet is supposed to appear.
![]() This is easy to do while you are creating your custom images. Simply create an identical static graphic that will
be displayed in place of the PageCharmer image.
This is easy to do while you are creating your custom images. Simply create an identical static graphic that will
be displayed in place of the PageCharmer image.
![]() When a Web browser displays a Web page, it reads the HTML code in the
Web page sequentially. When the browser encounters an "<APPLET..." tag,
it ignores everything but the "<PARAM..." tags until it reaches the
"</Applet>" tag. Browsers with Java turned "off" (and browsers
that are not Java-capable) will ignore the "<APPLET..." and "<PARAM..."tags and instead process any embedded tags it recognizes. Thus, tags placed within
the "<APPLET..." and "</APPLET>" tags that are not "<PARAM..."tags are considered alternative HTML.
When a Web browser displays a Web page, it reads the HTML code in the
Web page sequentially. When the browser encounters an "<APPLET..." tag,
it ignores everything but the "<PARAM..." tags until it reaches the
"</Applet>" tag. Browsers with Java turned "off" (and browsers
that are not Java-capable) will ignore the "<APPLET..." and "<PARAM..."tags and instead process any embedded tags it recognizes. Thus, tags placed within
the "<APPLET..." and "</APPLET>" tags that are not "<PARAM..."tags are considered alternative HTML.
The example below illustrates where to place alternative HTML code in a typical PageCharmer applet.
![]() Once you've customized the PageCharmer applets to your liking, and pasted
the HTML code into your Web pages, you will need to make sure to organize the directory
structure of your Web site and upload it to your server or Web site provider. All
.html files, .class files, .gif files, and .au files need to be in the proper directories
in order for your Web pages to look and act the way you expect. For the most part,
you can organize these files any way you like. But doing so takes some understanding
of how PageCharmer applets look for these files. If you're new at this, please follow
these organizational guidelines:
Once you've customized the PageCharmer applets to your liking, and pasted
the HTML code into your Web pages, you will need to make sure to organize the directory
structure of your Web site and upload it to your server or Web site provider. All
.html files, .class files, .gif files, and .au files need to be in the proper directories
in order for your Web pages to look and act the way you expect. For the most part,
you can organize these files any way you like. But doing so takes some understanding
of how PageCharmer applets look for these files. If you're new at this, please follow
these organizational guidelines:
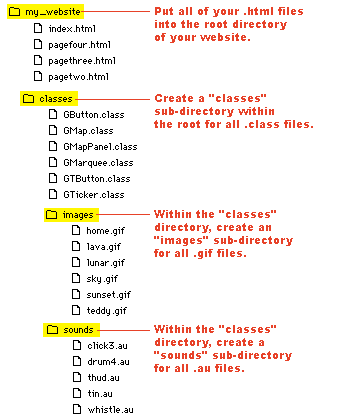
Start the next steps off by finding the "Upload to Your Web Site!"directory in the "PageCharmer" directory on your hard drive. Go ahead and open it, inside you will find the "classes" directory, inside that are two directories titled "images", and "sounds".