![]() All of the images within the "images" folder have been appropriately
named for quick reference. Upon opening the "images" folder you can easily
determine which images are associated with a specific AppletSet'r by following the
list below:
All of the images within the "images" folder have been appropriately
named for quick reference. Upon opening the "images" folder you can easily
determine which images are associated with a specific AppletSet'r by following the
list below:
Tip: As an aid when creating "ALT"(alternative) images, name the PageCharmer image "anything_map.gif" and the identical ALT image "anything.gif". This will be a time saver when working in the AppletSet'r.
Note: The map images are the only graphics that do not show up in the LiveG-Map AppletSet'r popup menu for display.
![]() Images used as foreground images in the LiveG-Ticker and LiveG-Marquee
applets can be .gif files or .jpg files. GIF files are recommended for most of the
time. In many cases, a transparent GIF image is preferred (sometimes called GIF89a).
This can best be achieved using Adobe Photoshop. For information, see Creating
Transparent GIF Images.
Images used as foreground images in the LiveG-Ticker and LiveG-Marquee
applets can be .gif files or .jpg files. GIF files are recommended for most of the
time. In many cases, a transparent GIF image is preferred (sometimes called GIF89a).
This can best be achieved using Adobe Photoshop. For information, see Creating
Transparent GIF Images.
Tip: Most of the images in the PageCharmer Graphics Library for use with the LiveG-Ticker, LiveG-Marquee, and LiveT-Ticker were created at a maximum height of 90 pixels. For example, when creating an image to go with a provided landscape background, a foreground image more than 90 pixels tall will run over the intended landscape size. See example below:
![]()
Tip: Modified any graphic, using a graphics program, to suit your particular needs. Like the company logo that has been added to the "truck.gif"image that you'll find included in PageCharmer.
![]() Images used as background images in the LiveG-Ticker and LiveG-Marquee
(plus LiveT-Ticker) applets can also be .gif or .jpg images. Background images that
are smaller than the actual area of the applet will be tiled, that is repeated to
fill the entire applet area. Experiment by making backgrounds as small as possible.
Tiled backgrounds can make your applets very small and this quick to download from
the Web.
Images used as background images in the LiveG-Ticker and LiveG-Marquee
(plus LiveT-Ticker) applets can also be .gif or .jpg images. Background images that
are smaller than the actual area of the applet will be tiled, that is repeated to
fill the entire applet area. Experiment by making backgrounds as small as possible.
Tiled backgrounds can make your applets very small and this quick to download from
the Web.
![]() With the LiveG-Ticker and LiveG-Marquee it is possible to have two backgrounds
by creating a transparent image, then assigning a "BGColor" (background
color) behind it. See Creating Transparent GIF Images for details.
With the LiveG-Ticker and LiveG-Marquee it is possible to have two backgrounds
by creating a transparent image, then assigning a "BGColor" (background
color) behind it. See Creating Transparent GIF Images for details.
Tip: GIF files are recommended in most cases. To make GIF images as small as possible, we recommend using the GIF compression service offered by GIFWizard.
![]() Images used as background images in the LiveT-Ticker applet can be .gif
or .jpg images. Background images that are smaller than the actual area of the applet
will be tiled, that is repeated to fill the entire applet area. Experiment by making
backgrounds as small as possible. Tiled backgrounds can make your applets very small
and this quick to download from the Web.
Images used as background images in the LiveT-Ticker applet can be .gif
or .jpg images. Background images that are smaller than the actual area of the applet
will be tiled, that is repeated to fill the entire applet area. Experiment by making
backgrounds as small as possible. Tiled backgrounds can make your applets very small
and this quick to download from the Web.
![]() With the LiveT-Ticker it possible to have two backgrounds by creating
a transparent image then assigning a "BGColor" (background color) behind
it. See Creating Transparent GIF Images for details.
With the LiveT-Ticker it possible to have two backgrounds by creating
a transparent image then assigning a "BGColor" (background color) behind
it. See Creating Transparent GIF Images for details.
Tip: GIF files are recommended in most cases. To make GIF images as small as possible, we recommend using the GIF compression service offered by GIFWizard.
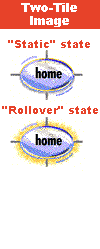
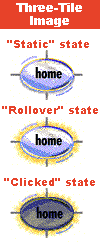
![]() Images used by the LiveG-Button, LiveGT-Button and LiveG-Map applets can
display three different states, think of a state as a single animation cell.
As your cursor rolls over the image the 2nd state (cell) is revealed; click the image
and the 3rd state (cell) appears. Ta Daaa! The three states equal a three cell animation.
This means you can now add dynamic animation to your buttons and your image maps
by creating unique images for each state. The following example illustrates the state
structure. View this example working.
Images used by the LiveG-Button, LiveGT-Button and LiveG-Map applets can
display three different states, think of a state as a single animation cell.
As your cursor rolls over the image the 2nd state (cell) is revealed; click the image
and the 3rd state (cell) appears. Ta Daaa! The three states equal a three cell animation.
This means you can now add dynamic animation to your buttons and your image maps
by creating unique images for each state. The following example illustrates the state
structure. View this example working.
|
|
|
![]() The number of tiles used in the creation process for the LiveG-Button
and LiveGT-Button is different from that of the LiveG-Map so they are covered separately
below:
The number of tiles used in the creation process for the LiveG-Button
and LiveGT-Button is different from that of the LiveG-Map so they are covered separately
below:
| Horizontal Tiles | Width = 1/2 Actual Image Width Height = Actual Image Height |
Width = 1/3 Actual Image Width Height = Actual Image Height |
| Vertical Tiles | Width = Actual Image Width Height = 1/2 Actual Image Height |
Width = Actual Image Width Height = 1/3 Actual Image Height |
![]() Please note that extremely complex image maps (image maps with 20 or more
areas) can take a minute or longer, to generate the HTML code after the "Create
HTML" button has been clicked. The actual time depends on your computer's speed.
Please note that extremely complex image maps (image maps with 20 or more
areas) can take a minute or longer, to generate the HTML code after the "Create
HTML" button has been clicked. The actual time depends on your computer's speed.
Tip: Consider making your images transparent whenever possible. See Creating Transparent GIF Images for details. And to make GIF images as small as possible, we recommend using the GIF compression service offered by GIFWizard.
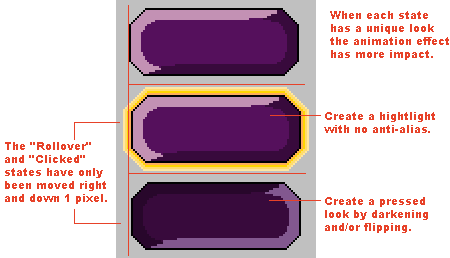
![]() In order to take full advantage of the applet's animation capabilities
adjust the placement of the "Rollover" and "Clicked" states.
This must be done with a pixel-accurate graphics program such as Adobe Photoshop.
The example below shows how to set this up.
In order to take full advantage of the applet's animation capabilities
adjust the placement of the "Rollover" and "Clicked" states.
This must be done with a pixel-accurate graphics program such as Adobe Photoshop.
The example below shows how to set this up.
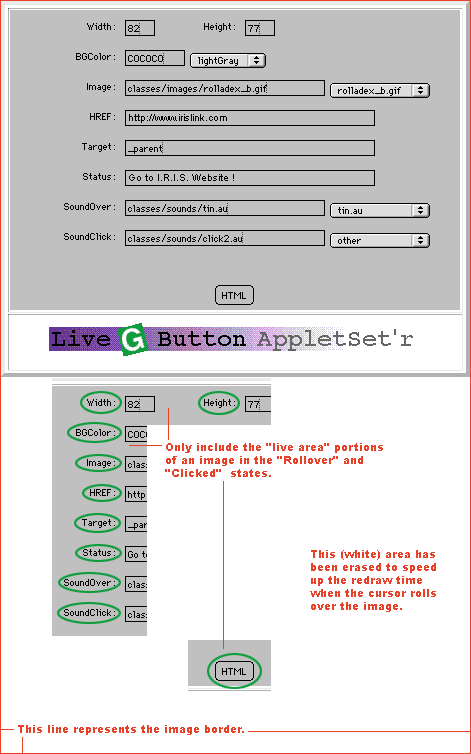
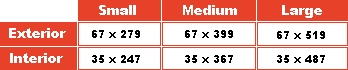
![]() When creating a larger two- or three-tiled image consider reducing the
size by erasing any part of the image that will not be seen in the "Rollover"and "Clicked" states. The following example is of a large two-tiled image.
Notice how the Rollover state is cropped, then check
out this example working .
When creating a larger two- or three-tiled image consider reducing the
size by erasing any part of the image that will not be seen in the "Rollover"and "Clicked" states. The following example is of a large two-tiled image.
Notice how the Rollover state is cropped, then check
out this example working .
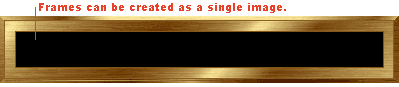
![]() The images created for the LiveT-Marquee can be two types, a single image,
or an animated image. Similar to the tiled images used by the LiveG-Button, LiveGT-Button
and LiveG-Map applets, animated frames for the LiveT-Marquee must be created as tiled
GIF images. Tiled frames can be two or more tiles (there is no limit to the number
of tiles you can use, but the more tiles you use, the longer they will require to
download and run).
The images created for the LiveT-Marquee can be two types, a single image,
or an animated image. Similar to the tiled images used by the LiveG-Button, LiveGT-Button
and LiveG-Map applets, animated frames for the LiveT-Marquee must be created as tiled
GIF images. Tiled frames can be two or more tiles (there is no limit to the number
of tiles you can use, but the more tiles you use, the longer they will require to
download and run).
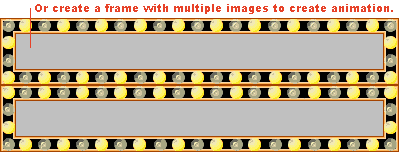
![]() It is important to note that tiled frames must be precisely aligned. There
can be no space between each tile. Creating these images must be done with a pixel-accurate
graphics program such as Adobe Photoshop. Both vertical and horizontal alignment
of tiled frames is necessary for the applet to animate properly.
It is important to note that tiled frames must be precisely aligned. There
can be no space between each tile. Creating these images must be done with a pixel-accurate
graphics program such as Adobe Photoshop. Both vertical and horizontal alignment
of tiled frames is necessary for the applet to animate properly.
Tip: It takes at least three frames to show directional movement in an animation.
Tip: To make GIF images as small as possible, we recommend using the GIF compression service offered by GIFWizard.
![]() Using transparent GIF images adds a whole new dimension to your PageCharmer
applets. It gives you the opportunity to have a third layer in the LiveG-Ticker,
LiveT-Ticker and the LiveG-Marquee. Simply by assigning a "BGColor" (background
color) while keeping the already assigned "BGImage" (background image).
Wow, two backgrounds in one applet. With the rest of the AppletSet'rs it enables
the applet to take on the shape of that specific image. It may be difficult to judge
beforehand when you may want to utilize this option so we suggest that you start
each new image as a transparent GIF; consider it a time saver.
Using transparent GIF images adds a whole new dimension to your PageCharmer
applets. It gives you the opportunity to have a third layer in the LiveG-Ticker,
LiveT-Ticker and the LiveG-Marquee. Simply by assigning a "BGColor" (background
color) while keeping the already assigned "BGImage" (background image).
Wow, two backgrounds in one applet. With the rest of the AppletSet'rs it enables
the applet to take on the shape of that specific image. It may be difficult to judge
beforehand when you may want to utilize this option so we suggest that you start
each new image as a transparent GIF; consider it a time saver.
![]() The following step by step instructions is just one way to create a transparent
GIF. It assumes that you are comfortable in Adobe Photoshop, so it starts off when
the graphic is done and you need only to save it as GIF89a.
The following step by step instructions is just one way to create a transparent
GIF. It assumes that you are comfortable in Adobe Photoshop, so it starts off when
the graphic is done and you need only to save it as GIF89a.
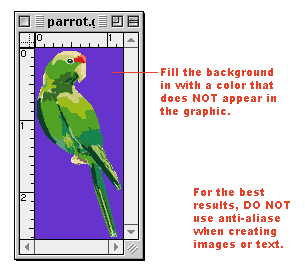
![]() Choose Indexed Color from the Mode menu. The Index Color dialog box appears.
Select the resolution, palette, and dither method. See Photoshop User Guide for option
descriptions.
Choose Indexed Color from the Mode menu. The Index Color dialog box appears.
Select the resolution, palette, and dither method. See Photoshop User Guide for option
descriptions.
![]() Choose GIF89a Export from the Export menu. The GIF89a Export dialog box
appears.
Choose GIF89a Export from the Export menu. The GIF89a Export dialog box
appears.

Tip: To make GIF images as small as possible, we recommend using the GIF compression service offered by GIFWizard.
![]() Using "ALT" (alternative) images will offer each and every viewer
the benefits of your carefully designed Web page. There is no need to worry about
losing the feel of your site. Simply create an identical single image that will only
be displayed in place of your PageCharmer applet if the browser is not Java capable
or when Java is turned "off". This image should then be linked to the same
URL or anchor as the applet.
Using "ALT" (alternative) images will offer each and every viewer
the benefits of your carefully designed Web page. There is no need to worry about
losing the feel of your site. Simply create an identical single image that will only
be displayed in place of your PageCharmer applet if the browser is not Java capable
or when Java is turned "off". This image should then be linked to the same
URL or anchor as the applet.
1. Since there are several different ways images are handled by PageCharmer AppletSet'rs see the list below for instructions:
2. Note the naming recommendations of "ALT" images
3. Now add it to your Web page.
Tip: The above instructions can be followed when using images from the included PageCharmer Graphics Library as well.
![]() All sounds used by PageCharmer Java applets must be .au files.
All sounds used by PageCharmer Java applets must be .au files.
![]() If you are using a Macintosh, we recommend the use of the Shareware utility
ConvertMachine
version 1.2 or later to create or to convert to .au files.
If you are using a Macintosh, we recommend the use of the Shareware utility
ConvertMachine
version 1.2 or later to create or to convert to .au files.
![]() If you are using Windows® 3.1, Windows 95®, or Windows NT®,
we recommend the use of the Shareware utility Cool Edit® version 1.53 or later to create or to convert
to .au files.
If you are using Windows® 3.1, Windows 95®, or Windows NT®,
we recommend the use of the Shareware utility Cool Edit® version 1.53 or later to create or to convert
to .au files.