Viewing Options
When viewing images with 20/20, there are several options and tools that can be used.
These include:
Panning
Once you have either opened or captured an image, the title of the image is displayed in
the title bar of the window. If the image is larger than what can fit into the
display area of 20/20, image scroll bars will appear. By clicking and dragging the
scroll bars, you may scroll portions of the image into view. You may position an image by
using the "Pan" tool. You can select the Pan tool from the
"Tools|Pan" menu or by clicking the Pan tool speed button .
.
Once the Pan tool has been selected, simply click the left mouse button anywhere on the
image and drag the image to the desired position.
Zooming
There are several methods to zoom an image. The first, is by using the "Zoom
In" and "Zoom Out" menu items located the View menu. Each of the Zoom
menus contains ratio sub-menus. Simply select the desired zoom ratio. To zoom
back to the original image size, select a ratio of 1:1 from either of the menu items.
There are two tools that can be used to zoom an image: Zoom Point  and Zoom Area
 . These tools may be selected from the
Tools menu or by clicking the corresponding speed button. With the Zoom Point tool
you can zoom in by clicking on the image with the left mouse button and zoom out by
clicking on the image with right mouse button. When zooming in with the left mouse
button, the point that is clicked will be centered in the view. Each click will
increase or decrease the zoom ratio by a factor of 1.
Note; when you zoom the image to a size that is smaller than the original size, the
appearance is effected by the "Blit Mode" option located on the Display tab in
the Preferences dialog.
Split View
20/20 has a viewing feature named Split View. This allows you to split the
viewing area into two windows either vertically or horizontally. This can be done by
selecting "Image|Split|Horizontal" or "Image|Split|Vertical"
 from the menu, or by
clicking on the corresponding speed buttons. When an image is initially split, the
image contents of the original viewing area is automatically placed into the new window
(without annotations). Both viewing areas are independent of each other. All
command and image manipulation tools apply to the "active" image. The
active image is the one that is currently selected and appears to be raised. You may
select the active image by clicking on the image you want to be activated. When you
open or capture images, the image is placed into the active image.
The "Split bar" that appears between the two images may be moved by clicking
and dragging the bar to the desired position.
Resizing
When an image is saved, it is saved in the original size regardless of how the
image is zoomed. For example, If you open an image that 100x100 pixels, zoom in two
times (200 x 200) and then save the image. The image is saved at the 100x100
dimensions. In order to save the image in a size that differs from the original
image size, it must first be physically resized. This can be done by selecting
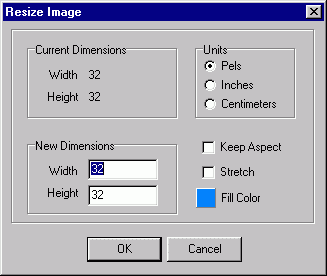
"Image|Resize" from the menu. This will cause the resize dialog to appear:

Figure 1.
Current Dimensions
These are the current width and height of the image measured in the units specified by
"Units" options.
Units
Indicates the unit of measure you want the Current and New dimensions to represent.
New Dimensions
Specify the width and height of the new dimensions of the image.
Keep Aspect
If this option is checked, 20/20 will automatically maintain the original image aspect
ratio. For example, if the original image is 100x75 pixels and you set the new
dimensions width to 200, 20/20 will automatically set the height to 150.
Stretch
If this option is checked, 20/20 will stretch the original image to fit the new
dimensions.
Fill Color
This option is only used when an image is being resized larger than the original, and the
stretch option is not checked. 20/20 will fill the unused area with the color
specified here. To change the fill color, click on the color button and select the
desired color.
Once you are done setting the resize image options and dimensions, click
on OK to resize the image.
Contents