MicroHof HTML Automator
v1.3 Help
by Brian Hof
Latest Information (jump to topics)
To view the latest updated documentation for MicroHof HTML
Automator, and to download the newest version, visit the on-line help center at http://www.public.iastate.edu/~microhof/mhauto!
As of now, I know of two business sites that use MicroHof
HTML Automator. If you use MHAuto and would like mention of your page
here, just let me know. Currently, http://www.platbook.com
uses MHAuto to create and maintain the "Printed Platbook" section, and
http://www.idealauctions.net uses
MHAuto to create and maintain the "Liquidations" section.
And what better than user testimonies to convince you of
MHAuto's potential: "I have just reviewed and experimented with version
1.1 and am downloading 1.2, and I think you have created exactly what I have
spent several sleepless nights trying to accomplish. I have downloaded and tried
many (probably 10) database to html programs, and yours is by far the most
logical and user (not programmer) friendly. I could have mastered Access and
Visual Basic in the time that I have spent with some... ...Thanks for an excellent
piece of work..."
Help Topics
Getting Started
What is MicroHof HTML Automator?
What can I do with MicroHof HTML Automator?
The Main Window
File Menu Options
Input Settings
Output Settings
Template Settings
Template Tags
Deleting Tags
Editing The Template
Previewing The Template
Running Your Automation
More About Frogs Example
Technical Details
Glossary
If you are reading this, you have successfully installed and run MicroHof HTML Automator. The default directory it is installed to is "C:\Program Files\MicroHof HTML Automator". It includes two subdirectories - Frogs (which contains the frogs example detailed in this documentation) and Help (which contains this documentation). A program group containing two shortcuts should have also been created in your Start menu. Most likely, that is how you first ran the program.
If, someday, you wish to uninstall MicroHof HTML Automator, the process is quite simple. Just go to the "Add/Remove Programs" control panel in the Windows Control Panel. Find MicroHof HTML Automator in the list of installed programs and click the "Add/Remove..." button. I can't imagine why you would ever want to uninstall this wonderful program, but I suppose, should aliens or a federal agent ever threaten to kill you unless you uninstall MicroHof HTML Automator, it is good to know how.
What is MicroHof HTML Automator? (top)
If you're like me, you don't like to be overwhelmed by complicated looking interfaces and long documentation when you set out to use a new application. I tried to keep this in mind as I designed MicroHof HTML Automator. Nevertheless, when designing a program with such widespread application and usefulness intended for businesses and individuals alike to benefit from, one cannot avoid a certain quantity of complexity. Indeed, at first glance, MicroHof HTML Automator may seem slightly overwhelming. It will take a little bit of getting used to, but once you have mastered its functions you will be able to harvest its benefits.
If you are reading this documentation before or shortly after running MicroHof HTML Automator for the first time, it may not be entirely clear just what this program is. Hopefully after reading this section, and maybe the next, its reason for existence will be clear. MicroHof HTML Automator (hereafter referred to as MHAuto) is an application that allows you to generate web pages from a database. This is the most technical description that I can think of. Following is a brief explanation of the steps MHAuto goes through whenever you run an automation. The terms used and the means with which you define the settings will be detailed in later sections.
Step 1 - MHAuto inputs a row of text from an input file. Each row is split into columns. The input file may have delimiters separating each column, or the columns may be of fixed width. You may specify whether each column contains a value or text, and you may specify formatting for each column containing text. One of the columns must be defined as the repetition control column. It is very important that you understand the purpose of this column, so be sure to read about it in the Input Settings and Template Settings sections.
Step 2 - MHAuto links the defined template tags to the appropriate column value(s).
Step 3 - MHAuto examines the repetition control column.
Step 3a - If the value in the repetition control column is different than that of the previous row, the current output file is terminated (the template's footer is added and the file is closed). A new output file is started (the file is created and the template's header is added).
Step 3b - If the value in the repetition control column is the same as that of the previous row, the portion of the template between the header and footer is added to the current output file.
Step 3 NOTE - The output filename is always the current repetition control column value, with ".HTM" appended.
NOTE - Whenever any text from the template is added to the output file, be it the header, the footer, or the code between the header and the footer, it is searched for the template tags. If a template tag is found in the text, it is replaced with the value linked to the tag in Step 2.
Step 4 - If there are rows remaining to be inputted from the data file, return to Step 1. Otherwise, the automation is complete.
Hopefully the above steps give you a better idea of just what MHAuto does - and thus, what it is. If not, continue reading, and play with the program and the included example. Soon you'll feel right at home with MHAuto.
What can I do with MicroHof HTML Automator? (top)
Ok, so now you have a basic idea of the purpose of MHAuto. Now you may be asking yourself the very question from which this section got its title. In all honesty, you probably wouldn't have downloaded and installed it in the first place if you didn't think it might come in handy. But maybe you were in one of those maniacal downloading moods, as I sometimes find myself in, and you downloaded everything in sight that had a nice description. If, for any reason, you find yourself asking the said question, this section is for you.
Think back to the time you designed the website for your highly successful plastic frog retail business. Remember how you had to make separate pages for each and every type of plastic frog (of which there were 2,753)? How meticulous the job was, inserting various statistics on each type such as manufacturer, color, weight, price, and more into each of the 2,753 pages. Not to mention coordinating all of the next and back links on each page so that they took you to the next or previous frog, and inserting the part number into the already-confusing CGI links to add the frog to the shopper's basket. It was a nightmare! But the most annoying part of it all was that you had all of that information listed in a database, yet there was no easy, quick way to convert that database into the multitude of pages you needed.
Sure, maybe you've never designed web pages for 2,753 plastic frogs. But the scenario shows just how helpful MHAuto can be. Whether you're creating product pages, or any other set of pages that have the same layout with different values, MHAuto can automate that task in minutes. Simply create an automation for the task at hand, and run it!
Sounds easy, right? Well there are still some tricks and methods that you need to learn before you begin creating an automation. So if you are serious about getting things done right, sit back, relax, grab some popcorn, get your MP3 player going, and read on!
We will consider this plastic frog example as we move on. A template file, input file, and automation file were included (frogs.htm, frogs.txt, and frogs.aut) with MHAuto. The rest of the help will include steps to create that very frogs.aut automation file, assuming that you installed MHAuto to the "C:\Program Files\MicroHof HTML Automator" directory. The included files should be in a subdirectory named "Frogs" in whatever directory you installed MHAuto to. A complete version of the frogs.aut file that I am about to walk you through should be in the main program directory. For simplicity, there will not be 2,753 types of plastic frogs. Instead, there will only be 10.
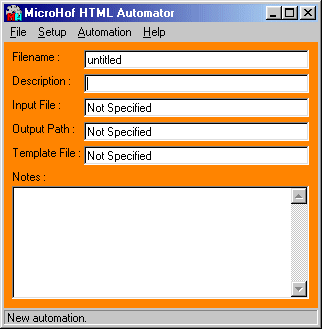
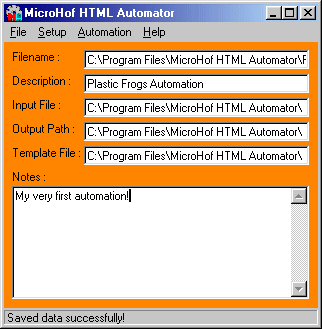
Welcome to MHAuto! When you first run the program, you are greeted with this bright orange window. I hope you don't mind the orange - I thought it would brighten things up a little!
At the very top of the window is the menubar. Much like any other program, you access MHAuto's various setup windows and functions from the menubar. Just below the menubar, you see six textboxes, whose functions are listed :
Filename - displays the path to the current automation.
Description - allows you to enter your own description for the automation.
Input File - displays the path to the selected input file.
Output Path - displays the selected path for output.
Template File - displays the path to the selected template.
Notes - allows you to enter any number of notes about the automation.
As you may have guessed, only the Description and Notes can be edited. The other four boxes display information that you must enter in the setup windows. That's about all there is to say about the main window...
Clicking on File in the main window's menubar gives you this drop-down menu :
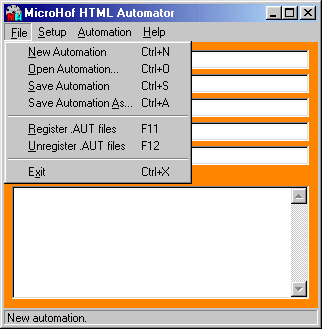
I have made the options as descriptive as possible. While they are similar to those you may find in any other program's file menu, I nevertheless elaborate further :
New Automation - Begin a new automation.
Open Automation - Open an existing automation.
Save Automation - Save the current automation.
Save Automation As... - Save the current automation using another filename.
-
Register .AUT files - Associate .AUT files with MHAuto.
Unregister .AUT files - Unassociate .AUT files with MHAuto.
-
Exit - Close MHAuto.
As with other programs, fear not! If you accidentally select one of these options before saving your changes to the current automation, you will be prompted to save the changes. There are also shortcut keys to all of the menu options...you will find them listed in the drop-down menus.
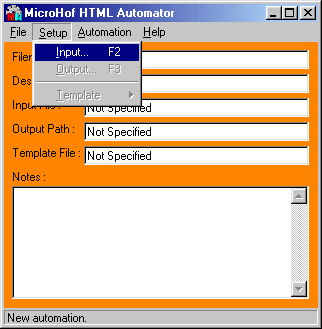
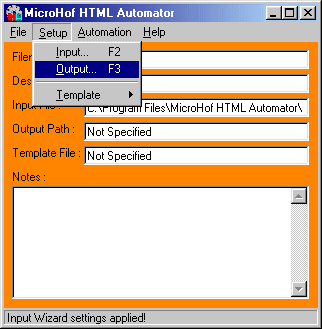
Alright, its time to dive into the more complicated aspects of MHAuto. The very first thing you need to do when creating an automation is define the input settings. To do so, click on Setup in the main window's menubar, and select Input... from the drop-down menu as shown below. If the current automation has no previously defined input settings, the Output... and Template options are disabled. This is because the setup windows for those options require defined input settings.
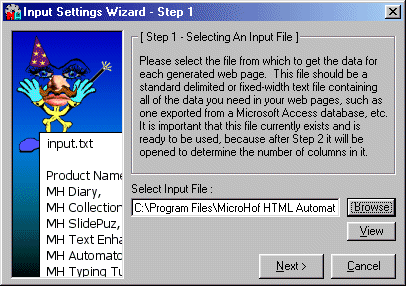
Welcome to the Input Settings Wizard! This 3-step wizard walks you through configuring the input settings. For our frogs example, we will need to click on the Browse button. This will pop up a file selection dialog. Locate the file "C:\Program Files\MicroHof HTML Automator\Frogs\frogs.txt", and click Open. That's all for the first step - click Next! (NOTE - Clicking on that little View button will load the selected file in notepad. This is sometimes handy if you need to see how to set up the input.)
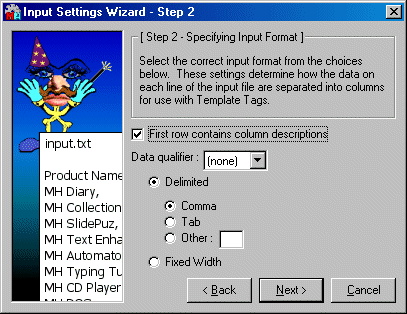
Now you must specify the column separation method used in the input file. In our frogs example, frogs.txt is comma delimited. This means that each column of every row is separated by a comma. The first row of frogs.txt contains descriptions for the columns. We want to input these descriptions and use them to help us remember what each column is for, and we do not want the first row to be used to generate the output files. If you aren't understanding any of this, open up the input file and study it. Based on this information, we need to select the Delimited option, and specify Comma (which happens to be the default). We also need to check the "First row contains column descriptions" option. Once this is done, click Next!
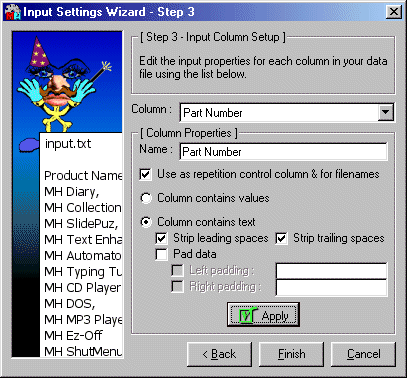
Now it is time to set the properties for each column. These properties define what we may link to our template tags (which we will discuss later). In our frogs example, every column contains text (no values). This is the default for each column, so we need not set this option. Each column, however, may contain leading and trailing spaces. Thus we need to go through each column and check the appropriate boxes. The very last column, Part Number, is what we will use to control repetition. This way, each unique part number will have its own web page containing all of the frogs with that part number, and the page's filename will be the part number with ".HTM" appended. So, cycle through the columns using the drop-down list and set the properties for each by selecting the desired options and clicking Apply. It is important that you click Apply, or the changes you make are not saved. When you get to the last column, check the "Use as repetition control column & for filenames" option before clicking Apply. When you are all done, click Finish!
There. All of the input settings for our frogs example have been defined, and you should be back at the main window. Configuring these settings for any other automation is very similar. Depending on the project, you may wish to use a delimiter other than the comma or the fixed width option. If you choose the fixed width option, another step (2b) will appear that allows you to specify the width of each column. You may need to specify a "Data qualifier" in Step 2. The "Data qualifier" is a surrounding character that marks anything in the input file that should qualify as data. If you choose a qualifier (a double or single quote), all MHAuto will do is strip the qualifier from the left and right of each column. Only qualifiers on the very left and very right of each column (counting spaces) will be stripped. This option is mainly to get rid of the qualifiers upon input - MHAuto does not do anything with the qualifiers and does not use them to qualify data. You may also wish to specify in Step 3 that some columns contain values rather than text. Doing so allows you to define tags that perform mathematical operations using the column values, but more about that later. You are now ready to configure the output settings!
Now that the input settings are defined, the other Setup menu options are available. You can define the rest of the settings in any order you like, but the order they are listed in seems the most logical to me. Thus, we will begin configuring the output settings for our frogs example. Click on Setup in the main window's menubar, and select Output... from the drop-down menu as shown below.
You will now see the Output Settings window. The only thing to we need to configure here for our frogs example is the output path. This is the directory/folder that all output files created by the automation should go into. For our frogs example, click on the Browse button and select the "C:\Program Files\MicroHof HTML Automator\Frogs" directory. When you have located the directory, click OK to return to the Output Settings window. Note the textbox labeled "Obtain filenames from column". This displays the repetition control column, which is also used as the output filenames. If you ever need to quickly check the repetition control column, you can look in here. Now that the output settings have been configured, click on the OK button.
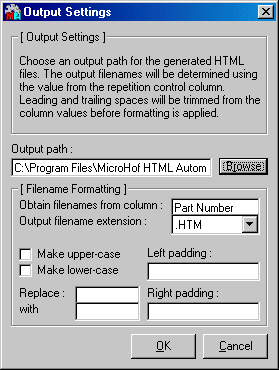
There are some "[Filename Formatting]" options here that we did not use for the frogs example. You can select the extension for the output files from the provided list. You can also specify the case of the filenames if you would like all upper case or all lower case filenames. You can enter text to add to the left and right of the filenames. You can replace characters in the filenames with other characters using the "Replace" and "with" options. Note that the replacing occurs after the padding at run-time. If you want to use an extension that is not in the list, simply pick "(none)" as the extension and include the desired extension in the "Right padding" field.
Now you're back at the main window, ready to move on to bigger and better steps...
We're half done now.... Next configure the template settings. Click on Setup in the main window's menubar, and select Template >> Settings... from the drop-down menu as shown below.
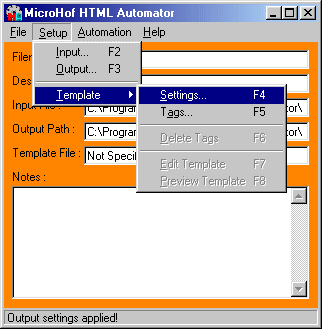
The Template Setting window will appear. This is where you specify the template file, and whether or not the template contains a header and a footer. If you specify that the template has a header and/or a footer, you must also specify the text which signals the end of the header and/or the beginning of the footer. This text should be on a line by itself after the header and/or before the footer. For our frogs example, click on Browse and select the file "C:\Program Files\MicroHof HTML Automator\Frogs\frogs.htm". Leave the other settings alone, because we will use a header and a footer and we will use the default strings. Now click on the OK button to finish!
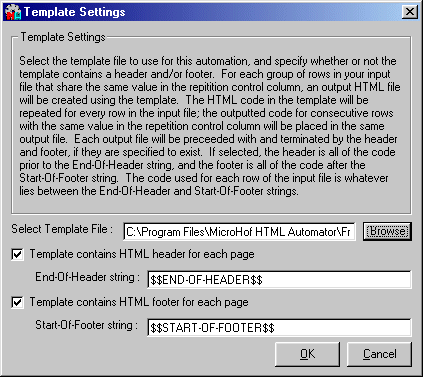
That's it for our example, but this *is* a help file, so I shall further explain the nature of the template. The template is a text file (or html file) that contains the layout for each web page that will be generated. If you indicate that it contains a header, everything in the template prior to the End-Of-Header string will be saved at the beginning of each output file, and everything in the template after the Start-Of-Footer string will be saved at the end of each output file. The contents of the template that lie between these strings is the code used for each row of the input file. This section of the template will be saved in each output file once for every row in the currently repetition group. A repetition group is defined as a group of consecutive rows in the input file sharing the same repetition control column value.
As every line is transferred from the template to the output file, it is searched for template tags. When a template tag is found, it is replaced with the value that the tag is linked to (which we will learn about next). You may use tags in the header, footer, or main segments of the template, but note that any tags in the header will only be replaced with values for the row that is being processed when the header is inserted, or the first row of a repetition group. Similarly, tags in the footer will be replaced with values for last row of a repetition group.
Something very important to note is that your input file should have all rows sharing the same repetition control column value GROUPED TOGETHER in what I have denoted repetition groups. If there are more than one repetition groups with the same repetition control column value in an input file, you will only get an output file for the last group because the previous output files will be overwritten (as they will all use the same filename, too).
Phew! In short, tags may be used in all sections of the template. Be sure every repetition group in your input file has its own unique value in the repetition control column. Now, for the tags...
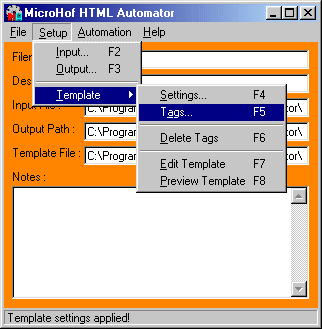
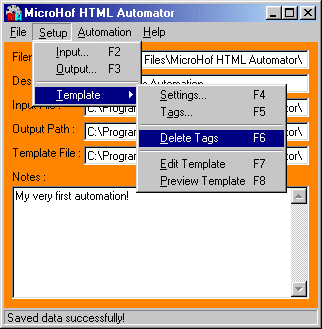
One more configuration step remains...creating the template tags. Click on Setup in the main window's menubar, and select Template >> Tags... from the drop-down menu as shown below.
This last step is probably the most complicated. Do not let the picture that follows bewilder you. How you define tags makes or breaks your success. Be glad that it is complicated - the cause of all of this complexity is the flexibility you have with defining tags. First, lets go through setting up tags for the frogs example. Then, I will explain anything else you might want to know about tags for your own project. Before all of that, take a look at the Template Tag Settings window and study its contents carefully. I will be referring back to them often.
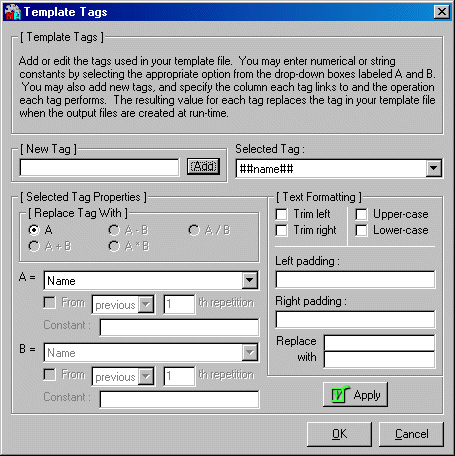
The best thing to do is add all of the tags that you think you might need first to the tag list. If you think of more later, you may create them then. Let's create one tag for each column of the input file, so we can insert the values of these columns into each outputted web page. Add the following tags by typing them into the "[New Tag]" box and clicking the Add button after each entry : ##name##, ##manufacturer##, ##color##, ##price##, ##weight##, ##quantity##, ##partnumber##. After you add the first tag (##name##) your window will resemble the one above.
Each tag is linked by default to the first column. We want to link the new tags to the correct columns. But first, lets talk about what you can and can't do. Remember when you set up the columns in the Input Settings Wizard? You specified whether each column contained a value or text. We left them all as text, which is fine for our example. The only operation you can do with a tag linked to text is replace the tag with the text, which is why you only have the option of selecting "A" in the "[Replace Tag With]" box. If you choose a column from the "A =" list that contains text, only "A" will be available. If you choose a column that contains values, you will be able to select "A" as well as "A+B", "A-B", "A*B", and "A/B". If you choose a value column and an option other than "A", you will also have to select a column from the "B =" list. The B column must be a column that contains values, because as I said you cannot do mathematical operations with text. In our frogs example, there are no value columns, so you don't have to worry about this.
Also, if the A column contains text you can specify a few formatting guidelines in the "[Text Formatting]" region :
The first things in the region are two checkboxes, "Trim left" and "Trim right". Selecting one of these will remove spaces from the left and right of the tag contents as indicated. The trim settings are applied to the tag contents FIRST. (You can specify to trim spaces during the input setup, as well, but doing so means that the column will always be trimmed before it is linked to any tags. If you want some tags that trim a column and some that don't, you should wait and specify the trim settings here.)
The next things in the region are two more checkboxes, "Upper-case" and "Lower-case". Selecting one of these will convert the tag contents to upper or lower case, as indicated. The case settings are applied to the tag contents SECOND.
The next things in the region are two more textboxes in which you may specify left and right padding for the tag contents. Padding is added to the tag contents THIRD. (Again, you can specify padding during the input setup. Any padding indicated in the input settings is added before any tag formatting.)
The last things in the region are two textboxes labeled "Replace" and "with". If the "Replace" box contains any text, every occurrence of the text in the tag contents will be replaced with the text in the "with" box. The replacement is made in the tag contents LAST.
If the A column contains values, you cannot specify trimming, replacement, or padding.
So, as I said, let's link the new tags we added to the correct columns. Cycle through each tag and link it to the column of the same name by selecting the tag in the "Selected Tag" list, selecting the column in the "A =" list, and clicking Apply.
If you are a curious user, like me, you are wondering what the last few options in the "A =" and "B =" lists are. The "A =" list contains the "Numerical Constant (enter below)" and the "String Constant (enter below)" options after all of the columns. The "B =" list only contains the "Numerical Constant (enter below)" option - this is because you can't use text in arithmetic. Now what in the heck are these options for? It shouldn't be too hard to figure out. You can use numerical constants for either operand in an arithmetic tag. Because these constants are entered by you, they remain the same throughout the entire automation process. You can use string constants in non-arithmetic tags. String constants remain the same throughout the automation as well. String constants can be formatted also, but I don't see why you would trim, replace, or pad a string constant when you could just include all of that in the string. Once you select to use a numerical or a string constant, the "Constant :" box for the operand is activated. Type your constant into the box and you're all set. We will be using a string constant in a moment for our frogs example...
On to the next tags for our frogs example. The frogs.htm template has "Previous Frog" and "Next Frog" links in the header. We want these links to point to the page for the previous part number and the next part number. We are about to use one of the most helpful features of MHAuto. Add the tag for the "Previous Frog" link the same way you added the first links. Call the tag ##previousfrog##. Select "Part Number" from the "A =" list. Notice when you select the "Part Number" column, the "From previous/next nth repetition" checkbox below the list becomes active. This option is only available when the repetition control column is selected for A and/or B. Check this box, and leave it set to "previous" and "1"th. I realize 1th isn't correct, but give me a break. Click Apply. This will link the tag to the repetition control column value from the previous repetition group. In this case, it means that ##previousfrog## will always contain the previous frog's part number. Now, in the "Right padding" box, enter ".HTM". This will pad the previous part number with ".HTM". Add the last tag, ##nextfrog##. Select "Part Number" again, check the "From previous/next nth repetition", and this time select "next". Enter ".HTM" as the "Right padding" again. Click Apply. Now the ##nextfrog## tag is similarly linked.
We have one more tag to create for our frogs example. There is a "Home" link right between the "Previous Frog" and "Next Frog" links in the header. This link needs to point to the web site's home page. Sure, you could just set the link up correctly in the template to begin with, and not even use a tag. But I want you to learn about string constants. So, add another tag named ##home##. Select "String Constant (enter below)" from the "A =" list. In the now-active "Constant :" box, type "home.htm". Click Apply. There! Now the ##home## tag will contain "home.htm" during the whole automation process.
When you are all done, click on OK. Can you believe it? You're ready to run the automation! Let's finish up the automation with a few final touches, and save it. Now that you're back at the main window, enter a description such as "Plastic Frogs Automation". If you want to be cutesy, enter something like "My very first automation!" or "Hello, world!" in the notes box. Then click on File in the main window menubar, and select Save Automation. If you want to you can save over the frogs.aut file that should already exist, but I suggest saving it as frogs2.aut. This will enable you to compare your automation with the correct included one if something should go wrong.
If you want to learn about the last two options in the Setup >> Template menu, read on. If you want to skip straight to running this new automation, go to the Running Your Automation section.
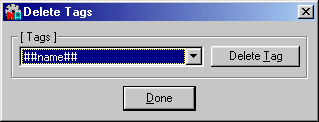
I almost didn't include this feature. But I realized that many people, like me, make mistakes. If you ever decide to remove a tag you have created, you may do so by clicking on Setup from the main window's menubar and selecting Template >> Delete Tags. If you accidentally spell a tag's name wrong you will have to remove it and add a correct one because, as you may have noticed, there is no way to change a tag's name.
Choosing this menu option will pop up a window that lists the tags and lets you select and delete them. When you are done deleting things, click Done.
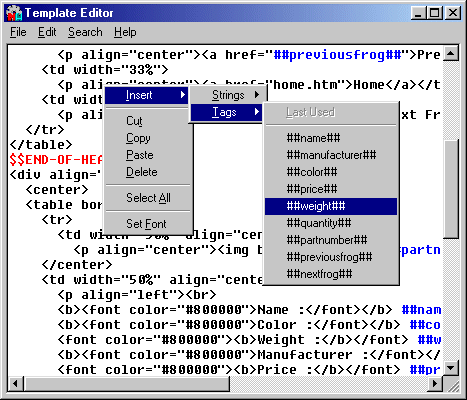
If the template settings are defined, you will find the Edit Template option activated under the Setup >> Template menu. One prerequisite for using this feature is that the template file must exist (if template settings aren't defined, you won't be able to use it anyway). Selecting this option opens up the template file in the internal Template Editor.

Normally, you would not create an entire template using this editor. Instead, it would be much easier for you to create the HTML for the template using your favorite HTML editor. Sure - if you are like me, your favorite editor is notepad. My advice to you, then, is to create the HTML in notepad. The internal Template Editor is there to allow you to quickly and seamlessly insert the End-Of-Header string, Start-Of-Footer string, and your tags into the template. Its not that you couldn't create the entire template in the editor - it does have nearly all of the features of notepad. If you insist on doing so, you will still have to create a blank template file so that you can select it in the template settings so that the editor is available.
Anyway, as I was saying, the editor allows you to easily insert tags into the template. Observe the following picture, and then I will describe all of the menu options present in the editor.
The menu options present in the editor are :
File >> Save Template - Save the template file.
File >> Quit And Return To MicroHof HTML Automator - Self-explanatory. Does not save the template file.
Edit >> Insert >> Strings >> End-Of-Header string - Self-explanatory.
Edit >> Insert >> Strings >> Start-Of-Footer string - Self-explanatory.
Edit >> Insert >> Tags >> Last Used - Insert the previously-inserted tag.
Edit >> Insert >> Tags >> (Tag list) - Choose a tag from the list to insert it.
Edit >> Cut - Cut the selected text to the clipboard.
Edit >> Copy - Copy the selected text to the clipboard.
Edit >> Paste - Replace the selected text with the clipboard's text contents.
Edit >> Delete - Delete the selected text.
Edit >> Select All - Select all of the text.
Edit >> Set Font - Set the editing font.
Search >> Find - Search the template for the first occurrence of a string.
Search >> Find Next - Search the template for the next occurrence of the string previously entered using Find.
Help >> View Help - Load this help file.
Now you see what I was talking about - to insert tags or the header/footer strings, either use the Insert menu options from the Edit menu, or right-click in the text window and select Insert! Whatever you select will be inserted at the current cursor location. The tags/strings are even color coded! The End-Of-Header string is red, the Start-Of-Footer string is green, and the tags are blue. If you insert them with the menu or if you paste them into the template, they will be color coded. If you type them in by hand, they will not be. But I fail to see why you would type them in by hand when they are all right there in the menu. Advanced users will note that the text box is a rich text box. Fear not; although the text box contains color tags, the template is loaded and saved as plain text.
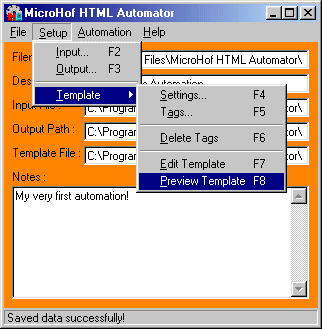
If the template settings are defined, the Preview Template option is active under the Setup >> Template menu. Selecting this option loads the template file in your default browser so that you can see what it looks like. It will be loaded as-is; that is, with no tags replaced. This option just provides a quick way to check it out.
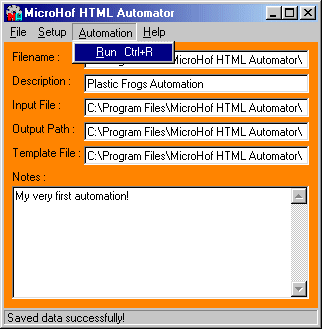
Alright, so you've set everything up. Now its time to run the automation. Running the automation means just what it implies - all of the output files are created in the output path using the input file, the template, and your defined settings. If you are following along in the frogs example, go ahead and run it now by clicking on Automation in the main window's menubar and selecting Run, as shown below. You will be prompted to be sure you meant to click on Run, so answer Yes. The automation will run, and a percentage bar will be displayed. If for any reason the program encounters an error while running, you will be notified and the run will be aborted. The automation first "simulates" the run to check for errors. When all is clear, it runs.
Tada! The output files have been created, and can be found in the output path. Go ahead and look at the output for the frogs example once you have run it. I think you will be quite pleased.
Perhaps you are to the point where you are seriously considering using MHAuto to create your web pages. If you are one of those types who likes command line features, or if you are integrating MHAuto into your already existing batch routines, have I got a surprise for you. MHAuto accepts two command line options. If you type "mhauto autfile.aut" (where autfile.aut is any existing automation), MHAuto will start up with the specified automation opened. If you type "mhauto /run autfile.aut", MHAuto will run the specified automation. The "/run" option does not load the interface, and if successful it does not even display any messages. If errors are encountered during the automation, you will be alerted via Windows dialog boxes.
More About Frogs Example (top)
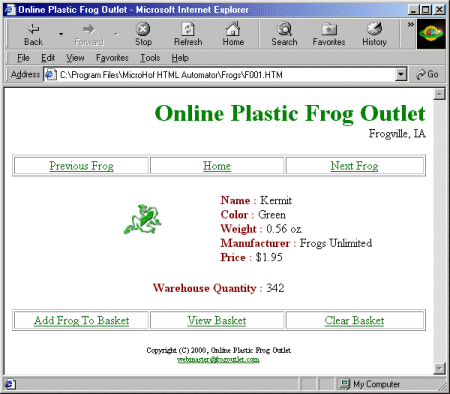
There isn't much more to say about the frogs example. I hope that it has been helpful in teaching you the basics of MHAuto. As you may have already discovered, you have an extreme amount of flexibility in MHAuto and are thus capable of doing massively complex things, and creating many database-dependent web pages in a matter of seconds. For your reference, here is what the F001.HTM file should look like (after you have run the automation the first time) :
Hopefully the most important idea is clear to you by now - the repetition control column. If not, perhaps one last step to the frogs example will help clarify it. Go back to the input settings wizard and go to the last step (leaving everything else the same). Select the Manufacturer column, and check the "Use as repetition control column & for filenames" option. Click Apply, then Finish. Run the automation. *Now* look at the newly created output files. This should make the repetition control column's purpose clear. You might think to do this you have to go back to the template tag setup and re-link the ##previousfrog## and ##nextfrog## tags to the Manufacturer column. Wrong! Any tags linked to *previous* or *next* repetitions will be automatically relinked to whatever you change the repetition control column to be.
Of course, www.frogoutlet.com does not exist, so don't expect the home or basket links to work!
In case you would like to know some technical
details about MHAuto, you can read this section. I'm just going to list
all the things I can think of. To begin with, only the first 300 columns
can be used from your input file. Likewise, you can only define up
to 300 tags (and thus 600 constants). Your input file can only contain up
to 2000 repetition groups. If you have more than that, break it up
into two input files and run them each separately. Sure, for the
frogs example you will have to change the Previous Frog and Next Frog links on
the middle two pages manually, but its better than doing it all
manually. MHAuto will not accept an input row that is smaller in length
than the sum of all of the entered widths for fixed width input; this is
for reasons that I believe are obvious.
When you specify that a column
contains a value rather than text, the option's name suggests that it
must be an integer. This is not true. When you select this option,
the column will have all spaces trimmed off the front and end and it will be
converted into what is called a variant number. As long as no foreign
characters are in the columns data, both integers and decimals can be
used. Anything that is not a decimal point, like a dollar sign, will cause
the value to be interpreted as a zero. Numerical constants can also be
decimals, and follow the same rules. Future releases of the program will
have the "(integers only)" caption removed from Step 3 of the column
setup wizard to avoid this confusion.
MHAuto accepts command line parameters. You can read about these parameters in the Running Your Automation section.
I am incapable of testing all of the possible things people could do with this program. If you are running an automation and you encounter an error - be it a program error or an output error, please tell me about it as soon as you can. I will try and fix it immediately, and get the updated version to you. Please send me a description of exactly what you were doing before the error occurred. Chance are I can only fix the problem if I can recreate the error. It would also be nice if you could send me your input file, template file, and automation file. You can contact me at microhof@iastate.edu.
If you were getting annoyed by all the bold text throughout the help, too bad. The bold items are bold because they can be found here with definitions. Just be glad I didn't link them all to the glossary. These are the terms that are imperative to your understanding of the help.
.AUT - This is the extension for automation files.
automation - An automation is the term used to describe the settings profile MHAuto allows you to create.
delimiter - A delimiter is any character that indicates the end of one column and the beginning of the next. Delimiters can be any character, but are most often commas or tabs.
End-Of-Header string - This is a string that should be placed in the template at the end of the header HTML segment, on a line by itself. It signifies the end of the header.
footer - A segment of HTML code to be placed at the end of each output file. The footer in a template should be preceded by the Start-Of-Footer string.
header - A segment of HTML code to be placed at the beginning of each output file. The header in a template should be terminated by the End-Of-Header string.
input file - The input file is the file that contains all of the database contents to be used in creating output files, arranged in delimited or fixed width columns and rows. Input files may be created by hand or they may be exported from a database application such as Access.
output path - The output path is the directory in which you want all of the output files placed when they are generated by running an automation.
repetition control column - This term describes a specific column of the input file. This column is selected by the user when the user runs the Input Settings Wizard. The repetition control column is used to create repetition groups. HTML code for rows in the same repetition group is all placed in the same output file. The output file's name is the current value in the repetition control column, plus ".HTM".
repetition group - This term describes a group of consecutive rows in the input file that share the same repetition control column value.
Start-Of-Footer string - This is a string that should be placed in the template at the beginning of the footer HTML segment, on a line by itself. It signifies the start of the footer.
tag - See template tag.
template - The template is a file that contains the HTML code to be used in generating output. Usually, it will contain various template tags that are replaced with values from the input file at run-time. It may also contain a header segment and a footer segment.
template tag - A template tag is a string of text that has been defined in the template tag settings window as being a tag. Template tags are linked to values from the input file. At run-time, template tags in the template are replaced with the values they are linked to.
text - When this term appears in bold, it refers to a value in a column of the input file that is to be regarded as a string of characters.
value - When this term appears in bold, it refers to a value in a column of the input file that is to be regarded as a numerical value, specifically an integer.
Copyright (C) 2000, MicroHof Programming