Preparing to upload the site
Before you upload your pages to the Web, use the Site Editor to do
a final check on all the files in your site. To prepare for uploading
your site, you can use the Site Editor to:
- check the estimated download times of all the pages in your
site
- verify that all links and references in your pages are not
broken
- consolidate all referenced images and multimedia files
- identify the location where files will be uploaded
To use the Site Editor:
- Choose Open Folder
as Site from the File menu.
The Browse for Folder dialog box (Windows) or the Select a Folder
dialog box (Macintosh) appears.
- In the dialog box, navigate to your site folder.
- Click OK
(Windows) or Select
"folder name" (Macintosh).
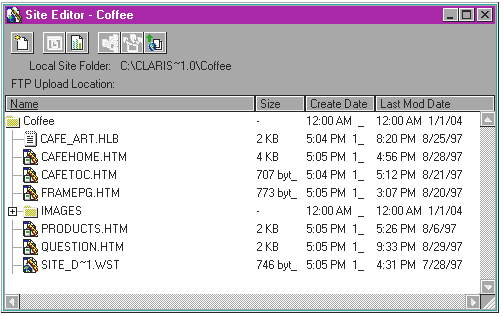
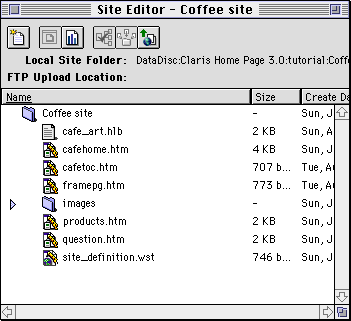
All the files in your site folder appear in the Site Editor. The
Site Editor also displays the name of your site and the total
number and size of your Web pages.
Note When you open
your site in the Site Editor, Claris Home Page creates a site
definition file in your site folder called "site_definition.wst."
(The .wst extension stands for "Web site.") Claris Home Page uses
this file to store your site settings.
Checking the document statistics
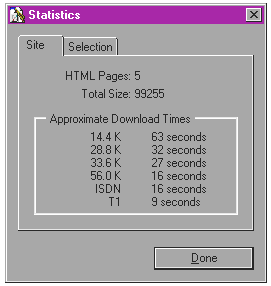
You can use the Site Editor to check the document statistics for
your entire site. Claris Home Page gives an approximate estimate of
the downloading time for individual pages in your Web site or for
your entire site.
To check the statistics for pages in your site:
- In the Site Editor, select the files you wish to check, or if
you want to check the entire site, select nothing.
- Click the Statistics button
 on the toolbar.
The Statistics dialog box appears.
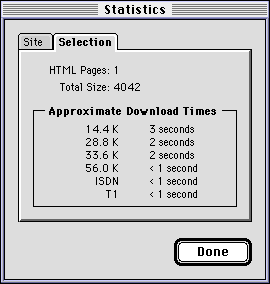
- Click the Selection tab to view the
statistics for the selection.
- Click Done to close the Statistics
window.
Consolidating media files
You can use Claris Home Page to consolidate all the media files,
including images, sounds, movies, etc., referenced by your Web pages
within your site, so they will be uploaded when you upload your site
to a Web server. You can consolidate them in your site folder or in a
folder that's separate from the pages and other associated files in
your site. If you have a lot of images in your Web pages, this can
help you keep them organized and ensure that the reference links to
the images won't be broken when you upload your pages to the Web.
When you consolidate your media files, Claris Home Page creates a
folder (named "Media" by default) or uses one that you specify to
hold the image and media files. Claris Home Page checks all
references to the image and media files made by the pages in your
site folder. If a file is not in the folder you specified, Claris
Home Page makes a copy of the file and places it there. The reference
link in the Web page is changed to reflect the new location. When you
consolidate again, any new images or media are added to the folder.
Note The media
consolidation feature does not detect media files that are referenced
within Java source code, as may be the case with multi- file Java
applets. Media files referenced in this manner do not get
consolidated.
To consolidate media files in your Web site:
- Open the Site Editor by choosing Open Folder as Site from the
File menu, selecting your site folder, and clicking OK (Windows) or
Select "folder
name" (Macintosh).
- Select the files you wish to consolidate, or select the site
folder to consolidate media for the entire site.
- Click the Consolidate button
 on the Site Editor toolbar.
If you select items in the Site Editor before clicking the
Consolidate
button, the Consolidate dialog box appears. Click Selected Files/Folders
or Entire
Site, and then click OK.
- In the Consolidate dialog box, specify where you want to
consolidate the media files by choosing an option from the
Consolidate media files
pop-up menu.
|
Choose this option
|
To specify this
|
|
At the same level as the HTML file
|
Images or media that are featured in a page are copied
to the same folder where the page that features them is
located.
|
|
In a one media folder for your site
|
All images or media that are featured in your Web site
are copied to a single folder that you specify in the
Media Folder Name text box (see step 4).
|
|
In a separate media folder for every folder in your
site
|
Images or media that are featured in a page that's in
a subfolder to the site folder are copied to a separate
media subfolder. Claris Home Page creates a media
subfolder for every folder in the site using the same
media folder name that you entered in the Media Folder
Name text box (see step 4).
|
- If you want your media files consolidated in a separate
folder(s) from the rest of your site files, type the name of your
media folder in the Media Folder name text box.
By default, Claris Home Page consolidates media files in a folder
called "Images." If the folder doesn't exist, Claris Home Page
creates a folder using the name in the Media Folder Name text box.
Claris Home Page uses this folder whenever you consolidate media
for this site until you change it in this dialog box. If later you
open an individual page from this site folder and click the
Consolidate
button on the Basic toolbar (rather than on the Site Editor
toolbar), Claris Home Page automatically consolidates all media to
this folder.
- Click Consolidate.
Claris Home Page checks the reference links in each page you
selected and consolidates all the referenced media files into the
folder you specified. If the media file is not already in this
folder, Claris Home Page makes a copy of it and places it
there.
Note A warning
dialog box may appear if a referenced file in your site cannot be
located. You can click OK to locate the file, click
Skip file to
leave the link unchanged, or click Cancel to end the consolidation
process and return to the Site Editor to examine your pages.


To consolidate images in a page you're working on:
- In Edit Page mode, click the Consolidate button on the Basic
toolbar.
Claris Home Page consolidates all image and media files referenced
in the page to the default media folder you specified. If the
media folder you specify does not exist, Claris Home Page creates
it in the same folder that contains the page you're working
on.
Verifying links and references
You can use the Site Editor to check for broken links in your Web
pages. Claris Home Page verifies links to pages, anchors on pages,
and references to image files or other associated files in your site.
Claris Home Page does not verify links to external Web sites or files
on a volume of a computer that is not networked to your computer. You
can also verify links and references in a page you're working on in
Edit Page mode.
For information about creating links to pages or anchors on a
page, see Creating links and anchors.
References to image files or other media files are automatically
created when you insert an image or media file into your Web page.
For more information, see Adding images
to your Web page and Adding
multimedia to your Web page.
To verify links in your Web site:
- Open the Site Editor by choosing Open Folder As Site from the
File menu, selecting your site folder, and clicking OK (Windows) or
Select "folder
name" (Macintosh).
- In the Site Editor, select the pages you want to check. If you
want to verify the links of the entire site, select all files.
- Click the Verify
Links and References button
 on the Site Editor toolbar.
If you selected something in the Site Editor before you clicked
this button, the Please Select dialog box appears. Click Selected Files/
Folders or Entire Site and click OK.
Claris Home Page verifies the links and references in your site.
If there are any broken links, Claris Home Page displays the
Verify dialog box for each broken link it finds.
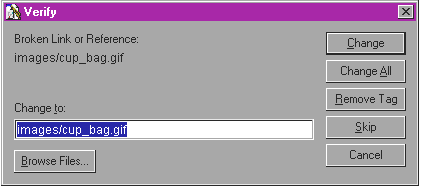
This dialog box displays the path for the broken link and also
enters it automatically in the Change to text box.
- Type the new path for the links destination in the Change to text box or
click Browse
to locate the missing file.
- For each broken link that Claris Home Page finds, do one of
the following:
- Click Change to fix the link as
specified in the Change to text box and
continue checking for other broken links.
- Click Change
All to fix all links to the same file as specified
in the Change
to text box and continue checking for other broken
links.
- Click Skip to not make changes to a
broken link and continue checking for other broken links.
- Click Remove
Tag to remove the HTML tag containing the broken
link or reference.
- Click Cancel to close the Please
Change dialog box.
To verify links in an open page you're working on:
- In Edit Page mode, click the Verify Links and References
button
 on the Basic toolbar.
Claris Home Page checks all the links in the page and if it finds
a broken link, the Verify dialog box appears.
- Type the new path for the link's destination in the Change to text box or
click Browse
to locate and enter the new path.
- For each broken link that Claris Home Page finds, do one of
the following:
- Click Change to fix the link as
specified in the Change to text box and
continue checking for other broken links.
- Click Change All
to fix all links to the same file as specified in
the Change
to text box and continue checking for other broken
links.
- Click Skip to not make changes to a
broken link and continue checking for other broken links.
- Click Remove
Tag to remove the HTML tag containing the broken
link or reference.
- Click Cancel to close the Please
Change dialog box.
Specifying the Web server account
You only need to specify the destination of your Web site once in
Claris Home Page before you upload your files. You can set
specifications for your Web server account and use it when you upload
or download a file. Claris Home Page saves the account settings for
each individual site. You can set Claris Home Page to upload files to
accounts with Netcom, Earthlink, another Internet service provider,
America Online, or to a specific intranet account.
The Web server you upload your files to must support passive or
active FTP (File Transfer Protocol). Your Internet service provider,
Webmaster, or system administrator will give you the server name
(your Web site domain), the names of the folder(s) where you can
upload your files to, the name of your account, and a password for
your account. You will probably also receive guidelines for naming
files, such as how to name the home page file of your site (typically
named "index.htm").
To specify the Web server account:
- Open the Site Editor by choosing Open Folder as Site from the
File menu, selecting your site folder, and clicking OK (Windows) or
Select "folder
name" (Macintosh).
- Click the Upload button
 on the
Site Editor toolbar.
The Upload dialog box appears.
- Click Set FTP
Options.
The FTP Options dialog box appears.
- Choose your service provider from the Service Provider pop-up
menu.
- Fill out or customize the FTP server settings, as appropriate.
|
Choose this setting
|
To specify this
|
|
Server Name
|
The domain name of the remote server, for example,
any_server.com .
|
|
User Name
|
The name of your account.
|
|
Password
|
The password for your account. Select the Save Password
check box to have Claris Home Page remember it.
|
|
Remote Folder
|
The name of the folder on the remote server where your
site files reside. If you've specified the account
information, and you're connected to the server, you can
click Browse to look for the
remote folder and enter its name for this setting.
|
|
FTP Mode
|
Use Passive or Active mode
for transferring files. Claris Home Page uses Passive
mode by default. Choose Active from the pop-up
menu if you're using a Macintosh Internet Config Setup
that's active.
|
- Click OK
to close the FTP Options dialog box.
Claris Home Page saves your account settings for the site in the
site definition file.
- To close the Upload dialog box without uploading, click
Cancel.
Previous topic |
Contents | Next
topic


