You can add a QuickTime movie to your Web page and set it to automatically play when a browser downloads the page or include a movie controller allowing your audience to start the movie when they want.
Your audience must have the appropriate QuickTime plug-in application for their browsers as well as a QuickTime movie player on their computers in order to view the movie. When you insert a QuickTime movie into your Web page, Claris Home Page automatically inserts a link to the QuickTime Web site where these applications are available for downloading. If your viewers do not have these applications on their computers, they will see a dialog box where they can activate this link.
QuickTime movies must have the extension .mov or .snm for a Web browser to recognize them. In addition, if you create a QuickTime movie on a Macintosh, you must "flatten" the movie (remove the resource fork) so that it can play on all platforms. Flattening is not necessary for movies created in QuickTime for Windows. A flattening tool is available at the QuickTime Web site.
Note You must preview your page in a Web browser for the movie to run.
When you insert a movie into your Web page, Claris Home Page displays a movie icon in your Web page while in Edit Page mode. To view the actual movie, you use Preview in Browser mode.
To insert a QuickTime movie into your Web page:
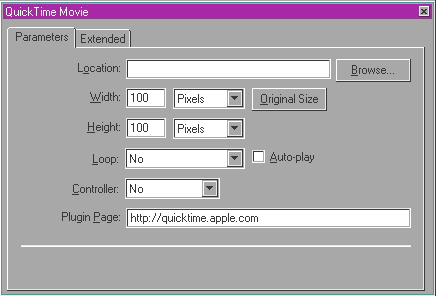
Once you insert the QuickTime movie into your Web page, you use the QuickTime Movie Object Editor to set the play options, and change other attributes of the movie, such as the width and height. You can also use the QuickTime Movie Object Editor to add your own HTML to the movie element.


To open the QuickTime Movie Object Editor, do one of the following:
To apply the new settings, press Tab or click the close box of the QuickTime Movie Object Editor.
In the QuickTime Movie Object Editor, you can set Claris Home Page to
To make the movie play automatically when the page is downloaded:
To make the movie play continuously:
You can use the QuickTime Movie Object Editor to change the size of the movie as it's displayed in the page. You can also use the mouse to change the width and height of the movie.
To change the size using the QuickTime Movie Object Editor:
To change the size using the mouse: Select the movie icon and drag the bottom handle to change the height of the movie, drag the right-side handle to change the width of the movie, or drag the lower-right corner handle to change the width and height at the same time.
To change the size back to its original setting, click the Original Size button in the QuickTime Movie Object Editor.
To test the movie, you need to preview it in a browser. You also need to test it on the same machine that has the Movie Player or QuickTime application.
To preview the QuickTime movie:
You can add your own additional HTML directly to the movie element using the QuickTime Movie Object Editor.
Note This is an advanced feature that requires knowledge of HTML; it specifies additional parameters for the <EMBED> tag.
To add extra HTML to the movie element: