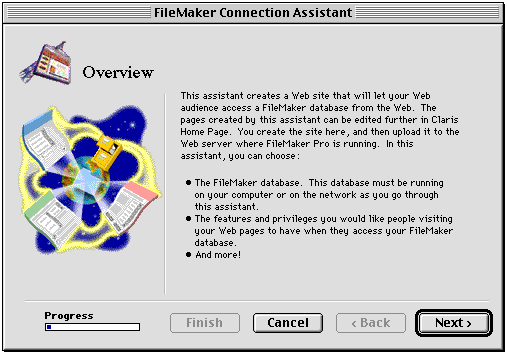
Using the FileMaker Connection Assistant
Claris Home Page provides an assistant that you can use to create
all the necessary FileMaker forms to connect to a database. With the
assistant, you specify the filename of the database file and the
layout, the fields you want to appear on specific pages, and the
access privileges and features you want to provide to your Web
audience. The FileMaker Connection Assistant creates all of the
necessary form pages and links based on the options you choose.
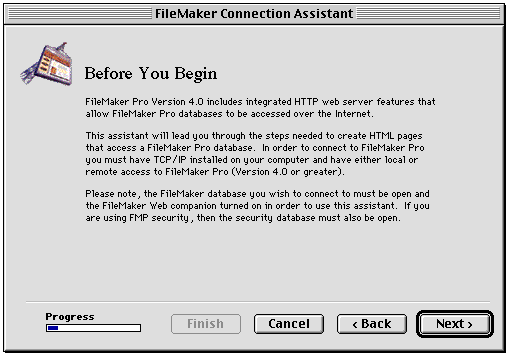
To use the assistant, you need the following:
- local or remote access to a prepared database, which must be
open before you begin
- the IP address of the remote computer hosting the FileMaker
Pro database file
- Export
records privileges enabled in the database file
- TCP/IP networking installed and configured on your
computer
- Web sharing enabled for the FileMaker Pro application and for
the database you want to access.
To open the FileMaker Connection Assistant:
- Choose New from the File menu.
- Click Use
Assistant.
- Select FileMaker
Connection Assistant in the scrolling list.
- Click OK.
The assistant displays a series of panels. When you complete
the settings on a panel, click Next to continue.
Note The
assistant is designed to be completed in a single session. When
you click Cancel,
Claris Home Page ends the session, and all
settings entered up to that point are lost.
- Click Next to select the FileMaker Pro
database that you want your Web audience to have access to.
Selecting the FileMaker Pro database
On the Database Selection panel in the FileMaker Connection
Assistant, you see the names of databases running on the server you
specify.
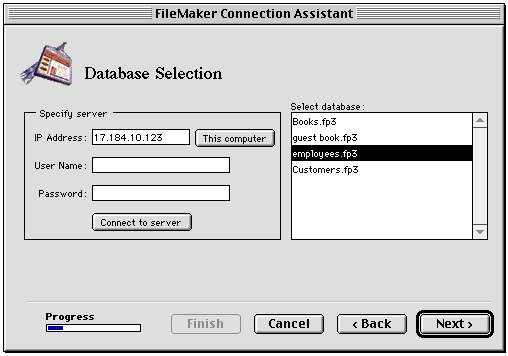
To select a database:
- In the IP
Address text box, type the IP address of the computer
where the FileMaker Pro database is open.
Click This computer
to enter
the IP address of the computer you are working on. To
connect to a server on the network, ask your network administrator
for the IP address of the remote computer you want to access.
- Type your user name in the User Name text box, and then
type your password in the Password text box.
If your database file is set up to use the Web Security database,
enter your user name and password. If your database file is using
FileMaker Pro access privileges for security, enter only the
password. See the FileMaker Pro documentation for more information
on security and access privileges.
- Click Connect to
server.
A list of databases appears in the scrolling list of the Database
Selection panel of the assistant.
- Select the database you want, then click Next.
Important If the
connection to a FileMaker Pro database is unsuccessful, you will want
to verify the following:
- The files you want to access are running either on your own
computer or over the network.
- The IP address is correct.
- The password and user name are correct.
- The Web companion is set up in the FileMaker Pro application,
and Web sharing is set up for the database file.
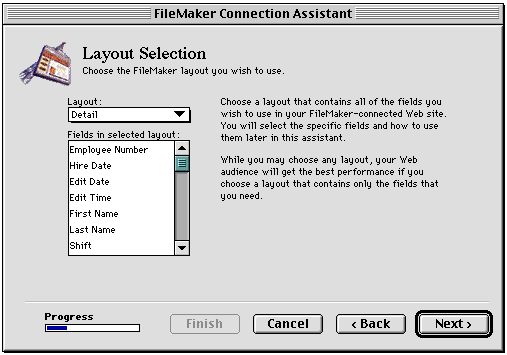
Choosing a FileMaker layout
On the Choose a FileMaker Layout panel, you can choose the
FileMaker layout containing the fields you want. The fields on the
layout you select will be used by the assistant to create the pages
of your site. Make sure the layout contains all the fields that will
be used for the entire site, which may include fields for searching
and sorting the database as well as fields that will be used to
create new records and to display record information. Select the
layout name in the Layout pop-up menu, and then click
Next to continue
with the FileMaker Connection Assistant.
Setting features and privileges for your Web audience
On the Feature Selection panel in the FileMaker Connection
Assistant, you set options for how you want your Web audience to
interact with your database.
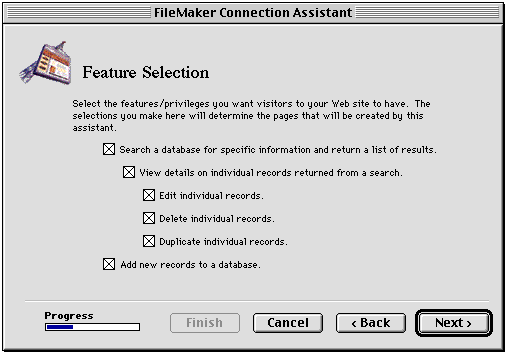
Using the assistant, you can create forms in your Web pages that
allow your Web audience to:
- search the database and view the search results in a list of
records on a page
- see a detailed view of each record in the search results
- edit, delete, and/or duplicate a record in the detailed view
of the search results
- add records to the database
The options you select on the Feature Selection panel determine
which pages the assistant creates. The assistant creates a page for
every option you select as well as pages for displaying replies and
error messages.
|
If you select this option on the Feature
Selection panel
|
The assistant creates these pages
|
With these filenames
|
|
Search a database for specific information and return a
list of results
|
Index page
Search page
Search Results page
Error page
|
default.htm
search.htm
search_results.htm
search_error.htm
|
|
View details on individual records returned from a search
|
Index page
Search page
Search Results page
Details page
Error page
|
default.htm
search.htm
search_results.htm
record_detail.htm
search_error.htm
|
|
Edit individual records
|
Index page
Search page
Search Results page
Details page
Edit Reply page
Error pages
|
default.htm
search.htm
search_results.htm
record_detail.htm
record_detail_reply.htm
search_error.htm record_detail_error.htm
|
|
Delete individual records
|
Index page
Search page
Search Results page
Details page
Delete Reply page
Error pages
|
default.htm
search.htm
search_results.htm
record_detail.htm
record_detail_reply.htm
search_error.htm record_detail_error.htm
|
|
Duplicate individual records
|
Index page
Search page
Search Results page
Details page
Duplicate Reply page
Error pages
|
default.htm
search.htm
search_results.htm
record_detail.htm
record_detail_reply.htm
search_error.htm record_detail_error.htm
|
|
Add new records to a database
|
Index page
New Record page
New Record Reply page
Error page
|
default.htm
new.htm
new_reply.htm
new_error.htm
|
When you click Next, the FileMaker Connection
Assistant displays additional panels for setting options for each
page, based on your selections.
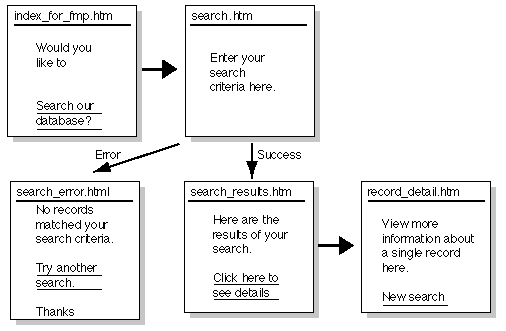
For example, if you create a site that lets your Web audience only
search and view records, the FileMaker Connection Assistant creates
the following pages:
- an default.htm that is an entry point into the pages of your
Web site that access a FileMaker Pro database
- a search.htm page for submitting a search request to the
FileMaker Pro database
- a search_results.htm page for displaying search results
- a details.htm page for viewing details for a single record
- a search_error.htm page for displaying an error (for example,
"zero records found") in processing the search request, which can
prompt the viewer to submit the request again.
The FileMaker Connection Assistant creates all the necessary pages
and saves them in a folder you specify. You can edit the pages
further using the Claris Home Page editing tools and the FileMaker
Connection Libraries. Choose FileMaker Form Library or FileMaker Reference
Library from the View menu (Windows) or the Window menu
(Macintosh).
Setting Search options
You can specify which database fields you want to appear in the
Search page of your Web site. In addition, you can specify whether
the search information for each field is to be defined by your Web
audience, whether the search is fixed, or a combination of fixed
search criteria and criteria specified by your Web audience.
The Web audience can type search criteria in the search fields and
specify field comparison operators. For example, in a search for a
name in the Name field of a database, your Web audience can type
search criteria in the field, and then they can choose "begins with"
from the field comparison pop-up menu. If the Web viewer typed
"Ignat" in the Name field as the search criteria, then the search
results return records where the first characters of the Name field
begin with that string of characters (for example, Ignat, Ignatius,
Ignatowski).
In a fixed search, you predefine the search criteria (including
the field comparison operator) for each field in the search. Your Web
audience does not need to type search criteria in a field or choose
the field comparison operator.
You can use a fixed search to allow your audience to search for
and display a set of records that is of interest only to them. For
example, if your database contained daily menu information, your Web
audience might be accessing your site to see only the menu choices
for the day. Your fixed search would be on today's date, and the
search results would display records (menu information) only for the
current date.
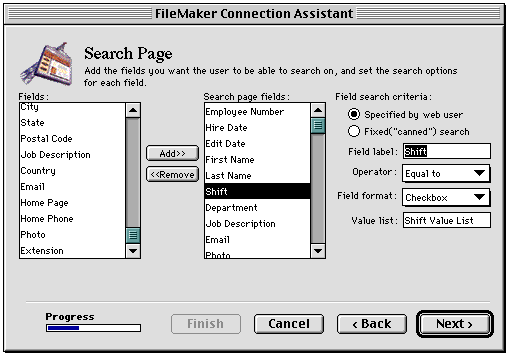
To set up the Search page:
- Select a field in the Fields list. Then click the
Add button.
Repeat for each field that will appear in the Search page.
All the fields you add appear in the Fields on Search page list.
- Select a field in the Fields on Search page list.
The field label is the name of the field as it will appear to your
Web audience.
You can change the field label by typing over it in the Field label text
box.
- Set the search options for the selected field.
|
Click
|
To
|
|
Specified by Web user
|
Have search results based on search criteria your
audience specifies for that field.
|
|
Fixed ("canned") search
|
Have search results based on the operator and search
value you specify for that field.
|
- If you selected Specified by Web user, choose
a field comparison operator from the Operator pop-up menu, and
then go to step 5.
- If you selected Fixed, choose the operator
for the field, and then continue.
The operator you choose determines how records match the search
criteria entered into a particular field. This determines which
records are displayed in the search results.
|
Choose this field comparison operator
|
To show these search results to your Web
audience
|
|
Equal to
|
Records that match the search criteria exactly
|
|
Not equal to
|
All records except those that match the search
criteria
|
|
Less than
|
Records with values less than the search criteria
|
|
Less than or equal
|
Records with values less than or exactly equal to
the search criteria values
|
|
Greater than
|
Records with values greater than the search
criteria
|
|
Greater than or equal
|
Records with values greater than or exactly equal
to the search criteria values
|
|
Contains
|
Records that contain the character or string of
characters specified in the search criteria
|
|
Begins with
|
Records with the character or string of characters
specified in the search criteria at the beginning of a
value
|
|
Ends with
|
Records with the character or string of characters
specified in the search criteria at the end of a value
|
- For a fixed search, type the search value in the Search value text box
(For example, for a field called "Shift," you might type "Full
Time" to find only full time employees). Then go to step 8.
You can type FileMaker Pro search symbols in addition to or
instead of text you type here. For example, to find records with
today's date in a date field, type two forward slashes
(//)in the Search value text box for the
date field.
Note The Search value text box
is not available unless the Fixed ("canned") search option
is selected.
- For a Web user-defined search, you need to specify the HTML
format (radio buttons, check boxes, pop-up menu, text field, or
text area) for the field in the Field format pop-up menu.
- To use a value list from the FileMaker Pro database, choose
Pop-up menu,
Radio button,
or Check box
in the Field
format pop-up menu.
Note The Values list text box is not
available if the field format is text, text area, image, or
read-only text.
- Type the name of the value list in the Value list text box.
Note The Number of items
visible and Allow multiple selections
options are available only when the field format selected is a
pop-up menu.
- Repeat steps 3 through 7 as appropriate for each field in the
Fields on Search
page list.
- Click Next.
The Search Page Logical Operator panel appears.
Setting the Search Page logical operator
The Search page logical operator determines how records are
searched when a search request is submitted.
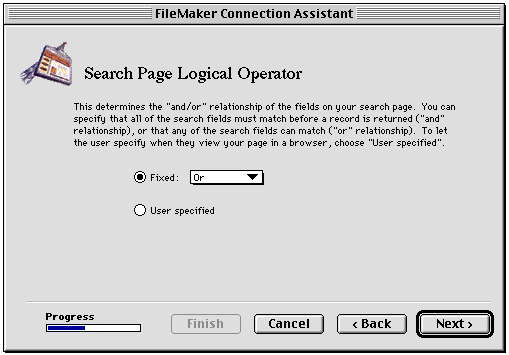
If the option is set to OR, the records in the search results are
returned based on the search criteria matching one or more fields. If
the option is set to AND, the records in the search results are
returned based on all the search criteria matching.
To set the logical operator for all searches made by your Web
audience, click Fixed. To let your Web audience
choose the logical operator for their searches, click User specified.
After setting the Search page logical operator, click Next. The Search Results
panel appears.
Setting options for the Search Results page
Once a search request is submitted, the search results are
returned to the Web viewer as a list of records that display on a
separate Search Results page. You set options for this page on the
Search Results panel in the FileMaker Connection Assistant.
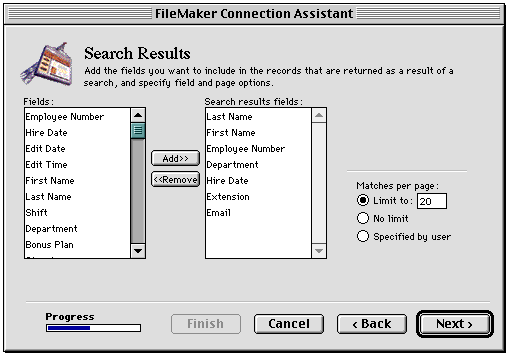
To set up the Search Results page:
- Select a field in the Fields list. Then click the
Add button.
Repeat for each field that will appear in the Search Results
page.
- Set the option for the number of records to display per page
in the Matches per
page area of the panel.
The Specified by
user option adds a pop-up menu element on the Search
page, where the Web viewer can make a choice for the maximum
number of records that will display per page of their search
results.
- Click Next.
The Sort Results panel appears.
Setting a sort order for search results
On the Sort Results panel, you can specify whether the results for
the search are sorted or not.
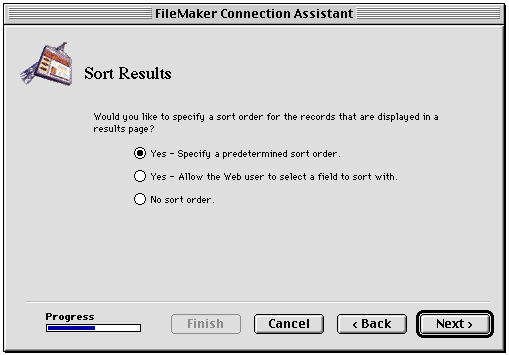
- If you choose the Yes - Specify a predetermined sort
order option, the search results are sorted before they
are displayed in the search results page. For this choice, you
choose the fields to sort by, and choose the sort order
(ascending, or descending) in the next panel of the assistant.
- If you choose the Yes - Allow the Web user to select a field
to sort with option, the Search page contains a pop-up
menu of all the fields featured on the Search page and a pop-up
menu of the sort order choices (ascending, descending). The Web
viewer can make the choices for sorting the records that are
returned as search results.
After setting the sorting options, click Next. If you selected the Yes - Specify a predetermined sort
order option, the Predetermined sort order panel appears.
Otherwise, panels for setting up any remaining pages in your Web site
appear.
Setting a predetermined sort order for search results
You can choose to sort search results so that records return to
your Web audience in a specified order.
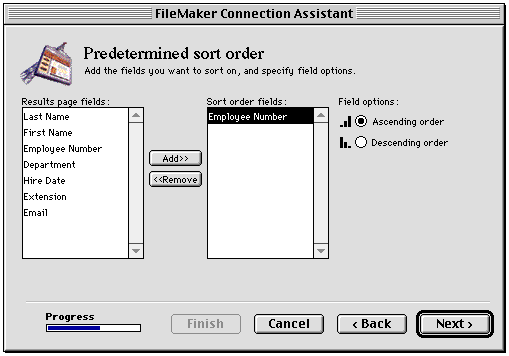
To set a predetermined sort order for your search results:
- Select a field from the Search Results fields list.
- Click Add.
- Choose a sort order for the field.
Ascending is
the default value. Descending sorts the records
from greater values to lesser values.
- Repeat these steps for as many fields as you want to sort
on.
After setting the predetermined sort order for your search
results, click Next. Panels for setting up any
remaining pages in your Web site appear.
Setting options for the Details page
The assistant creates the Details page to display an individual
record on an entire page. The Details page for a record appears in
the browser when a Web viewer clicks the link (the contents of the
first field for that record) in the list of records displayed in the
Search Results page.
If you selected record modification privileges on the Feature
Selection panel, your Web audience can edit, delete, or duplicate
individual records from the Details page.
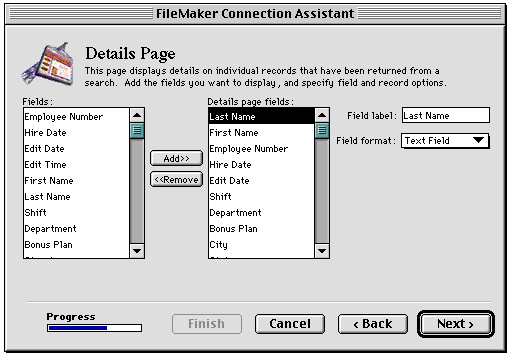
To set up the Details page:
- Select a field in the Fields list. Then click the
Add button.
Repeat for each field you want to appear in the Details page.
The field label is the name of the field as it will appear to your
Web audience.
You can change the field label by typing over it in the Field label text
box.
- Select a field in the Fields on Details page list.
- Specify the HTML format (radio buttons, check boxes, pop-up
menu, text field, text area, or read-only text) for the field in
the Field
format pop-up menu.
Note If you did not
choose Edit Individual
Records on the Feature Selection panel, the Field format pop-up
menu, Values
list text box, Items visible text box, and
Multiple
selections check box are not shown.
- If you want to format the selected field as a pop-up menu,
check boxes, or radio buttons, see step 6 to
use a value list defined in the FileMaker Pro database.
- Repeat steps 1 through 4 as appropriate for each field on your
Details. page.
- Click Next.
If you selected record creation privileges on the Feature
Selection panel, the next panel that appears is the New Record
panel.
Setting options for the New Record page
If you design your site so that your Web audience will be able to
create new records, you can set options for information they can type
and submit as a new record in the New Record Page panel.
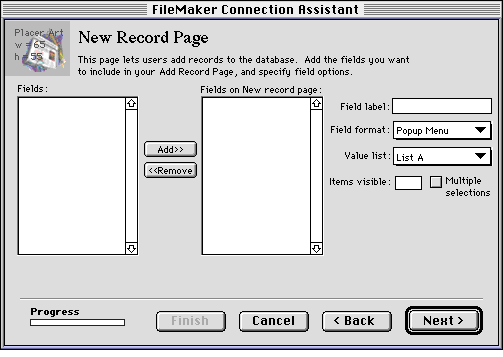
To set options for the New Record page:
- Select a field in the Fields list. Then click the
Add
button.
Note FileMaker
container, calculation, summary, and related fields cannot be used
to create a new record from the New Record page.
- To change the field label of a field, select the field in the
Fields on New record
page list and change the field label by typing over it
in the Field
label text box.
- Specify the HTML format (radio buttons, check boxes, pop-up
menu, text field, or text area) for the field in the Field format pop-up
menu.
- If you want to format the selected field as a pop-up menu,
check boxes, or radio buttons, see step 6 to
use a value list defined in the FileMaker Pro database.
- Repeat steps 2 through 4 as appropriate for each field in your
New Record page.
- Click Next.
The Additional Pages panel appears.
The Additional Pages panel appears and displays information about
additional reply and error pages that the assistant creates based on
the features and privileges you set in previous panels. Click
Next, and then
the Style panel appears.
Setting style options for the FileMaker Pro form pages
On the Style panel of the FileMaker Connection Assistant, you set
the page background and text style of your FileMaker Pro form pages.
The assistant provides a list of pre-made styles and displays an
example of each one on the left side of the Style panel. You can
change the text and background color of these styles and use your own
GIF image for the background if you want.
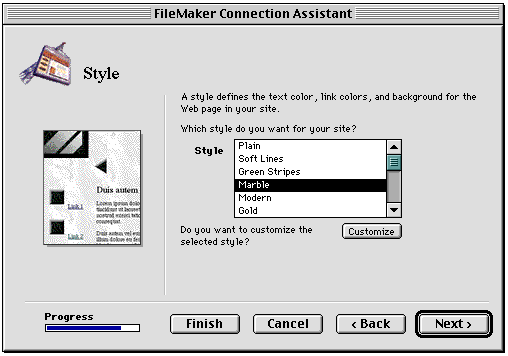
To set the basic page style for your FileMaker Pro form pages:
- Select a style in the Style scrolling list.
- Click Custom
to enter custom values for the color of text and links
as well as the color of the background.
The Custom Style panel appears.
- Make your selections for text color and background in the
Custom Style panel.
- To use an image for the background, select Image in the
Background area of the panel, and then select the image name
from the pop-up menu.
- To import an image, select Import Image in the
Background area of the panel, and then click Browse to locate the image on
your computer.
- Click Next to continue with the
assistant.
The Final hints and suggestions panel appears. Click Next, and the Location
panel appears.
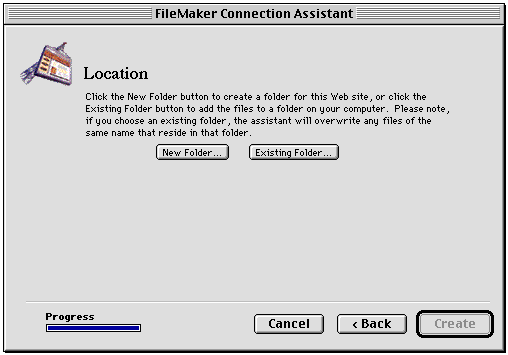
Finishing up with the assistant
The last step before finishing the FileMaker Connection Assistant
is to specify a location and folder for the files. On the Location
panel, click New
Folder to create a new folder for your site; or click
Existing Folder
to specify the name and location of an existing folder
that will contain your FileMaker Pro form pages. Then click Create to create the
pages.
The FileMaker Connection Assistant creates the FileMaker Pro form
pages based on the options you specified and inserts all the
necessary CDML tags and links. Claris Home Page displays your site in
the Site Editor, and opens the ReadMe file for the site you just
created with the assistant. You can double-click the icon of any page
in the Site Editor to open it and make changes. See
Using the Site Editor for
information on using the Site Editor.
Be sure to click the Consolidate button  on the Site Editor toolbar to copy the image files into the new site
folder.
on the Site Editor toolbar to copy the image files into the new site
folder.
The pages created by the FileMaker Connection Assistant are
designed to be used right away without modification. For information
on transferring your pages to a server, see
Copying your files to FileMaker Pro
and Testing the database in your
site for information on testing the site.
If you want to customize the appearance of the pages you created
with the assistant, you can use the Claris Home Page editing tools to
make changes. You can use the FileMaker Connection Libraries to edit
and expand the database functionality of the site and to create new
FileMaker Pro form pages as well. See the following sections "Editing
FileMaker Pro form pages" and "Using the FileMaker Connection
Libraries" for more information.
Note Some of the
CDML tags in the FileMaker Pro form pages that the assistant creates
are required tags. It is better not to edit the required CDML tags in
the pages the assistant creates. Changing a required CDML tag (such
as the filename of the database the entire site depends on) in one
file requires changing the database filename in other files that
refer to it. See Editing required CDML
tags for more information.
Previous topic |
Contents | Next
topic