Resizing a table or parts of a table
There are different ways you can change the size of a table and
the table's cells. You can use the Table Object Editor or the mouse
to change the size of the table, individual cells, or rows and
columns.
You can set the size of a table to be a percentage of the browser
window's size so that the table adjusts according to what the size of
the window is. Or you can set the size to be a fixed number of pixels
so that the table is always the same size regardless of which browser
it appears in.
Note Some browsers
that support tables do not support widths measured in pixels.
Changing the table width or height
You can change the width and height of a table and how it appears
in different browser windows by using the Table Object Editor. You
can also resize a table using the mouse.
To resize a table in relation to the browser window:
- Double-click on the table border to open the Table Object
Editor.
- Click the Table tab if necessary.
- Choose a setting type from the Width or Height pop-up menus.
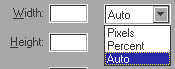
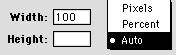
|
Choose this type
|
To have the table sized like this
|
|
Pixels
|
Table width or height is always the specified size,
measured in pixels, regardless of the browser window's
size.
Note Some browsers that support tables do
not support table widths measured in pixels.
|
|
Percent
|
Table width or height appears as the specified
percentage of the browser window width or height.
|
|
Auto
|
Table width or height fits evenly around its elements.
|
- Type the number of pixels or percent for the table's width or
height.
If you leave the Width or Height boxes empty, the browser
used to view the table will determine the table's width or height.
(In other words, no width or height attributes are added to the
<TABLE> tag.) In Claris Home Page, the table is tall enough
to display the text and images inside it and is as wide as the
window.
- Press Tab or close the Table Object Editor to apply your
changes.
To resize a table using the mouse:
- Select the table.
- Drag the bottom handle to change the height of the table.
- Drag the right-side handle to change the width of the
table.
- Drag the lower-right corner handle to change the width and
height at the same time.
Changing the cell width or height
Changing the size of a cell affects the size of the table and the
row or column that the cell is in. To change the size without
affecting other cells, see Resizing a cell to span
rows and columns.
To resize a cell using the Table Object Editor:
- Select a cell in the table and open the Table Object
Editor.
- Click the Cells tab if necessary.
- Choose a setting type from the Width or Height pop-up menus.
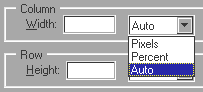
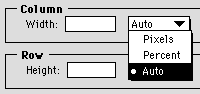
|
Choose this type
|
To have the cell sized like this
|
|
Pixels
|
Column width or row height is always the specified
size, measured in pixels, regardless of the browser
window's size.
Note Some browsers that support tables do
not support widths measured in pixels.
|
|
Percent
|
Column width or row height appears as the specified
percentage of the browser window width or height.
|
|
Auto
|
Cell width or height fits evenly around its elements.
|
- Type a number in the Width text box for column's
width.
- Type a number in the Height text box for row
height.
- Press Tab or close the Table Object Editor to apply your
changes.
To resize a cell using the mouse:
- Drag the bottom border of the cell to change the height.
- Drag the right border to change the width of the cell.
The size of all the other cells in that row or column changes too.
Note Dragging the
handles instead of the border causes the cell to span columns and
rows. See Resizing a cell to span rows and
columns for more information.
Resizing a row or column using the mouse
When you change the cell width or height in a table, the row and
column that the cell is part of resizes also. You can also resize a
row or column using the mouse.
Note Some browsers
may ignore the size you set for the row or column. In addition, some
browsers may override the specified size if the row or column size
you set is too small to display the text or images within that row or
column.
To resize a row or column using the mouse:
- Select the table.
- Place the pointer over the border of the row or column you
want to resize.
The pointer changes into a double-headed arrow.

- Drag the border of the row or column to resize it.
Resizing a cell to span rows and columns
You can resize a cell without affecting the size of other cells by
making the cell span more than one column or row. This is useful if
you want to make a table heading, for example.
Important If you
resize a cell to span over cells that contain text or graphics, the
text or graphics are lost.
To change the number of rows or columns a cell spans:
- Click inside the cell to select it.
A heavy line appears on the inside of the cell.

- Open the Table Object Editor.
- Click the Cells tab if necessary.
- Type a number in the Span text box for rows or
columns you want the cell to span.
- Press Tab or click the close box of the Table Object Editor to
apply the changes.
Claris Home Page gives you a warning that resizing the cell may
cause elements in some cells to be deleted.
Note You can select
the Header Cell
check box in the Table Object Editor to format text in the selected
cell as a row or column header.
To make a cell span more than one column or row using the mouse:
- Drag the handle to make the cell span more than one column.
The other cells remain unchanged.
Previous topic |
Contents | Next
topic