3D Studio MAX® Exporter |
|
Installing the Cult3D Exporter into 3D Studio MAX® Known Problems The Cult3D Export Dialog
The Cult3D Desginer Installer also includes the Cult3D Exporter plugin for 3D Studio MAX®. To install the Cult3D Exporter plugin into 3D Studio MAX® you need to place the plugin in 3D Studio MAX®'s plugin directory.
The Cult3D Designer Installer attempts to find the 3DStudio MAX plugin directory and place the Cult3D Exporter plugin there, or, you can explicitly specify where the Installer should put the plugin. Unless the Cult3D Exporter plugin is in 3D Studio MAX®'s plugin directory it will not work.
|
Polygons
|
|
||||
|---|---|---|---|---|---|
|
Texture
|
Up to 2048×2048 pixels. If the bitmap is larger, it is resized to 2048×2048 pixels. | ||||
|
Texture Tiles
|
Sizes from 23 (8) up to 210 (1024) pixels. Both the x and y sizes must be exact powers of 2. I.e., if a tiled bitmap is 143×78 pixels, it must be shrunk or stretched to fit. (See Texture Map Options.) | ||||
|
Shading Methods
|
Constant shading | ||||
| Flat shading | |||||
| Gouraud shading with highlight | |||||
| Phong shading | |||||
| Selected shading mode in exporter. Bump mapping requires Phong shading. | |||||
|
Light Source
|
Infinite Omni Light | ||||
|
Export
|
The exporter translates object materials and their properties in 3D Studio MAX® to Cult3D so as to reproduce the same output result within the limits possible. | ||||
|
Smoothing
|
Smoothing groups are supported. | ||||
|
Optimizer
|
|
||||
|
File Format
|
Compressed and streamable file format. | ||||
| Advanced color reduction for true-color bitmaps | |||||
| Advanced bitmap compression for smaller file size. | |||||
| Metrics | Uses 3D Studio MAX® unit settings for converting to Cult3D's metrics when exporting. | ||||
| Preview | Viewer for instant preview of the exported object. | ||||
|
Ambient Color
|
Supports ambient color. |
|---|---|
|
Diffuse Color
|
With or without bitmap. Mixes the diffuse color and bitmap if the bitmap amount is less than 100. |
|
Specular Color
|
Supports specular color. |
|
Shininess
|
Uses the amount setting for strength. |
|
Reflection Bitmap
|
(Environment mapping). Uses the amount setting for strength. |
|
Bump Mapping
|
Uses the amount setting for strength. |
|
2-Sided Materials
|
Will support 2-sided materials in a future version. |
|
Tiling
|
Supports tiling (but not mirror tiling). |
|
Compound Materials
|
Standard |
| Multi/Sub-Object | |
|
Compound Map Types
|
Bitmap (still images) |
Object Placement
The objects you export use the world axis center as the center of the scene in Cult3D. The exporter uses the current frame, so when the time slider is at frame 14, the object's top viewport for frame 14 will be exported.
Entire Worlds into One Object
If you make an entire world within 3D Studio MAX®, the Cult3D exporter will always act as if it is a single object.
2-Sided Materials
3D Studio MAX® has an option in the rendering options dialog to force 2-sided polygons. Make sure you do not have this option set. If you have, the rendered object may be different than the exported one.
Use 2-sided materials with caution as they seriously affect real-time rendering performance.
Currently the Cult3D viewer does not use 2-sided materials, even if it is specified in the Cult3D object file. This feature will be used in a future version of the player.
Metal Shading
Metal shading in 3D Studio MAX® calculates the specular color; and phong sets the author's choice of color for the highlight. If you want to simulate metal shading in the exported object, you need to make some modifications to your material. First of all, change the shading to Phong. Then manually change the specular color to a color nearest to the material's color (either diffuse color or the superior color on the bitmap). Compare the Metal and Phong shaded versions in 3D Studio MAX® so that you get a similar result.
The exporter does not support metal shading. (See the Hint for how to reproduce a similar look.)
Texture Mapping
Currently every texture map you use has an additional footprint size of 256 KB during rendering, regardless of the size of your texture, so be careful with the amount of different texture maps you use.
Bump and Texture Mapping
There is one restriction when using bump and texture mapping together: the tile setting and image size must be exactly the same size and value.
We have noticed that under some circumstances 3D Studio MAX® will not tell the export plugin that a texture has been updated or loaded. This sometimes occurs if you do not render the scene before exporting it, or when you have changed an existing texture via reload. The easiest workaround is simply to exit 3D Studio MAX® and restart it.
When running 3D Studio MAX®, the Cult3D Exporter will be found under File|Export.
| Select Cult3D Designer (*.c3o) in the Save as type… list box. |
| Type in a filename for the object you want to export. |
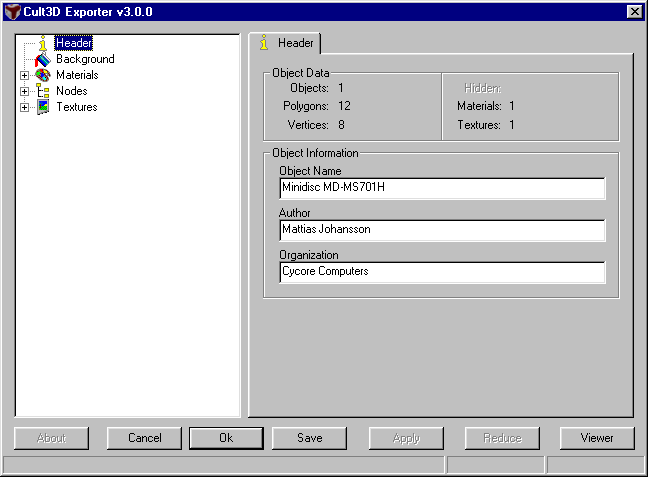
| Click Save and you will see the dialog with export options shown in figure 1. |
Main Interface
The actual exporter consist of a treeview will all the exported information, as you can see on the left in figure 1 and on the right you can see tabs representing which type of "information" youÆre standing on in the treeview. Initially youÆll stand on the Header and see itÆs respective tab. We have a total of 5 different tabs as you can see in figure 2. The first one being the one we saw in figure 1, Header, but we have also Material, General, Mesh and the Texture Tab. Standing one the Materials, or any material under the expanded Materials in the treeview will show you the materials tab. Likewise for textures. The Nodes info is a little bit different. Under the nodes, youÆll see the hiarchy of all the objects. These objects always have a General Tab, but if the object is for instance a mesh, then the mesh tab would be also be shown. But we will go in to that later on in this guide.
The exporter does not support metal shading. (See the Hint for how to reproduce a similar look.)
The one thing thatÆs the same is the main buttons and the status bar. Figure 3.
NOTE: If you have made some changes and have not pressed "Apply", then when pressing the "Ok" or the "Save" button, those changes will NOT be included. This is also true regarding of what you actually see in the viewer. The changes take effect only after the "Apply" button has been pressed. If the "Apply" button is greyed out as in the figure 3. Then that tells you that no changes has been made.
The status bar consists of 3 different parts. Beginning from the left, we have the actual status text of the ongoing procedure. The next one is a progress bar of the specified procedure and the last one is the progress bar for all the procedures it needs to do. When the last one is finished, then you can either save or do more changes of your liking.
Treeview & Selection
The treeview in the exporter is where you do all your selections of which settings on what you want to make. You have 5 main categories.
- Header
- Background
- Materials
- Nodes
- Textures
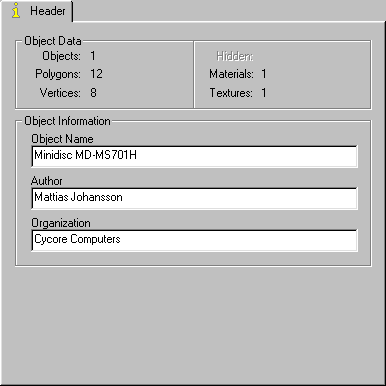
All except Header and Background have multiple selections. If you for instance have selected Materials, you have then selected all the materials we have on a specified object/scene as seen in figure 4. If you want to individually select the materials, you can do that by opening up the Materials, either by double clicking on that category, or pressing the "+" sign.
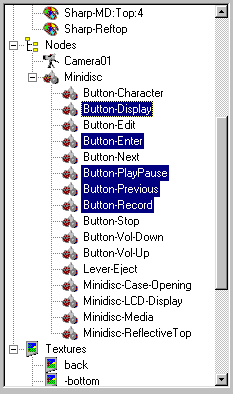
The Nodes category do not only contain the actual objects or meshes as we have called them we have got from 3D Studio MAX. They also contain cameras and dummy objects, or Helpers as they may be called. The hierarchy of the different nodes are also exported and can be seen in the treeview, figure 5.
Multiple selection only works within each own category, and selection on specific selections are done in a normal Windows fashion. By holding down the Ctrl key while pressing on the one you want to select, that keeps the selections youÆve made beforehand. Or if selecting for instance the first object in the list, and then while holding down the shift key, you select for example the fifth one, you get a selection from 1 to 5.
Header Tab
When standing on the "Header" in the tree view, youÆll see this tab as shown in figure 4. Here you can see some information we have got from the exported scene that we got from 3D Studio Max. Some of the information here can change though. For instance, if you optimize the polygons on your meshes, then the total amount of polygons and vertices can be changed. Here you can also change the name of the actual object/scene and copyright notice.
Materials Tab
Shading type. Here you can set the desired shading on your object. You have 4 choices.
- Constant: This shading type doesnÆt use any lightning.
- Flat: This shading uses the lightning, but the objects using a material with flat shading will get faceted.
- Gouraud: Uses the lightning and gives a smooth appearance over the object. Cult3D Gouraud shading show also a highlight. This highlight is calculated at vertex level.
- Phong: Gives an even smoother appearance of the material since itÆs highlight is calculated at pixel level.
Options. By checking the Bilinear Filtering option, the texture in this material will get filtered. This applies only to a material where only one texture is used. Mixing textures like applying a reflection texture onto a textured material will not be able to use the Bilinear Filtering. A single texture used for Bump mapping will also not be able to use the Bilinear Filtering.
General Tab
Every node that we export have a general tab. A node can also be a Mesh or a Camera or a dummy object. In the general tab youÆll see information on the selected node or nodes selected.
Animation. If this is checked, then all matrix animation will be included for the selection. Matrix animation in other terms: is the collection of: rotate, scale, translate of the object.
Hide Object(s). If you have checked Hide Object(s), then the selected objects will get hidden. They will be included in the saved file but they are initially hidden.
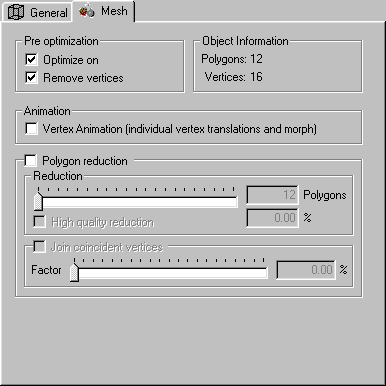
Mesh Tab
Pre Optimization. Setting Optimize On will enable the optimization of your object. Remove Vertices is an extra setting, which improves the optimization result. If you intend to use our polygon reduction, then you should normally turn off the Optimize On setting
Object information. From the treeview, you can select one or multiple meshes, and all the selected meshes will calculate the total amount of polygons and vertices to be displayed here.
Vertex animation. By checking this option youÆll include all the vertex animation of the object. Vertex animation is "individual" movement of each vertex, so if you by chance use a skin on a Character Studio character which deforms the skins when animating the bones, then youÆll need to check this, so that we can export the vertice animation of the object.
Polygon reduction. This is an advanced feature for reducing the amount of polygons used in an object. ItÆs a more lossy reduction than the optimize. By reducing your object, the rendering performance increase and the filesize of the object gets smaller. The reducer employs a set of advanced algorithms, including differential evolution and experience based algorithms. The end result depend a lot on the object, so this is a feature you need to experience with for each new object to get a result to your satisfaction. You can define a percentage to reduce, or enter the amount of polygons youÆd like to get. The Join coincident vertices checkbox is a feature used as a measure against problems with models where cracks show up in the model after the reduction process. If this happens on any of your models, click this checkbox and try again with the original model. If the cracks still show up, try a larger factor for the joining. What this technique does is to weld together vertices that are very close and are really meant to have the same position. During reduction, such vertices might slide to each their side, making cracks appear in the reduced model, which is normally not what you want.
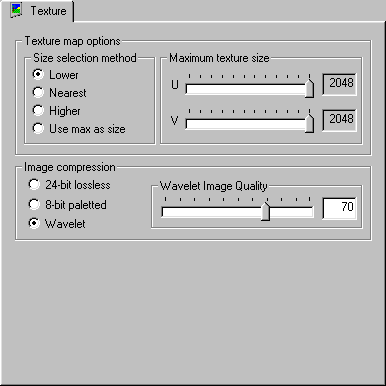
Texture Tab
Texture map options. Due to the power-of-2 limitation on texture sizes, the exporter will automatically resize a “non-valid” size to a correct size depending on your settings. Lower means that it will resize to the next lower even power-of-2 size. Nearest chooses the nearest corresponding size. Higher chooses the next larger size.
For instance, if the bitmap is 260×200 pixels and you choose Lower, then the bitmap will be resized to 256×128 pixels. If you choose Nearest the result will be 256×256 pixels and if you choose Higher the result will be 512×256 pixels. None of these settings will go higher than the Maximum Texture size setting. If you choose Use Max as size, then all textures will be resized to the Maximum Texture size settings. For your convenience, you can set Lock XY-size so that when you drag the x slider, the y slider follows.
Image Compression. You have 3 different methods to save your textures in the Cult3D file. The first one is 24-bit lossless, which mean that we will save the texture in 24-bit and use a simple RLE compression algorithm to compress the image with no loss of quality what so ever. Using the e 8-bit paletted option will save you space compared to the 24-bit option, but the texture may become a bit lossy if the input image was a 24-bit image, then we need to quantify that image. Normally, these two methods to save the textures will never be used, because compressing with a Wavelet algorithm, will keep a lot of information and the size of that data is in normally exceptionally small.
So if Wavelet is set, youÆll be able to set the compression slider. Cult3D uses an advanced compression algorithm to make your bitmaps as small as possible. In the slider you can set the desired amount of image quality. The value is always depending on your objectÆs texture maps. (For a more detailed discussion, see the section on Compression.)
Background Tab
The background tab works almost like the texture tab. Here you can define the quality/compression of the background image. It only uses the Wavelet algorithm.
A background image doesn't have the power-of-2 limitation like texture maps has, therefor the original bitmap resulution will be saved.
You can select to either Tile the background if the viewing area is larger than the actual background image. Or you can Stretch (scale) the image to always fit into the viewing area.
You can also overide the background color taken from 3D Studio MAX® and select a new Background color of your choice.
The Viewer
Here you can view the actual exported scene/objects. You can in realtime rotate and zoom in and even play the animation if you have exported any. In the button bar at the top, you have 3 buttons for the animation. Play, Pause and Stop. You have also 6 fastviews. With these you can quickly choose an orientation of the view.