

PocoMail Basics
Individual or Multi-User Setup
When you first install PocoMail you will be led through an account setup wizard to help you set up your first e-mail account. However, PocoMail also support multi-user setup, which means that more than one person can use the same installation of PocoMail, while ensuring that their specific accounts and mail options are kept separate and secure from other users.
Note that there needs to be designated default user to make the multi-user options available.
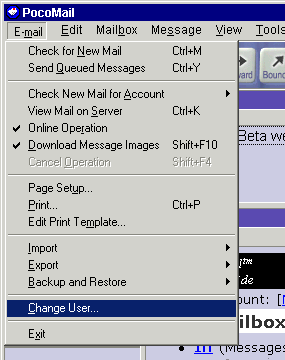
To add another user to your PocoMail:
- Go to the PocoMail Menu - E-mail, Change User.
- The Select User dialog box will popup.
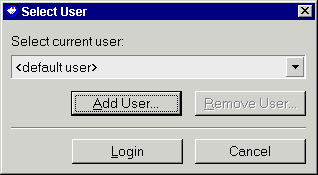
- Click on Add User. An Add User dialog box will prompt you for the name of the new user.
- Click OK to return to the Select User box.
- Click on Login.
- A new PocoMail setup wizard will be launched.
The new user should enter requested information and continue with account setup as described in the following sections.
Many people have more than one e-mail address (i.e., personal e-mail and business e-mail), and PocoMail enables you to set up any number of mail accounts very easily.
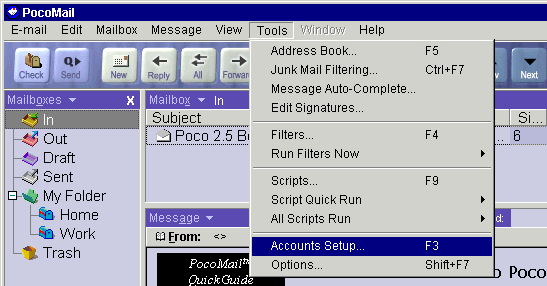
To set up one or more e-mail accounts, first go to PocoMail Menu - Tools, Accounts Setup (Quick Key F3).
If you followed the account wizard when you first installed PocoMail, you should already have one account set up. Unless you have changed the name, the default account name is "My Account". You may, of course, change this to any name you want.
Click on New. A new General detail window will open. You should give the account a unique name, and fill in the account information.
Note: If you leave the SMTP (outgoing mail server) information blank, PocoMail will attempt to use the default SMTP server set in Program Options - Sending Mail. If no default SMTP server is entered in the account set up, PocoMail will then attempt to use the POP (incoming mail) server to deliver mail.
If your e-mail provider requires you to use SMTP authentication, make sure to check off the Use Authentication box, and fill in the appropriate username and password.

Some ISPs or e-mail providers use a different port for their SMTP servers. One often used is Port 2525. In order to set up an SMTP server that uses a different port, add the port number to the end of the server setting, preceded by a colon.

Click on Optional. The Advanced POP Settings allows you to skip over messages of a certain size when downloading mail. If you use this option, you should probably also use the next one, which allows you to leave mail on the server for a specified number of days. These features are particularly useful if you have dial-up access and may receive the occasional large file. Rather than slowing down downloading the rest of your mail, you can skip the large file and retrieve it later from the server with PocoMail's View Mail on Server capability.
You can customize how you are alerted to new mail. You can choose to have the sound file (specified in Checking Mail) play or the new message alert box pop up or even both. Or neither.
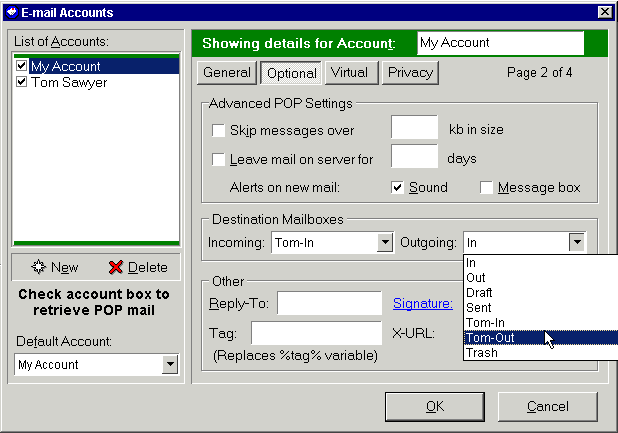
Destination Mailboxes allows you to identify where you want the incoming mail for this account to be stored upon download, as well as where you want to keep the retained copy of any outgoing mail for this account. The default set up is Incoming mail to "In" box and Outgoing mail to the "Sent" box. However, you may set up other mailboxes and specify those as destination boxes. Once set up, these mailboxes are then available in the drop-down box in this window. Even more customization can be added with filters, which will be dealt with in another section.
The Other section lets you customize reply settings for this account. You can enter settings for:
- A different Reply-To address. This setting is optional and is used when you want replies to your mail sent to a different address from your primary e-mail address.
- Choosing a different Signature file.
- Using a different signature Tag (a variable referred to in Signatures file).
- Specifying an X-URL to appear in your e-mail message header information. This is useful if you wish to identify your own domain or web page in your e-mail information.
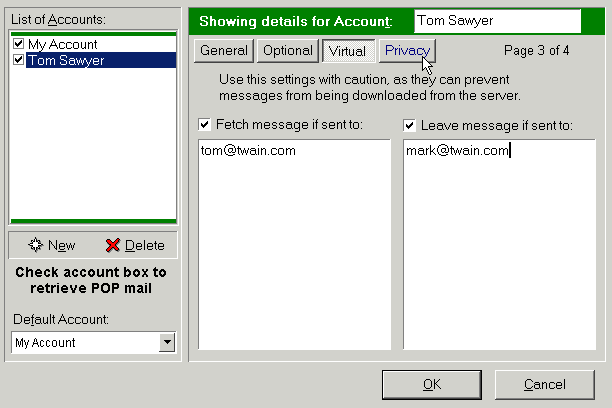
Click on Virtual tab. If you use mail forwarding to forward several "virtual" accounts to one specific POP account, you can set from which addresses you will accept, and which address you will reject mail. This is particularly useful for people who share one POP mailbox, as in the following example:
Tom, and his brother, Mark, have numerous free webmail accounts, but can only afford one internet account and one computer. They've configured their webmail (i.e., virtual) accounts to forward all mail to the one internet POP account they share. In image below, you can see that all mail to Tom will be accepted (as this is Tom's PocoMail setup), while those to Mark will not. Mark's PocoMail account set up will be just the opposite of Tom's; he'll reject all mail to Tom, but accept all mail to Mark. (This works out well, especially as they are dating the same girl, but neither knows it.)
Click on Privacy tab. PocoMail's privacy settings allow you to use built-in message encryption, for both incoming and outgoing messages.
- Incoming messages can be encrypted after download and saved in encrypted form. This ensures that no one but you (or someone to whom you've given the password) can read this mail.
- Outgoing messages can be encrypted after sending. In this encryption process, only the message retained in your Sent box is encrypted. The sent message is not altered so the recipient does not need a password to read it.
 Be very careful when using this feature. If you should forget or lose the password, you will not be able to access any encrypted mail.
 What's the difference between a mailbox and a folder?
In PocoMail, mailboxes are the file folders in which the pieces of correspondence - your e-mail messages - are kept. The folder, meanwhile, is like the file cabinet drawer into which the file folders are placed. Mail messages cannot be placed directly in a folder, but they can be placed into the mailbox that is inside the folder.
For example, if Tom receives mail from various girlfriends, and he wants to be sure not to mix them up (a disaster!), but he also doesn't want to clutter up his PocoMail Mailbox pane with an endless line of mailboxes named "Pamela," "Erika, "Candice," etc. (all this mail is probably encrypted, too), he may create a folder called, "Contacts." And in this folder, he would create separate mailboxes for each contact.
There are a couple of ways to create new folders or mailboxes.
- From the PocoMail Menu, click on Mailbox, New Folder or Mailbox, New Mailbox
Or
- Right click on the Mailboxes Pane toolbar, and choose New Folder or New Mailbox
Once you do this, a dialog box will appear and prompt you to name the folder or mailbox. Here's what Tom's Contacts Folder looks like now:
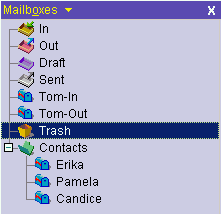
As you can see in this expanded view, Tom's contact mailboxes are all nestled in the "Contacts" Folder.
When you first create folders and mailboxes in PocoMail, they will always be created at the bottom of your mailbox pane. To rearrange the folder and mailboxes in alphabetical order in the mailbox pane, go to the PocoMail Menu and click on Mailbox, Refresh List of Mailboxes. This will also alphabetize the mailboxes in the folder.
To carry this on even further, you can also create folders with more mailboxes inside of other folders, so that they are "nested".
Remember that folders can contain only other mailboxes, and not messages, which belong solely in mailboxes.
Using Mailboxes and Folders assists you in keeping your mail in order, as well as keep the Mailbox Pane a less cluttered appearance. Later, you will see how this function is further complemented by PocoMail's dynamic filtering powers.
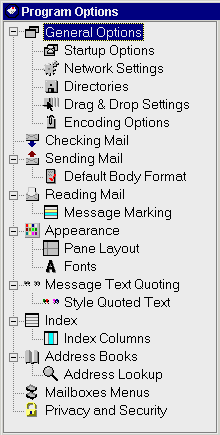
The Program Options screens are the heart of PocoMail, and allow you to configure the majority of PocoMail's functions to work for you. To get to these screens go to PocoMail's Menu and click on Tools, Options (Quick Key F7).
The following sections will follow the order of each Options screen or set of screens in Program Options.
General Options
These settings allow you to configure most of the options related to some basic operations:
- If the Trash mailbox should be emptied upon existing the program
- If PocoMail should be hidden on closing application
- If PocoMail should be minimized to the Windows System Tray
- How mailboxes are opened
- If tool tips associated with toolbar icons should be shown
- If Progress Window (when receiving or sending mail) should be shown only when errors occur, or whenever it is online and being accessed
- Make PocoMail your default mail program (to launch when accessing mailto: links in web pages or other documents)
- Set up automatic backup of mailboxes at specific intervals (as numbered in PocoMail sessions), and specify location for backed up mailboxes. If you decide to store your backed up mailboxes in a directory other than the PocoMail directory, don't forget to specify the complete path, including drive, if necessary. It is recommended to store backed up mailboxes on a different physical fixed or removable drive then your PocoMail installation to protect from drive failures.
Startup Options
These settings allow you to configure most of the options related to PocoMail startup operations:
- If the QuickGuide should be shown on start-up
- If PocoMail should check for new mail automatically upon startup. (You must enable this option to automatically check for new mail on startup, even if you have set automatic interval checking in Checking Mail.)
PocoMail supports Multi-Users, meaning that more than one user can use the same installation of PocoMail without seeing the other users' mail and PocoMail setups. Use this section of the Startup Options to determine:
- If PocoMail should prompt for a user upon startup, or
- Always automatically login as a specific user upon startup.
 Only the default user can change these Multi-User Options.
Network Settings
This window lets you configure how PocoMail connects to the internet. You can:
- Specify Dial Up settings to automatically dial up as needed, and if so, to automatically hang up after mail has been sent and/or received. Your ISP dial up profile, as configured in Windows Dial Up Networking is set here.
- If you use a Proxy server, the Proxy Settings (host, port number, username and password) are configured in this screen.
- PocoMail allows you to set a "time-out" parameter. This parameter governs how long PocoMail attempts to access a server before moving on. Some servers take a little longer to respond, and setting a higher time-out number may increase the likelihood of successful mail processing.
- A maximum number of "threads" to spawn may be specified here. A "thread" in this instance means the process of accessing a server. It may prove more beneficial to set a lower number, like three, so that servers may be processed as quickly as possible. You could set it for a maximum, of course - e.g. if you have 10 accounts and set PocoMail to spawn 10 threads - but that may actually cause a slow-down in accessing servers, especially if one or more of them are slow to respond.
Directories
PocoMail sets up default paths for the following directories:
- Mail Directory - where your mailboxes are stored
- Attachment Directory - where received attachments will be stored
- Address Book Directory - where your address books (.ini files) will be stored
- Scripts Directory - where PocoScript script files (.poc files) are stored
- Signature Directory - where your signature files are stored
- Templates Directory - where your message templates are stored
- Users Directory - where the different users directories will be stored.
However, you can set the location of these directories to other drives, directories or network shared directories.
Click on the folder drop down icon on the right of each directory field to browse for a folder. Alternatively, you may just type in the desired location, being sure to include the entire path, including the appropriate drive, if required.
Drag and Drop Settings
One of PocoMail's strengths is it's filtering capabilities. With PocoMail, you will be able to auto-create simple incoming and outgoing mail filters by dragging and dropping a contact (address) on top of a mailbox in the mailbox pane.
If you choose to use this drag-and-drop filter function, the configuration options available are to creating a filter with actions that will:
- Copy mail - copy any mail from the contact to the specified mailbox (a mailbox other than the default "In" mailbox or "Sent" mailbox)
- Move mail - move any mail from the contact to the specified mailbox (a mailbox other than the default "In" mailbox or "Sent" mailbox)
- Whether the filter action is run on Incoming mail, Outgoing mail, or both
Conversely, PocoMail also allows you to drag-and-drop a message onto a contact (address), to produce either of these actions:
- Forward message to the recipient (contact), or
- Bounce message to the recipient (contact)
 What is a bounced message?
Sometimes referred to as a "redirected" message, and unlike a forwarded message, a bounced message is one which is sent from an original recipient to a third party with all original sender and recipient information intact. To the receiving third party, the message looks as it did when the original recipient downloaded it. This has the advantage of leaving the original sender's reply address intact so the third party may respond directly with a Reply-To action. The bounce function will not hide the identity of the original recipient as that information is still in the bounced message headers.
Encoding Options
This screen specifies encoding options for messages and attachments.
- Message Encoding - allows Quoted-Printable (QP) encoding to be disabled; also, set an alternate character-set to be used when sending messages.
- Attachment Encoding - how received and sent attachments are handled
- Option to have received attachments encoded inside the message by default: this means that any attachment received will not be automatically stored in PocoMail's Attachment Directory and will remain part of the message. If you want to separate the attachment from the message, you will need to manually save it to a directory or other Windows folder.
- Option to have sent attachments encoded into outgoing messages by default when messages are queued to send: this means that attachments will be encoded into the outgoing message at the time of queuing rather than when the queued mail is being sent.
Enabling attachment encoding should result in having fewer multiple copies of attached files in the Attachment Directory.
You can also specify how many lines of a message body will be retrieved when fetching only headers, used when viewing mail on server or for pre-download filters.
Checking Mail
The following parameters may be set for checking mail:
- Check for new mail at specified intervals (in minutes) - PocoMail will dial-up as needed (and as set up in Network Settings) to check mail at intervals.
- Use custom sound alert - choose what sound file you want PocoMail to use when new mail is received. This sound alert will only play if it has been enabled in the Mail Accounts Set-Up, Advanced POP Options.
Receiving Options
- New messages to top of index - Checking this box will display mail in descending order, with newest mail at the top of the index. PocoMail's default is to display mail in the message index in ascending order; that is, oldest mail at the top of the index, and newest mail at the bottom of the index.
- Overwrite decoded attachments with the same name - Checking this box and specifying the file extensions to be overwritten will certainly help if you are used to getting revisions of documents. Instead of having multiple copies of the same document, you would only have one copy at any given time if it has the same exact name and extension each time you receive it. If you want all received and decoded attachments to overwrite files already present in the attachments directory then leave this field blank.
Why you may want to overwrite a file: PocoMail's default process when receiving attachments with the same name is to append a number to the file name. For example, if you received weddingpicture.jpg from Aunt Emily on Wednesday, but she forgot she sent it to you, and sends it again on Thursday, PocoMail would automatically name Thursday's file weddingpicture1.jpg. If Aunty Emily, bless her, is very forgetful and keeps sending you this picture, you will end up with multiple copies of the same picture in your Attachments Directory, all sequentially numbered by PocoMail.
Virus Scanning
If you use an anti-virus software program, you can set it up to automatically scan attached files when PocoMail downloads them.
- Check files of type - You should specify file extensions to trigger the automatic scan. Although this function is not enabled by default, some of the more common file extensions on which viruses like to piggyback are included. If you want to check every single decoded attachment received then you can leave this field empty.
- Virus scanner - You will need to direct PocoMail to the correct path to the anti-virus executable file to trigger the program.
- Command line parameters - The command line parameters used to instruct the scanning software on how to scan files are generally specific to each anti-virus software. Refer to your users manual or anti-virus software website for this information. Make sure to pass the location of your attachments directory to your anti-virus software to minimize the scanning time.
Sending Mail
You can set general Editing Options for sending mail.
- Always wrap text - If you enable this, you can specify how many characters per line before forcing a "wrap". Many e-mail programs wrap at 65 to 70 characters per line. This setting will override the wrapping set in the Message Text Quoting screen.
- Check spelling as you type - If this is enabled, any misspellings as per PocoMail's active dictionaries will be underlined with a squiggly red line. Should you find that squiggly red line tiresome and annoying, you may wish to leave this disabled.
- Wide cursor caret - this option will enlarge your cursor caret when editing messages so it is easier to spot on the screen.
- Spell-check on sending mail - This is one of your alternatives if the squiggly red line bothers you. PocoMail will spell check your message when you click on "Send" or "Queue" from the Compose New Message window.
- Send Messages with - Specify which combination keys will send a message [Alt+N] or [Alt+S]
- Split message - This is a nice little function that takes into account that some ISPs don't like a lot of mail messages from one sender flooding their SMTP servers, since that looks like SPAM. If you have a message that must go out to a large number of people, you may want to split the messages. For example, if you need to send an invitation to 100 people, you might choose to have PocoMail split the list in increments of 25 each. This would yield four messages with 25 recipients in the "To:" field being sent, and four messages being retained in your "Sent" mailbox.
 You could use this function to customize mail to a few people. For example, if you wanted to invite six people to a picnic, you set the split message increment to one message. This would yield six totally customized e-mail invitations being sent, as well as six separate retained copies in your "Sent" mailbox. You'd better think twice about using this feature to customize a mailing list of 200! Read more about this feature in Sending Mail.
- Send queued messages when checking mail - Checking this box will send queued messages after POP (incoming) mail has been checked. Enabling this does not stop you from sending mail immediately or from sending queued mail without checking POP first.
- Default SMTP server - You may specify a default SMTP server to be used if an SMTP server is not specified in Mail Account Set-Up. If there is no SMTP in account set up, and no default SMTP server specified here, then PocoMail will attempt to send mail using the POP servers designated in mail account settings.
Default Body Format
Configure how you want your mail to look when composing and sending.
The settings in this screen give you the choice regarding default composition settings that will affect new mail you write using the New Message command. PocoMail allows you to choose whether both your message and signature formats are styled, plain, or one of each.
- Use custom background colour - Checking this box allows you to specify the "paper" colour of your e-mail messages. Click on the white button to the right to open the colour panel. You may choose a colour from the panel, use the slider, or enter colour values.
- Use the following font for message body - You may specify font, font size, font style and colour for the message text. Click on the black box to the right to open the colour panel. You may choose a colour from the panel, use the slider, or enter colour values.
- Always use this message format - Three options are available: Just Plain, Plain and Styled, and Just Styled.
- Last used - Enabling this will cause whatever style you last used to compose to be used when you compose the next new e-mail message.
Enabling some of all of these custom settings will make your default mail type styled mail.
 What is the difference between styled and plain mail?
Plain mail is exactly that. When you compose messages, you can't use "special" characters or formats, such as italicizing, bolding or underlining text, or highlighting sections of your message with different colours. Any of these changes in formatting will make your message styled.
While most e-mail applications support viewing of styled mail, not all people like to receive styled mail and "turn off" their styled mail viewing. However, if you prefer to always compose styled mail, but are uncertain as to whether your recipient wants or is able to see styled mail, then you may want to send your message in both Plain and Styled, an option which PocoMail supports.
- Use the following fonts for the signature - As with message body fonts, customize your font, font size, font style and colour. Click on the black box to the right to open the colour panel. You may choose a colour from the panel, use the slider, or enter colour values.
- When starting a message - Specify whether you always want signatures to be enabled, disabled, or governed by the last used style in composing. PocoMail supports many ways to deal with Signatures, discussed in a different section.
Reading Mail
- Query to delete attachments when deleting messages - If enabled and attachments are not encoded with the message, a query box will ask if you want to delete attachments related to e-mail messages being deleted.
- Preview message when switching mailbox - When switching mailboxes, the last mail in the index will be shown in the message Preview Pane.
- Show supported attachments in-line - PocoMail will show encoded and unencoded attachments, such as .jpg, .gif, .html, .txt documents, after the e-mail message body in the Preview Pane. This means that you don't have to "launch" these attachments into another program, such as a graphics viewer or browser, in order to see them. Furthermore, PocoMail's attachment display is safe regardless of the file type being displayed (including HTML), so it is safer and quicker to view the attachments inside PocoMail's viewer than launching an external viewer.
- Mark message read - Specify the interval when highlighting a message in the index becomes "read". Read status is indicated by the envelope icon shown with an open flap.
Message Marking
Mark messages in the index - You may specify "marks" that can be used to identify certain messages, describe an action that should be taken, or whatever you wish. Clicking on the colour bar to open the colour panel will allow you to customize the colours. Corresponding descriptive text can be entered into the fields provided.
Appearance
Application colours can be customized from this screen. You can choose different "skins" from the Load and save skins drop down box or customize colours based on the skins and save them under a different name. Additionally, PocoMail has an auto-create skin function that allows you to choose a "base" colour and then make a new skin by clicking the Create button. As the PocoMail toolbar is really a collection of images, enabling the When saving copy images from current skin ensures that the current toolbar and images are saved with the custom settings. If this is not checked, the default PocoMail toolbar is used when that customized setting is next used. For more on customizing PocoMail's appearance take a look at the PocoMail Makeover section.
Pane Layout
Choose the layout of your PocoMail panes.
Fonts
Specify fonts and sizes as they will appear in the index list, preview and message panes. Note that the e-mail message fonts chosen here govern how e-mail will look in your Preview Pane. When composing mail in Just Plain, the default font that appears will be the proportional-space font specified here. However, what gets sent is a plain/text character set which will be seen by the recipient in whatever font is specified in their e-mail application.
Message Text Quoting
You can configure how text is quoted in replies, and specify headers and footers for Reply, Forward and Bounced messages.
- Quote text when replying - Check on this if you wish to have the entire e-mail message quoted when you reply
- Insert quote-characters for replies/forwards - Specify what character will be appended to the beginning of each line of quoted text
- Quote only selected text if selection present - You can select a specific portion of an email to be quoted in the reply. Highlight the portion of the message you want to include and right-click and select Reply (Ctrl+R) to include on that text in the reply message.
- Wrap quoted text after (characters) - This specifies when a "wrap" will be forced, after an indicated number of characters per line. This setting will be overridden by the Always wrap text option in Sending Mail, if it is enabled.
- When quoting a message, place cursor - Specify where you like to start replies or add message text when "quote text when replying" is enabled.
If you enable headers and/or footers for Reply, Forward or Bounced messages, you can customize the text by using the Tags provided. The information that the tags represent, and which is inserted in place of the tags at the time of composition, is based on information in the message being replied to, forwarded or bounced. For complete list of tags, take a look at Common Variable Tags.
Style Quoted Text
Enabling Style quoted text will activate PocoMail's "generational" colour scheme when you have e-mail "conversations". What this means is that when you compose a reply to a message, the colours of the original text and your reply text will change depending upon the colours set in this screen. With each succeeding "generation" of replies, the colours will continue to shift. Besides breaking up the monotony of having all text in one colour, using this generational colour scheme will help you to better track who wrote what when.
You can also choose to italicize quoted text, which will only affect the quoted text, and not your current reply.
The colours will be active as you compose replies, and in your retained copies of the replies. The recipient will be unable to see these colours unless you send the message as styled.
Colour settings are customizable by clicking on the colour bars and specifying new colours.
Index Settings
- Message threading sensitivity - PocoMail supports threading of messages. If you don't wish to have messages threaded, then make sure all the boxes are cleared. If you enable threading, you have three options that offer different levels of "sensitivity". You can choose any combination of the three options or even all three options.
- Date format to be used - Choose how you want the date displayed in the index and in composing mail.
- Show index grid - Enabling this will cause a light gray "grid" to appear in the Index Pane as a viewing aid.
Index Columns
These settings affect how the Index columns appear. You can also set up custom columns to be shown in the index pane.
- Column Shading - Choose to shade index columns, at what intervals to shade horizontally or vertically.
- Column Setup - This lets you specify custom columns. Column data can only be taken from message header information. For example, if you would like to display an additional column containing the contents of the "X-URL" field, just enter "X-URL" (without quotes) into the Custom text field. Make sure to enable the visibility of this column below. Changes to custom columns will not be reflected in your index until you compress the mailbox.
- Column Visibility - Set default columns that will be displayed in the Index.
Address Books
PocoMail supports multiple address books. The default address book is named "Address".
- Add New -You can add any number of address books to PocoMail by clicking on the Add New button. A Windows dialog box will pop up and ask you to either select an existing address book (.ini file extension) or create a new one.
- To create a new address book, fill in the File Name and press Save. The new file will appear in the "Currently installed address books" pane.
- To load an existing address book, select the appropriate .ini file so that it appears in the File Name area, then press Save. The imported file will appear in the "Currently installed address books" pane.
- Move - Should you want to relocate where your address book resides, click on the Move button. A Windows dialog box will pop up and ask where you want to move the address book. You can use the Save in: drop down box to locate the appropriate drive and/or directory. When the new location is selected, click on Save. The address book with it's expanded location description will appear in the "Currently installed address books" pane.
- Delete - To delete an address book, first highlight it in the installed address books pane and press the Delete button.
- Current address book - Select a default address book. If you have the address book pane enabled, the default address book specified here would appear in PocoMail's interface. If the address book pane is disabled, the default address book specified here would be the one which first appears when you enable address book pane, or access the address book when composing mail.
Address books from other mail programs can be converted and imported into PocoMail. This is discussed in more detail in Managing Information.
Address Lookup
This function is to assist you in finding a complete e-mail address when composing mail. You can choose to have PocoMail search the address book by name and e-mail address "properties" of a contact's profile in the address books.
When composing an e-mail, you may type in a few characters in the To:, cc: or bcc: fields, and PocoMail will automatically search based on the options chosen here. For every match option, PocoMail will return the full e-mail address in the appropriate field (To:, cc: or bcc:) You can enable any combination of options: from none (no matching at all) to all (highest sensitivity). This dynamic lookup can be disabled directly from Compose Window, under View menu.
- Match for nickname - PocoMail will search the nickname property field in the address books for a match.
- Match for full name - PocoMail will search the full name property field in the address books for a match.
- Match e-mail address - PocoMail will search the e-mail address property field in the address books for a match.
Mailboxes Menu
These custom assignments allow you to assign Menu "quick" keys to Mailboxes. To assign a mailbox to a key combination, use the drop down box and highlight the mailbox desired, and click on it. The mailbox will appear in the assigned Menu box.
Use Ctrl+Alt instead of Shift+Ctrl - Check this box if you prefer to use the alternate key combination.
Privacy and Security
As a broad security measure, PocoMail allows you to set a password to control access to different areas of the program. You can choose to lock up PocoMail itself, by password protecting PocoMail on start-up; or password protect areas which impact the way you have configured PocoMail, such as Program Options, Accounts Setup, Filters or Scripts; or ensuring that no one can access your mail via the view mail on server function.
The Privacy Sheet can be used when you don't wish PocoMail to be accessible to others when you need to leave your computer for a short (or long) period of time. If you prefer to have PocoMail active, but not accessible because, for instance, you have it set to retrieve mail every 15 minutes, you can use the Privacy Sheet. Once enabled, you will see the gray bar in the status area of the PocoMail interface, named Privacy Sheet. If you click on the bar, the sheet rolls up and does a three-second countdown. If the sheet is not disabled in those three seconds, then it will be locked. PocoMail will only be accessible again once the privacy password is entered and the Unlock button pressed.
Protecting Individual Mailboxes
Although this feature is not part of Program Options, it bears mentioning that you can password protect individual mailboxes.
From the PocoMail Menu - Mailboxes, Mailbox Properties. A dialog box will prompt you to set passwords.


![]() Be very careful when using this feature. If you should forget or lose the password, you will not be able to access any encrypted mail.
Be very careful when using this feature. If you should forget or lose the password, you will not be able to access any encrypted mail.


![]() Only the default user can change these Multi-User Options.
Only the default user can change these Multi-User Options.
![]() What is a bounced message?
What is a bounced message?
![]() You could use this function to customize mail to a few people. For example, if you wanted to invite six people to a picnic, you set the split message increment to one message. This would yield six totally customized e-mail invitations being sent, as well as six separate retained copies in your "Sent" mailbox. You'd better think twice about using this feature to customize a mailing list of 200! Read more about this feature in Sending Mail.
You could use this function to customize mail to a few people. For example, if you wanted to invite six people to a picnic, you set the split message increment to one message. This would yield six totally customized e-mail invitations being sent, as well as six separate retained copies in your "Sent" mailbox. You'd better think twice about using this feature to customize a mailing list of 200! Read more about this feature in Sending Mail.
![]() What is the difference between styled and plain mail?
What is the difference between styled and plain mail?