Item Settings
There are two types of items: Macro items
and clip items. While macro item allows you to perform variety of
different tasks (from simple text inserting or starting application to complex
scripts) clip item allows you just one thing: pasting clipboard data.
Using clip items you can simply insert pictures, formatted texts, tables or
charts to Windows applications. To access item properties double-click on an item in the main window.
General
General item settings are provided mostly for user's convenience (easy
navigation, searching and orientation among items).
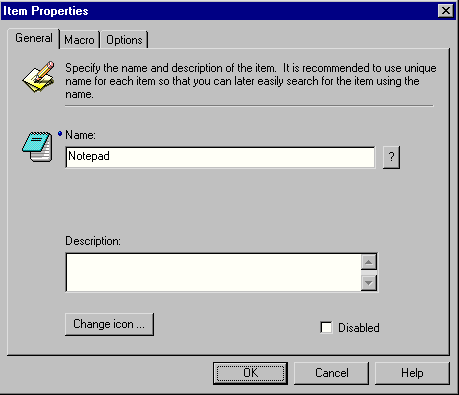
- Name - the name of the item that is shown as a
toolbar button tooltip. If the name is extended by " /XY" (space + / + X +
Y) than the XY characters are displayed over the toolbar button icon. For example,
"Macro /1", the tooltip will be "Macro" and there will be
"1" shown on the icon.
- Description - description of the item.
- Change icon - allows to select/change icon.
- Disable - if checked, the item is disabled and not
shown in the toolbar.
Macro
In this section, the user can edit macro.
If the item was created as a "clip item" this page is not
available.

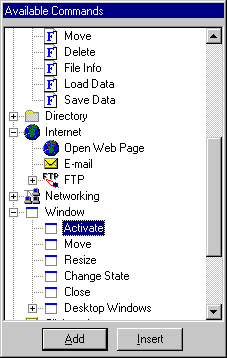
- Macro - define the macro
you want to run here. Just type the macro text in or use "Add/Insert"
buttons of the "Available Commands"
window. Depending on the "Raw source text / Formatted" switch the macro is
displayed as plain text or sequence of steps.
- Raw source text - if selected, the macro is
displayed as a plain text and can be edited as any other text.
- Formatted - if selected, the macro is displayed as
a sequence of steps (commands).
- Edit - allows to visually edit command.
- |< << >> >| - use these arrows
for navigation in macro.
- Up - moves the macro steps one row up (only if
"formatted" macro view).
- Down - moves the macro steps one row down (only if
"formatted" macro view).
- Copy - copies selected macro step (only if
"formatted" macro view).
- Delete - deletes selected macro step (only if
"formatted" macro view).
- Other / Insert recorded macro - inserts macro recorded in the memory.
- Other / Remove timing commands - removes timing commands <wx> from the macro. These
commands are in the macro if user records macro with real time information.
- Other / Remove mouse move commands - removes mouse
move commands <mm> from the macro. These commands are in the macro if user
records macro with mouse move information.
- Available Comands - all the available commands organized in the tree. Just
select the command in the tree and press "Add" (adds the command to the end of
macro) or "Insert" button. This window appears automatically when
"Item Porperties - Macro" page is selected.
Clip:
Insert clipboard data. If the item was created as a "macro
item" this page is not available.
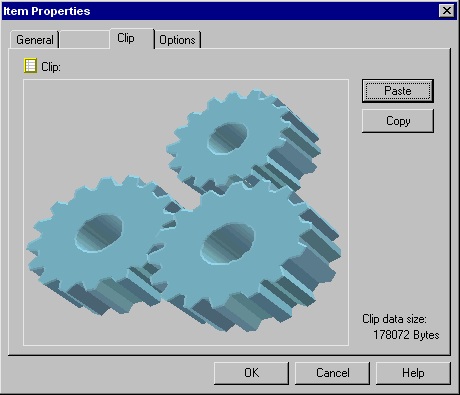
- Paste -click this button to insert
data from the clipboard to the item.
- Copy - click this button to copy data
from the item to the clipboard.
Options:
In this section, there are additional options the user can set for each item.
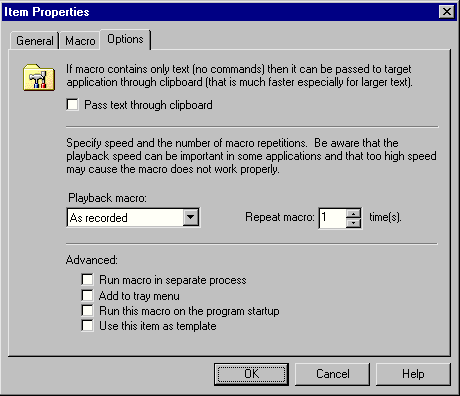
- Pass text through clipboard - if the macro is just
a text with no commands or special keys then it can be inserted to the destination
window through the clipboard. It is faster especially if the text is bigger.
If this option is checked and the macro contains commands then the commands are not
executed.
- Playback macro - user can control the playback
speed of macro if it contains wait commands (usually recorded
macros).
- Repeat macro - how many times should be the macro
repeated.
- Run macro in separate process - during the macro
execution no other macro can start. This is not convenient for macros that can take
very long to finish (for example, FTP download). In such case there is an option to
start time consuming macro in separate process so that it doesn't block other macros from
starting.
- Add to tray menu - if checked, the item is
available in the tray menu.
- Run this macro on the program startup - if checked,
the macro is automatically executed when the program starts.
- Use this item as template - if checked, this item
is available in the list of templates that can be used to create new items.
Related topics: Main
Help File | Running Macros