
The page's title is just about what you probably think it is: the overall name of the page (not to be confused with the name of the file you're creating). If someone views the page in a graphical browser (such as Netscape or Mosaic), the title appears in the title bar of the browser's window (I'll show you an example in a sec).
To define a title, you surround the text with the <TITLE> and </TITLE> tags. For example, if you want the title of your page to be My Home Sweet Home Page, you'd enter it as follows:
<TITLE>My Home Sweet Home Page</TITLE>
Note that you always place the title inside the head section, so your basic HTML document now looks like so:
<HTML>
<HEAD>
<TITLE>My Home Sweet Home Page</TITLE>
</HEAD>
<BODY>
</BODY>
</HTML>
The following figure shows this document loaded into the Windows 95 version of the Netscape Navigator browser program. Notice how the title appears in the window's title bar.
| Most Windows Web browsers display the page title in, of all places, the window's title bar. | 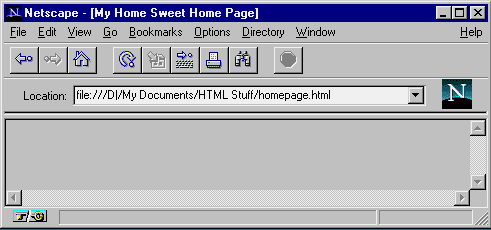 |
For a few more tidbits about working with Web page titles, head for Chapter 4, "Laying the Foundation: The Basic Structure of a Web Page."
With your page title firmly in place, you can now think about the text you want to appear in the body of the page. For the most part, you can simply type the text between the <BODY> and </BODY> tags, like so:
<HTML>
<HEAD>
<TITLE>My Home Sweet Home Page</TITLE>
</HEAD>
<BODY>
This text appears in the body of the Web page:
</BODY>
</HTML>
When you want to start a new paragraph, you have to use the <P> tag. For example, consider the following text:
<HTML>
<HEAD>
<TITLE>My Home Sweet Home Page</TITLE>
</HEAD>
<BODY>
This text appears in the body of the Web page.
This is the second line (sort of).
<P>
This is the third line.
</BODY>
</HTML>
The following figure shows how this looks in the browser. As you can see, the first two lines appear beside each other, despite the fact that they're on separate lines in the original text. However, the third line sits nicely in its own paragraph thanks to the <P> tag that precedes it. I'll talk more about paragraphs and other ways to break up text in Chapter 4, "Laying the Foundation: The Basic Structure of a Web Page."
| You need to use the <P> tag to create paragraph breaks in HTML. |  |
Well, you're getting there. So far you've been able to use HTML to convince a Web browser to display a page title and break up plain text into paragraphs. That's a good start, but you won't exactly have Web surfers clamoring to read your page. What you need now is to jazz up the page with some text formatting and a few impressive headings.
HTML has a cartload of tags that will fancify your text. You saw earlier how a word or phrase surrounded by the <B> and </B> tags will appear bold in a browser. You can also display text in italics by bracketing it with the <I> and </I> tags, and you can make your words appear as though you produced them with a typewriter by surrounding them with the <TT> and </TT> tags.
Like chapters in a book, many Web pages divide their contents into several sections. To help separate these sections and so make life easier for the reader, you can use headings. Ideally, these headings act as mini-titles that convey some idea of what each section is all about. To make these titles stand out, HTML has a series of heading tags that display text in a larger, bold font. These are six heading tags in all, ranging from <H1> --which uses the largest font- down to <H6>--which uses the smallest font.
To illustrate these text formatting and heading tags, the next figure shows how Netscape displays the following text:
<HTML>
<HEAD>
<TITLE>A Text Formatting and Headings Extravaganza</TITLE>
</HEAD>
<BODY>
Here's some <B>bold text</B>. You can also do the
<I>italic text</I> thing. And, what the heck,
<TT>typewriter-like text</TT> is also available.

<H1>An H1 Heading</H1>
<H2>An H2 Heading</H2>
<H3>An H3 Heading</H3>
<H4>An H4 Heading</H4>
<H5>An H5 Heading</H5>
<H6>An H6 Heading</H6>

</BODY>
</HTML>
| Examples of text formatting and heading tags. |  |
To learn more about these tags and a few others to boot, pay a visit to Chapter 5, "From Buck-Naked to Beautiful: Dressing Up Your Page." If you're using the Netscape browser, you have access to a few more text tricks; Chapter 10, "Fooling Around with the Netscape Extensions," fills you in on the details. Finally, if you need to include lists of things in your page, there are HTML tags to handle your every need; Chapter 6, "A Fistful of List Grist for Your Web Page Mill," gives you the complete list lowdown.
 |
 |
 |
 |
![]()
![]()
![]()
![]()
For comments or technical support for our books and software,
select Talk to
Us.
To order books, call us at 800-716-0044 or 317-228-4366.
⌐ 1996, QUE Corporation, an imprint of Macmillan Publishing USA, a Simon & Schuster Company.