Transgender

Gender NerdWearBy Jamie Faye FentonMy name is Jamie Faye Fenton and I am a certified gender-nerd. I have loved science and technology all my life -- I understood the difference between male and female electrical connectors years before I figured out the difference between male and female people.
Several of my TG friends and I go dancing at the Masquerade, a Fetish/Gothic
dance club held once a month in San Francisco. This month's theme was Science
Fiction, and rather than coming as just another Barberella or Dax, I chose to
sport some homemade electronic jewelry. After a quick stop at Radio Shack and 10
minutes of experimentation I made a nifty pair of glowing LED (Light Emitting
Diode) earrings. They worked well and I decided to write this technical report to
help my fellow gender-nerds accessorize.

Radio Shack sells a great battery to power LED jewelry with. Its called the
CR1025 (23-268), it is a 3 volt Lithium button that measures 3/8" in diameter and
just over 1/8" thick. They cost $2.79 each. Radio Shack also sells a grab-bag
package of 20 assorted LEDs (276-1622) for $2.29. My mounting scheme used some
1/4" inside diameter plastic tubing cut to 3/8" in length - heat shrink tubing
would do fine here.
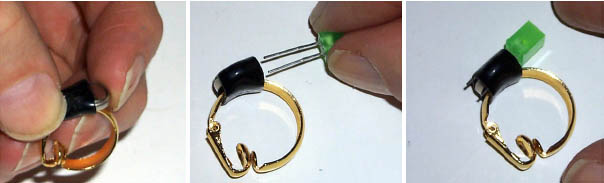
I threaded an earring hoop through the tubing, pressed the battery into the tubing, and inserted the LED leads into the tubing, with one lead contacting the positive side of the battery, and the other the negative. A LED has polarity, just like a battery, and the negative side, called the cathode, should go to the negative battery terminal. Usually the LED cathode is indicated by making the lead a little shorter or by a bump on the side of the LED housing. Its no big deal if you put the LED in backwards, it just won't glow so you take it out and reverse it. I also trimmed the leads back so the ends would not stick out the back.
To turn my earrings off, I just pulled out the LEDs and reinserted them with only one
lead connected. One can change colors at will, or even plug in more than one LED.
Radio Shack has more expensive LEDs that are multi-colored, and others that flash
automatically. LEDs vary in their current consumption: my earrings ran over 3
hours solid without dimming (Most of these Radio Shack LEDs have an
integral current-limiting resistor). Tubing is available in many colors too.
I made several other styles of LED earrings shown above. In the pierced-ear style example, I poked the leads of the LED through the plastic to make contact with the battery terminals. One can obviously make LED rings, pendants, bracelets, and pins. One TV here in San Francisco has an electric dress. Many opportunities to experiment exist, so let's go show 'em that the combination of femininity and technology can be most illuminating. |