|
You can access ADSI from
many different development platforms such as Microsoft® Visual Basic®,
Scripting, Visual C++®, and any other language that is compatible with
Automation. Your mission is the easy part - picking the development
platform that is best suited for you and your projects. To learn more, follow these links:
Microsoft
Scripting Technologies
Before you start, make sure you download and install the
scripting components from http://www.microsoft.com/management/wshobj.htm.
If your operating system is Windows® 2000, the scripting components are already ready to be
used. For more information on scripting, visit http://msdn.microsoft.com/scripting.
Scripting technology is ideal for
administrators
creating batch scripts for frequently used tasks.
A simple VBScript sample: Enumerating
ADSI objects in a computer
Before we start, you must have a machine
that runs Windows NT®, or be logged on to
a domain. If your machine runs Windows 95/Windows 98, you must have a
Windows NT machine that you can connect to.
- Create a new text file using Notepad
or your favorite text editor.
- Write the following line:
'----------------------------------------------------------
'--- This script enumerates ADSI objects in a computer
'---------------------------------------------------------
Dim machineName
machineName = "mymachine"
Set comp = GetObject("WinNT://" & machineName & ",computer" )
For each obj in comp
wscript.echo obj.Name
Next
- Save it as first.vbs.
- At the command prompt, type cscript first.vbs
for a command line or first.vbs for windows scripting. You should see the
result.
- If you want to see objects in the domain, replace
the above two lines with:
domainName = "myDomain"
Set dom = GetObject("WinNT://" & myDomain )
You can find the source code here.
What's Next?
- To find out more about Scripting, see http://msdn.microsoft.com/scripting/.
- Once you decide which ADSI provider (WinNT, LDAP - for Active
Directory, Exchange, Site Server, NDS, NWCOMPAT) you would like to
use, use the links found on the banner at the top of this page to find
out information about that provider.
- You can also browse the VBScript samples.
Back to top
Microsoft Visual Basic
Microsoft Visual Basic is ideal for developing
applications or prototypes.
To set up Visual Basic Project, follow this easy
step-by-step instruction:
- Launch Visual Basic.
- Select the type of project you would like
to create.
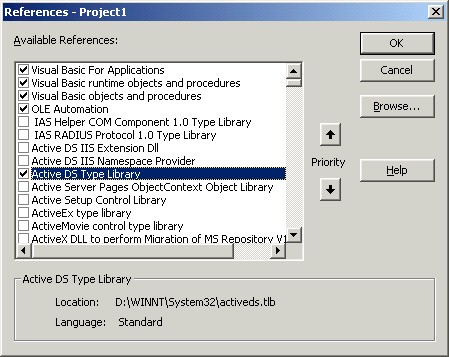
- Select Project | References.
- Make sure to check the Active DS type Library
as shown below. If you don't need early COM object binding, this process is not necessary.
- Now you're ready to start ADSI programming.
A simple Visual Basic sample: Modifying
FullName and Description on a user
- Before we start, you must log on to a
Windows NT domain. You must
also have permission to modify a Windows NT 4.0 directory database. Administrator,
by default, has
this privilege.
- Follow steps above to create a standard executable VB project.
- Double-click the Form.
- On Form_Load, type:
'------------------------------------------------------------
' This program is used to set FullName and Description in a user
'------------------------------------------------------------
Dim usr As IADsUser
dom = "YOURDOMAIN" 'Replace with your domain
'----Binding to a user object
'----Note the ',user' is optional. It's used for performance
Set usr = GetObject("WinNT://" & dom & "/Administrator")
usr.FullName = "James Smith"
usr.Description = "Administrator for " & dom
usr.SetInfo 'Commit the changes to DS
- Press F8, to step through the program line by line.
- Once you finish, use usrmgr.exe to view,
if the FullName
and Description are changed.
- You can find the source code under
/samples/start/first/first.vbp.
What's Next?
- To find out more about Visual Basic
programming, visit http://msdn.microsoft.com/vbasic/.
- Once you decide which ADSI provider (WinNT, LDAP - for Active
Directory, Exchange, Site Server, NDS, NWCOMPAT) you would like to
use, use the links
found on the banner at the top of this page to find out more
information about that provider.
- You can also browse the Visual Basic samples.
Back to top
Microsoft Visual C++
Microsoft Visual C++ is ideal for developing
commercial applications.
Here are step-by-step instructions for
setting up your Visual C++
environment.
- You must install the ADSI SDK. You can
find the ADSI SDK
download link from http://www.microsoft.com/adsi.
- Optionally, you can install the MSDN Build Environment. To
subscribe to MSDN, go to http://msdn.microsoft.com/developer.
- Make sure you point to the include and library directory.
Select Tools | Options. Click on the Directory tab, and specify the path.

- In your project, be sure to include "activeds.h".
- In your project, be sure to include activeds.lib
and adsiid.lib.
- Now you are ready to start ADSI programming.
A simple Visual C++ sample: Creating a
user in a domain
- Before we start, you must log on to a
Windows NT domain. You must
also have permission to modify the Windows NT 4.0 directory database. Administrator,
by default, has
this privilege.
- Follow the steps above to set up your project.
- Create a standalone EXE project. It can be either
an MFC, ATL, or Console Application.
- Type the following code:
#include "stdafx.h"
#include "activeds.h"
int main(int argc, char* argv[])
{
HRESULT hr;
IADsContainer *pCont;
// You must initialize COM before calling any ADSI
functions or interfaces.
CoInitialize(NULL);
hr = ADsGetObject(L"WinNT://YOURDOMAIN", IID_IADsContainer,
(void**) &pCont );
if ( !SUCCEEDED(hr) )
{
return 0;
}
//----------------------------
// Creating a user
//-----------------------------
IDispatch *pDisp=NULL;
IADs *pUser;
hr = pCont->Create( L"user", L"jsmith",
&pDisp );
pCont->Release();
if ( !SUCCEEDED(hr) )
{
return 0;
}
hr = pDisp->QueryInterface( IID_IADs, (void**) &pUser );
pDisp->Release();
if ( !SUCCEEDED(hr) )
{
return 0;
}
// Commit creation to the directory.
pUser->SetInfo();
// Release the object.
pUser->Release();
CoUninitialize();
}
- Go to User Manager (or the Active Directory Management Snap-in
for Windows 2000) and verify if the user is created.
- You can find the source code in /samples/first.
What's Next?
- To find out more about VC programming,
see http://msdn.microsoft.com/visualc/.
- Once you decide which ADSI provider (WinNT, LDAP - for Active
Directory, Exchange, Site Server, NDS, NWCOMPAT) you would like to
use, use the links
found on the banner at the top of this page to find out more
information about that provider.
- You can also browse Visual C++ samples.
Back to top
Active
Server Page
- Install IIS.
- Set the IIS Authentication mechanism (Anonymous, Basic or
NTLM). If you choose anonymous, your security context will be mapped to
IUSR_MACHINE
account. If you select NTLM, the security context will change, depending on
which user logs on to your web site.
ASP code starts with '<%' and ends with '%>'.
Now you're ready to program.
In this exercise, we will create a simple page
that can accept a
computer name and enumerate an object in that computer (source code can be found in
\samples\ASP\First)
- Create a new page which accept a computer, user name and
password. Example, default.htm.
- It's much easier to use Microsoft FrontPage to create an
ASP or HTML path. Type the following lines:
<form method="POST"
action="enum.asp">
<p>Connect to:<input type="text"
name="Computer" size="20"></p>
<p>User Name:<input type="text"
name="Computer" size="20"></p>
<p>Password:<input type="password"
name="Computer" size="20"></p>
</form>
Now, you're ready to accept the computer
name and start enumerating using ADSI.
- Create a new ASP page called, enum.asp
<%
'----Get the inputs----
compName = Request.Form("computer")
usrName = Request.Form("userName")
password = Request.Form("password")
'----Binds----
adsPath = "WinNT://" & compName & ",computer"
Set dso = GetObject("WinNT:")
Set comp = dso.OpenDSObject(adsPath, userName, password, 1)
%>
<%
'----Enumerate----
<%for each obj in comp %>
<tr>
<td width="35%"><small><font
face="Verdana"> <%Response.Write
obj.Name%></font></small></td>
<td width="65%"><small><font
face="Verdana"> <%Response.Write
obj.Class%></font></small></td>
</tr>
<% next %>
This is what the page looks like when you execute the ASP.
Computer Name:
TownCenter
Contains the following objects:
| Administrator |
User |
| jamessmi |
User |
| Guest |
User |
| IUSR_ADSI |
User |
What's Next?
- To find out more about ASP programming, visit
the ASP Microsoft web
site.
- Once you decide which ADSI provider (WinNT, LDAP - for Active
Directory, Exchange, Site Server, NDS, NWCOMPAT) you would like to
use, use the links
found on the banner at the top of this page to find out more
information about that provider.
- You can also browse ASP samples.
|