CHANNEL SETTINGS
Sampler Channel Settings (SMP)
The Sampler Channel Settings page holds properties specific for the Sampler
generator. It also appears in plugin generators that support custom shapes for
their oscillators. In such case, only the sample bank is visible in this tab.

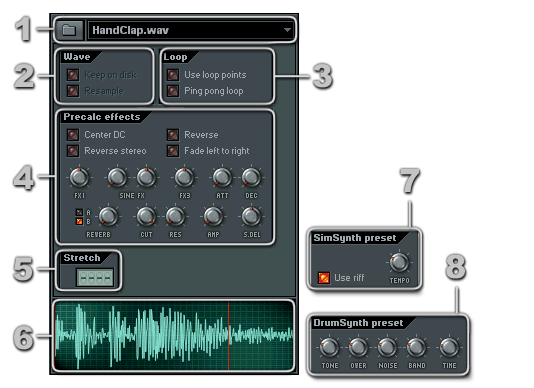
1. Sample Bank
The sample bank contains the wave that Sampler uses for synthesis. Left-click
the button on the left side to browse a sample
or SimSynth/DrumSynth
preset for the sample bank. The Open dialog has been enhanced with Favorites
section. The combo box on the right side displays the name of the currently
selected sample. If you left-click it, a history list with recently opened samples
shows.
2. Wave
Contains general wave handling routines.
- Keep on Disk - Turning this option on lets
you save memory by streaming the sample from your hard disk, instead of loading
it entirely in the memory. Note that to be able to use this option, the sample
needs to be in 44100 kHz 16 bit Stereo format. Also, you can not use precalculated
effects (4), because they are applied
to the whole wave at once.
- Resample - If your sample is not at 44100
kHz 16 bit Stereo format, you can click this option to let FruityLoops resample
the wave for higher quality output. However, it is not recommended to turn
this on for looped samples. Since all loop points are sample aligned, resampling
may cause clicks. Note that while this option improves the real-time playback,
it requires additional CPU and memory (resampled waves are bigger). Also,
if you export your wave/mp3 with
hermite curve interpolation or better, then
the quality of non-resampled waves won't be degraded.
3. Loop
Contains options concerning sample looping.
- Use Loop Points - If the sample contains loop
points (this is visible in the Sample view described below), you can check
this option to make the sample loop. It will start playing from the beginning,
then when it reaches the loop end point, it will "jump" back to
the first loop point, thus creating sound with unlimited length, useful for
instruments like strings, organs etc.
- Ping Pong Loop - This effect will take the
wave between the loop markers and insert it reversed right before the loop
end marker. The audible effect is like sample "ping-pongs" between
the start and end loop points, instead of just jumping back to the start loop
point.
4. Precalculated effects
It is a set of effects and processing routines for the sample loaded in the
sample bank. None of them requires additional CPU power to play your song, because
they are all applied precalculated - FruityLoops processes the sample and then
it loads it in the memory with all effects already applied. However, this fact
makes the automation of precalc effect impossible (see Automation).
Also, they can not be applied to streamed samples (when the
Keep on Disk option is turned on), since they need to process the whole
wave at once.
- Center DC - Removes any DC offset in the loaded
sample.
- Reverse Stereo - Switches left and right channel
in the loaded sample.
- Reverse - Reverses the sample.
- Fade left to right - Creates a fade from left
to right channel in the sample.
- Boost (FX1) - This effect is useful for boosting
up & overdriving your sample.
- Sine FX - Applies a sine modulation to the
sample. The first wheel controls the amount of modulation; the second one
controls the sine frequency.
- Pitch bend (FX3) - Applies pitch bend to the
sample. Useful with drum samples.
- Attack & Decay (ATT & DEC) - Turn
right the attack wheel to create a fade in effect in your sample. Decay creates
fade out (this is not true instrument envelope.
To use a real AHDSR envelope, use Instrument
Channel Settings instead).
- Reverb - Use this effect to add echoic ambiance
to your sample. You have two different modes of reverb available - A &
B. The wheel controls the amount of reverb applied to the sound. This effect
may extend your sample at the end to fit the whole reverb (it is recommeded
that you use the real-time reverb effect included with FruityLoops - Fruity
Reeverb, see Effects).
- Cutoff & Resonance (CUT & RES) - Applies
a low pass cutoff and resonance filter (for
a real-time automated cutoff and resonance filter, see Instrument
Channel Settings).
- Amplify (AMP) - You can use this effect to
make louder low volume samples.
- Stereo Delay (S.DEL) - This effect applies
a short delay between the left and the right side of the sample, which creates
a pseudo stereo effect. Turning the wheel to right slides the left channel
forward, while turning it left slides the right channel forward. Note that
it is recommended not to use that effect on looped samples. Since all loop
points are sample aligned, sliding either channel may cause clicks.
Precalc Effects Apply Order:
This is the order in which all precalc effects are applied to the sample:
Stereo Delay Reverse
 FX3
FX3 Sine
Sine Cutoff
& Resonance
 Attack
 Decay
Decay Amp
Amp FX1
FX1 Pan/Fading
 Final
Clipping
 Reverb
 Rev.
Stereo
 End
Silence Removal
5. Stretch
Left-click and drag up and down to set a number of steps (16-th notes) the
sample will be stretched to. This is a real-time effect, so it will follow properly
tempo changes during the song. However, note that samples are stretched with
pitch non-preserving technique, so you can not have different pitches (tones)
with one tempo. This makes it more suitable for use with drum loop samples instead
of instrument samples. You can also right-click the LCD to gain access to a
menu with several predefined stretch lengths. To turn off the effect (so the
sample can have different pitches - notes, slides), just drag down until the
LCD displays four dashes.
6. Sample View
The sample view displays the loaded sample (with all precalc effects applied
to it). It also shows the loop points, if such exist (loop points can be set
by using an external wave editor). The first vertical red line is the loop start
point; the second one is the loop end point. Left-clicking the sample view previews
the sample. Right-clicking it shows a menu with additional channel settings
and commands. It contains exactly the same entries as the menu you can call
by clicking the button at the top left corner of the Channel
Settings window.
7. SimSynth Preset
This panel appears only when a SimSynth preset
is used to fill the sample bank.
Enable the Use Riff option if you want to generate
the whole riff in the preset (this option is disabled if the preset you used
does not contain riff data). The Tempo wheel lets
you set the tempo of the generated riff.
8. DrumSynth Preset
This panel appears only when a DrumSynth preset
is used to fill the sample bank. They are few parameters that define the generated
sound and they are identical to the same options in DrumSynth standalone.
- Tone (TONE) - Sets the loudness of the sine
oscillator in DrumSynth.
- Overtone (OVER) - Sets the loudness of the
second oscillator in DrumSynth.
- Noise (NOISE) - Sets the amount of white noise
added to the sample.
- Noise Band (BAND) - Sets the loudness of noise
band generator in DrumSynth.
- Time (TIME) - Sets the length of the generated
sample.


![]() Reverse
Reverse![]() FX3
FX3![]() Sine
Sine![]() Cutoff
& Resonance
Cutoff
& Resonance![]() Attack
Attack![]() Decay
Decay![]() Amp
Amp![]() FX1
FX1![]() Pan/Fading
Pan/Fading![]() Final
Clipping
Final
Clipping![]() Reverb
Reverb![]() Rev.
Stereo
Rev.
Stereo![]() End
Silence Removal
End
Silence Removal