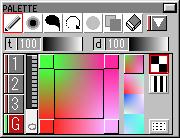
This is the place where you can register the colors you frequently use, and select different types of pens, brushes, eraser, etc. You can even register a picture as the current color, and color gradations can be made here.
* PALETTE
Click one of theClicking
on one of the registered colors obtains the color as the current. Right-clicking
registers the current color. Simple colors and even bitmap pictures can
be used here.
Click ![]() and the selection
menu will pop up.
and the selection
menu will pop up.
| Draws with the current color (including bitmaps and gradations). | |
| Blurs the place where you click or drag. | |
| Gives an effect same as rubbing on wet inks. | |
| Stirs the colors where you drag. | |
| Draws with the average color of where you drag. | |
| Applies the filter you selected to where you drag. Very handy way of giving filter effects to a part of the picture. First choose a filter and drag in the canvas where you would like to use the filter. | |
| Transparentizes the dragged place. |
* T value and D value
@![]()
This changes
Thickness value and Density value that control the look
of the color you use for drawing. The less value gives an effect of thinner
look of the color.
"t" stands for Thickness and "d" stands for Density.
Drawing many times on the same place accumulates the color and eventually
becomes the same as filling the color with full t and d values.
Note that these values affect all the places you applied in the canvas,
and affect other editing to the places such as filters and/or pasting.
* Bmp Palette
The colors
that look like ![]() in the
palette are bitmaps.
in the
palette are bitmaps.
Right-drag in the canvas with [SHIFT] key down captures the image by the
dragged area, and you will be able to register it in P-panel by right-clicking
on the place where you would like to put the image.
("Dropper" needs to be assigned to "Right-Clicking"
at [View]-[Paint Setting] beforehand.j
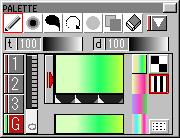
* Gradation Palette
There are
two types of gradation. Straight-line gradation and rectangular gradation.
Clicking ![]() gets rectangular
gradation palette and clicking
gets rectangular
gradation palette and clicking ![]() gets straight-line gradation palette.
gets straight-line gradation palette.
Rectangular Gradation
Place colors by clicking at the four corners of the palette and make the rectangular gradation. Colors can be placed at the four long rectangles at the sides of the big square, and the gradation becomes two-color gradations between the two opposite sides. Right-clicking the center square switches the gradation back to the four-color gradation.
Straight-line Gradation
Make the color you would like to add current, and drag from [>] button onto the gradation palette to the right, and the color will be added there. The tiny pyramids in the black belt at the bottom of the palette are where basic colors are located. Dragging a pyramid toward the [>] button to the left deletes the color.
Each of the gradation palettes can hold four gradations you made at the foursmall square lined up vertically between the palette and the buttons at the right. Cllicking one of them gets the gradation back to the palette. Clicking or dragging on the small ruler located between the numbered buttons and [>] button changes the angle of the gradation. The angle value is displayed underneath. Clicking there gets the angle back to 0 degree.
Bitmaps can be added to the gradation. Capture an image as explained at BMP palette above, or load a file at C-panel. How to add a bitmap is the same as how to add a regular color.
 |
 |
|
Rectangular
Gradation
|
Straight-line
Gradation
|