This panel
controls layers.
The layer selected here (highlighted in red) will be the layer you work
on in the canvas.
 |
 |
The layer
located lower in L-panel has a higher priority.
In other words, the layer at the bottom of the panel is the one that is
located on top of all the others.
(Refer to the picture above for better conprehension.)
Dragging each layer changes its position.@
| Choose
a plane you work on, among [Mask]
and [Transparency]. You can also add and/or delete transparency and/or mask. |
|
| You can [Delete][Duplicate][Setting][Resize][Merge Layers][Drop Shadow] here. | |
| Choose the display color of transparent part. |
![]()
The activated layer is highlighted in red as this picture.
Clickingswitches between display and hide modes of the layer.
Clickingswitches between [Display this layer only] and [Display layers blended].
Left click the layer name, or Right click the blank part (gray area) of the layer button, and you will get this layer options window.

| Name | Rename each layer with a word that is easily recognizable, and you can avoid unnecessary mistakes or confusions. | ||||||||||||||||||
| Layer Mode |
This chooses how you want the layer to blend with the one behind.
|
||||||||||||||||||
| Opacity | This controls the value of opacity of the whole layer. The lower the figure becomes, the more transparent the layer is displayed. |
* Components a layer is made of.@
Each layer
consists of a set of planes of: "image"and "mask".
"Transparency" plane can also be added. More than one mask planes
and transparency planes are used in one layer. Click [Image] button and
choose [Add and delete...].
All the
planes used in the layer get copied when you copy to cllipboard.
When you paste it, all the information even including selection gets pasted.
If you paste it to mask or transparency plane, only color thickness information
gets pasted. Pasting as a new layer becomes a complete duplicate of the
original layer that was copied.
* Mask and transparency
Mask and transparency planes are displayed like the followings.
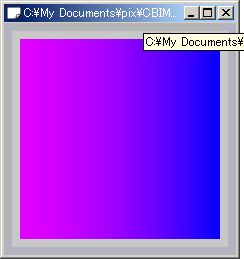 |
Mask
plane is displayed like this. Pink part is the area which is masked,
and blue part is not masked. The sample is the gradation of mask.
The pinker the color is the stronger mask is, the bluer the color
the weaker the mask. It is made using a white to black (left to right) gradation. |
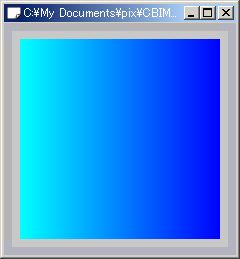 |
This is transparency plane. White part is the transparent area while blue part is opaque.@The whiter the color is, the more transparent the part is, and the bluer the color is, the more opaque the part is. The sample is made using a white to black (left to right) gradation. |
* Change
of transparency color.
![]()
Clicking this button enables to change the color that indicates transparency.
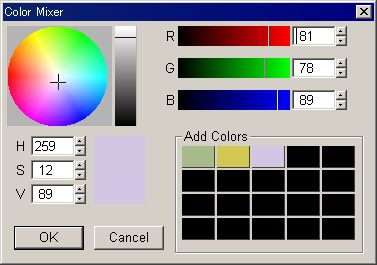
Just like C-panel, after making a color of your choice, click [OK] button. Transparency is displayed using that color. The color you made can be registered in the [Add Colors] panel of the dialog.
 |
Transparency color is white at default, but then it is hard to distinguish transparency from real white which is very often used in images. @ |
 |
The transparency color is changed to reddish purple. Now transparent part is easily recognizable. |
@