The Snake Effect applies wave forms to vary the Transforms for components of a Complex Object over time.
The Snake setting tab of the 'Effect Settings' dialog box is represented below. This dialog box is displayed when you first create the Snake Effect. It can also be displayed by double-clicking the Snake Effect in the Timeline, or right-clicking the Snake Effect and choosing 'Properties' from the context Menu.
By component
When the by component box is checked, the Snake Effect applies to each component in turn, based on its position within the object. When the option is turned off, the snake applies to all the components at the same time.
For example, the following images show a 'time-lapse' view of some text moving in a circle. The first image shows the Effect with the By component option turned on.
The second image shows the Effect with the By component option turned off.
Follow path
When the Follow path option is turned on, the components automatically rotate to follow the path. When it is turned off, the components maintain their original orientation. Any angle Transform is added on to this calculated angle.
For example, the following images show a 'time-lapse' view of some text moving in a circle. The first image shows the Effect with the Follow path option turned on.
The second image shows the effect with the Follow Path option turned off:
Forward
The Forward option moves the components in order. When the option is turned off, the components move in reverse order, as shown below.
Note: This only has an Effect when the By component option is checked.
For example, the following images show a 'time-lapse' view of some text moving in a circle. The first image shows the Effect with the Forward option checked.
The second image shows the Effect with the Forward option turned off.
Start straight
When the Start straight option is turned on, components start from their initial positions and gradually move into the Snake Effect. When unchecked, the Snake Effect starts immediately.
Note: This only has an Effect when By component is ticked.
For example, the following images show a 'time-lapse' view of some text moving in a circle. The first image shows the Effect with the Start straight option turned on.
The second image shows the Effect with the Start Straight option turned off.
Wave
This set of columns has the Wave settings for each Transform. The Wave settings are the waveform itself, the Period is number of Frames over which the wave repeats its 360 degree cycle, and the Phase is where the wave starts within its 360 degree cycle.
Waveform
There are nine separate waveforms, plus a Fixed value indicating that no waveform applies.
The following illustrations show the effect of each waveform on the y value of a rectangle.
Sine: moves smoothly between the start and end values
Triangle: 
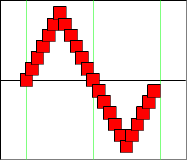
moves linearly between the start and end values
Square: jumps between start and end the values
Saw Up: moves linearly from start to end, then jumps back to start
Saw Down: moves linearly from end to start, then jumps back to end
Sqr+Tri: moves linearly to end values, stays, move linearly to start value, stay
Bounce: moves in a parabola from start to end values and back
Gravity: same as bounce, except, rather than repeating, the curve continues past the start point
Pulse: jumps to end value and back at the start of the cycle
Cycles or Period
This is controls the number of Frames it takes for the wave to complete a cycle, or the number of cycles for the effect duration.
If you specify "Period", then the values in this column is the number of frames per cycle. The larger the period, the less cycles during the effect and the slower the wave moves. Changing the effect duration does not change the speed of the effect, only how long it plays.
If you specify "Cycles", then the values in this column are the number of cycles during the effect. The larger the number of cycles, the longer the period and the faster the wave moves. Changing the effect duration changes the spped of the effect, not only how long it plays.
Note: Further, if you specify "Cycles", then you can control the speed of animation by adjusting the overall effect duration. The shorter the duration, the faster the animation.
Phase
This determines where the wave starts in it cycle. A vaue of 0 degrees starts at the start of the cycle, a value of 180 degrees starts halfway through and so on.
Decay
The parameters in these columns determines how the waveform changes over time.
A (amplitude)
When checked, the amplitude (or strength or range) can decrease toward zero or increase toward the full value (depending on the direction). When this option is turned off, the amplitude stays the same for the duration of the Effect.
P (period)
When checked, the period (or wavelength) can decrease toward zero or increase toward the full value (depending on the direction). When this option is turned off, the period stays the same for the duration of the Effect.
Halflife
This is the number of Frames it takes for the amplitude or period to halve (or double) its value. The larger the half-life, the slower the rate of decay.
Direction
This is the direction and (for amplitutde) the final value that the decay takes. The amplitutde can decay toward (or from) the minimum value, maximum value or halfway between.
X=Y
This option forces the Y value to equal the X value.
PositionX/Y
Controls the maximum distance each component moves from its original position. A negative X is left, and a positive X is right. A negative Y is up and a positive Y is down. A value of 0 means no change in position.
Spacing X/Y
Controls the component(X) / line(Y) spacing factors for the components when the wave is farthest from its original position. A value of 100% means no change in spacing.
ScaleX/Y
The amount by which each component is scaled horizontally/vertically as the wave passes through. Maximum change in scale will occur when the wave is farthest from its original position. A scale of 100% means the scale will not be varied. A negative value will shrink the component horizontally/vertically as wave passes through.
AngleX/Y
The amount by which each component's X/Y axis is rotated as the wave passes through. Maximum change in angle will occur when the wave is farthest from its original position. An angle of zero means the axis will not be rotated.
Alpha
The amount by which each component is faded out as the wave passed through. Maximum fade out will occur when the wave is farthest from its original position. An alpha of 100% means the alpha will not change. A value of 0% means the component will completely fade out as the wave passes through.
Color
This controls the color Transform for the component when the wave is farthest from its original position. The component color is calculated by taking the percentage of the selected color and adding the complementary percentage of the original color. For example, if the given percentage is 30%, the result will be 30% of the selected color mixed with 70% of the original color. A value of 0% means no change in color.