Using Actions to Control Your Movie

This is a step-by-step tutorial on how to add Actions to your SWiSH Movie. This tutorial is saved as "Actions.swi" in the Samples Menu.

1.Open "first.swi" from the Samples Menu  
 
2.On the 'Outline' Panel select Scene 1 and copy to the Clipboard by holding down the Control while pressing the C key (Ctrl+C) on your keyboard  
 
actionsnew_copyscene1.png  

3.   Select File | New and close "first.swi" without saving changes. Adjust your new Movie stage size to match "first.swi" by selecting the Movie Panel and changing the Width to 700, Height to 450

4.   Paste in Scene 1 from the Clipboard by selecting Edit | Paste from the Main Menu or Control+V on your keyboard
 
Note: Remember to delete the Scene 1 created with your new Movie, so that you have only one Scene 1 in the Timeline. It should have a + symbol beside it

actionsnew_pastescene1.png  

5.   Add a new Text Object by pressing the 'Insert Text' button or by selecting Insert | Text from the Main Menu. Change the size to '36', and change the text to read "Go to Swishzone"

actions_new_text_object.png  
 
6.On the 'Timeline' Panel click on Frame 122 in the Timeline row labeled "Go to Swishzone" and add a Place Effect.  
 
actionsnew_placeeffect1.png  
 
This will open the 'Place Settings' dialog box. As we are not changing anything about the Place Effect, simply close this panel. You will notice that a Place Effect marker actions_place_effect_marker.png is now visible at Frame 122  
 
actionsnew_placeeffect2.png  
 
Note: Simply closing the 'Place Settings' dialog box will place your Effect on the selected object at the specified Fame on your Timeline
 

7.   Select the 'Timeline' Panel tab and select Frame 10 in the row labeled Scene 1 ('Scene' is always the top row in the Timeline). Press Add Action and choose Stop from the Actions Menu

actionsnew_stopaction1.png  
 

   The timeline should now look like this:

   actionsnew_stopaction2.png

Note: When you move your mouse over the action marker you should see a ToolTip indicating the Stop Action
 

8.   Now select the 'this' Text object (bottom row of the Timeline) and click on the Actions Panel

9.   Press Add Event and choose On Release from the Menu (the actions_trigger_icon.png 'Add Event' icon was chosen because Events are 'triggers' to Actions)

actions_add_onrelease.png  

   The 'Add Event' button will change to Add Action, and the selected Mouse Event will show in the window below the button, and also as a checked box on the right of the panel (you can change your chosen event easily here at any time)

   actions_add_action.png

10.   Press Add Action and choose Play from the Menu

actions_add_action_play.png  

   The Action list should now look like this:

   actions_add_onrelease_play.png

11.   Press playmovie.png Play on the Control Toolbar. The 'this' Text Object will fade in and grow onto the screen then the Movie will stop because of the Stop Action at Frame 10. Now move your mouse over the 'this' Text Object and click and release the mouse button. When the mouse is released the Movie continues playing because of the Play Action that is triggered On Release. Press stopmovie.png Stop on the Toolbar

12.   Now go back to the Timeline Panel and select Frame 122 in the row labeled Scene 1

13.   Press Add Action and choose Stop from the Actions Menu.
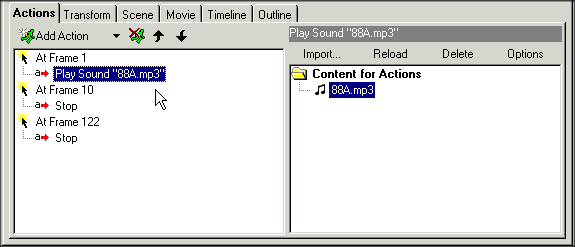
The Actions panel should now look something like this:  
(note that the two stop actions have been artificially emphasised to clearly indicate what you have just done)  

actionsnew_stopaction4.png  


14.   On the 'Timeline' Panel, select the 'Go to Swishzone' object and click on the Actions Panel

15.   Press Add Event and choose On Press from the Menu

16.   Press Add Action and select Goto Frame from the Menu. You should now see the Goto Frame Properties on the the right side of the Actions Panel

17.   Scene 1 and Frame Number 0 (zero) are preselected in the Goto Frame properties. Make sure the 'Goto' and 'Play' options are checked

   The Actions tab should now look like this:

   actions_add_action_goto_0.png

Note: The 'Goto Frame' dialog box will default to Frame 0 | Scene 1. If you wish to direct the Play Head to a different Frame or Scene, enter the Frame and Scene numbers in the dialog box


18.   Press Add Action again and choose Goto URL from the Menu. You should now see the Goto URL properties on the the right side of the 'Actions' Panel

19.   Enter "http://swishzone.com" into the URL text box

   The Actions tab should now look like this:

   actionsnew_gotourl1.png

20.   You will be able to test most of your Actions by pressing playmovie.png Play on the Control Toolbar. The 'this' Text Object will fade in and grow onto the screen, then the Movie will stop. Click and release the mouse button over this object. The Movie will continue playing and run the rest of your animation until "Go to swishzone" appears and then it will stop. Now move the mouse over the "Go to swishzone" object and press the mouse button. The Movie will restart at Frame 0

21. To test the Goto URL Action, select File | Test | In Browser. Your default browser will open and your Movie will start and then stop when it reaches the first Stop Action you applied at Frame 10, click on the 'this' object to carry on playing your Movie. When it reaches "Go to Swishzone" it will stop (at the Stop Action you applied at Frame 122). Click on the "Go to Swishzone" object. Your Movie will go back to the start and, at the same time, a new browser window is launched and will display the URL http://swishzone.com

Note: Testing the Goto URL Action requires testing in a browser rather than using the 'Play' button on your 'Control' Toolbar

22. You will have noticed that there are other Actions already applied in this Scene. On the Scene line on the 'Timeline' Panel, select the Action marker in Frame 110, hold down the Shift key while you also select the marker in Frame 111 and then press the Delete key on your keyboard

actionsnew_deletesound1.png  


23. On the Timeline in the Scene line, double-click on the sound Action marker on Frame 1. This will open the 'Actions' Panel where you can then select Play Sound to open the 'Import' dialog box

Your 'Actions' Panel should look like this:

actionsnew_playsound1.png  


24. Import a wave file from your system and you will find that it is automatically added to the Play Sound Action list on the left. By double-clicking on the sound in the Content list you will open the 'Play Options' dialog box, where you can select the number of times you want your sound to loop, apply various Effects such as fade and pan and also define the length of time and number of Frames your sound will play for

actionsnew_soundoptions.png  
 
25.Select File | Test in Player to test your Movie  
 
26Save you Movie  
 

[Previous] [Main] [Next]