[Previous] [Main] [Next]

Shape Object Panel

The 'Shape' Panel shows properties for the current shape.

panels-object-shape.png  

Name

This is the name of the shape that appears in the Outline Panel.

Line style
You can select from a number of line styles for the line around the outside of the shape. The default style is solid. If you do not want a line around the outside of the shape, select None from the Menu.
panels-object-scene-linestyle.png  
If you choose the custom option, then you can directly define the line style using the 'Custom Line Style' dialog box. This allows you to define the line style by a combination of minus signs and spaces. The window at the bottom of the dialog box shows you a preview of what the line style looks like. When you have the line style you want, press the 'OK' button.
panels-object-shape-customlinestyle.png  
 
panels-object-shape-linethickness.png Line thickness
You can change the thickness of the line around the outside of the shape (if any). The default thickness is 1.

Line color
You can change the color of the line around the outside of the shape (if any) using the Color Selector. The default col our is black.
 
Fill style
You can select the fill style of a shape from a number of styles. The default setting is solid, though if you want the interior to be hollow, select 'None' from the Menu.
panels-object-shape-fillstyle.png  
·Solid: uses a single color, which may have a degree of transparency (alpha value). Click on the 'Fill Control' or colored button to change the color using the Color Selector  
·Linear gradient: uses a smooth change in colors in straight bands across the shape. The Fill Control lets you change the colors in the gradient (see below)  
·Radial gradient: uses a smooth change in colors in circular bands across the shape. The Fill Control lets you change the colors in the gradient (see below)  
·Tiled image: uses a bitmap image to fill the shape. If the image is too small to fill the shape completely, then the image is tiled. Click on the Fill Control to select an image  
·Clipped image: uses a bitmap image to fill the shape. If the image is too small to fill the shape completely, then the outside pixels are stretched. Click on the Fill Control to select an image  

Fill Properties Button
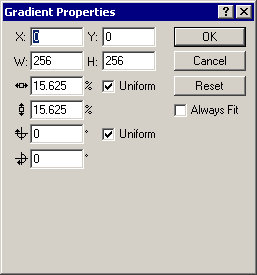
When you select a gradient or image fill style, the 'Properties' button is displayed. If you press the 'Properties' button, you can directly edit the fill Transform in a dialog box. For image fills, you can also change the compression (image quality).
 
The 'Gradient Properties' dialog box is represented below.
panels-object-shape-fillproperties-gradient.png  
The controls are the same as for the Transform Panel. However, in this case, the Transform applies to the fill pattern within the shape, rather than the shape within the Scene. You can also visually edit the fill Transform using the Fill Transform tool.
 
For image fills the title bar shows you the size in pixels and color depth of the image. The dialog box looks like this:
panels-object-shape-fillproperties.png  
There are several extra controls at the bottom right hand corner of the 'Image Fill' dialog box:
·The 'Always Fit' checkbox lets you automatically set up the fill Transform so that the fill will always fit the shape while reshaping  
·When the 'No Smooth' setting is checked, the bitmap that have been resized will never be smoothed. This can result in a clearer image in some cases, as smoothing can blur images  
·There are two types of image compression for SWF files. ZIP compression is 'lossless' compression, which means compression does not change the image quality or alter the image content. It uses the same compression as .zip files. You cannot control the compression ratio. It gives similar results to .gif or .png compression. JPEG compression is 'lossy' compression, which means image quality is reduced during compression. You can control the compression indirectly using the Quality setting. This is the same compression that JPEG files use  
·If you have selected JPEG compression, you can decide whether to use the existing JPEG compression of your imported image, or have SWiSH recompress the image itself to the quality level you select. Some images must be recompressed because they use progressive JPEG encoding, which will crash the Flash Player if not recompressed, or because the original file is not JPEG compressed  
·If you have selected JPEG compression and have selected to recompress the JPEG image, you can specify the image quality. The higher the value, the better the image quality, the larger the files size and the less compression. The quality is not directly related to the compression ratio  
·The 'Transparency' checkbox is only available for opaque images. When the 'Transparency' setting is checked, you can make the specific color from the image transparent. The 'Tolerance' setting controls how similar to the specified color the pixel must be before it is changed to transparent. The valid tolerance setting is between 0 and 255. At low settings, the colors must be close. At higher settings the tolerance is greater, so more pixels are made transparent  
·The 'Preload image' function lets you select where you want the image definition to appear in the .swf file. See the Export Panel for more information.  

Fill control
The fill control changes depending on the fill style you have selected.

For solid fills, the control shows you the fill color. Click on the colored 'Fill control' button to select a different color.
panels-object-shape-fillcontrol-solid.png  
 
For gradient fills, the control shows you the gradient. Click to place new colors onto the gradient. Click on a triangular colored handle to change the corresponding color using the Color Selector. Drag the handles along the gradient to adjust their positions. Drag the triangular colored handles completely off the bar to delete them.
panels-object-shape-fillcontrol-gradient.png  
 
For image fills, the control shows you the image. Click on the control to select and load a new image file. Double click on the image to reload the current image file.
panels-object-shape-fillcontrol-image.png  
 
Solid shape with overlap filled
This function forces the shape to have no border and to be filled with a single solid color. Any areas where the shape has overlaps will be filled. This is different to the usual behavior of shapes, where overlapping areas are left hollow. You may find this setting useful when setting up masks for Sprites. The default setting is to have this function turned off.

Note: There is a bug in Flash, such that it will crash when trying to import a .swf file that has the 'Solid shape with overlap filled' option turned on for any shape


[Previous] [Main] [Next]