PageStream can make multiple copies of selected objects and change the copies in a variety of ways. The Transform command combines the Copy, Paste, and Rotate commands into a powerful step and repeat function.
To transform objects: Select the object(s) with the Object tool. Choose Transform from the Object menu to display the Transform dialog box. Enter the number of copies to make, and the offset, scale and rotation of each copy. Click OK.
![]()
PageStream can rotate objects about their centers or a user defined point. You can slant objects horizontally or twist them vertically. Rotation is a combination of equal amounts of slant and twist.
To rotate objects with the Rotate command: Select the object(s) with the Object tool. Choose Rotate from the Object menu to display the Rotate dialog box. Enter rotation, slant and twist values or click a Rotate or Flip button. Click OK.

To rotate objects with the Edit palette: Select the object(s) to rotate. Enter new rotation, slant and twist values, or click either of the Flip buttons.
![]()
To rotate objects with the Rotate tool: Choose the Rotate tool and select and click drag on an object. You can select objects with the Rotate tool in the same manor as the Object tool.
As you drag the object, it will rotate about the current rotation point represented as a small "x". Hold down Control to slant the object, andShift to twist.
![]()
Only the object's bounding box will be displayed if you drag without pausing. To see the object's outline, hold down the mouse button and wait until the pointer changes to a crosshair shape before moving the mouse.
By default the rotation point is at the center of the selected object. To create a rotated duplicate object at the new location instead of moving the existing object, press and holdOption (Alt). The pointer will change to a paste shape. To set the rotation point, click and drag the rotate point, or in the Edit Palette select the Custom Rotate about Point icon and enter new values for X and Y.

PageStream can align objects relative to each other, to the page or to a point. You can choose to align their top, bottom, left or right edges or their center points. You can align objects horizontally, vertically, or in both directions.
To align objects: Select the object(s) with the Object tool. Choose Align from the Object menu to display the Align dialog box. Click on a horizontal and/or vertical arrow button to specify which edges to align. Select from the Align To pop-up menu whether to align relative to the objects' bounding box, the edges of the page, a numeric point or a visual point. If you decide not to align in a direction after choosing a button, click on it again to deselect it. Click OK.
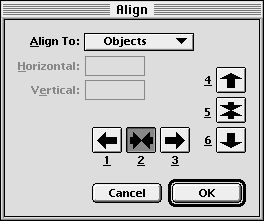
You cannot align locked objects; however, PageStream can align unlocked objects to locked objects. This is useful when you want to align objects to ones which are already positioned correctly.
In this example, the white box should be aligned vertically with the black box but horizontally with the gray box. To do this, lock the black and gray boxes and then align the right and bottom edges with the Align to Objects option. This will move the white box to the bottom right corner of the the objects' bounding box. The bounding box is shown by a dotted line to make this clear.
PageStream can distribute objects evenly within their bounding box or with a given amount of space between them. You can choose to distribute objects evenly, relative to their left or right edges, or to their centers.
To distribute objects: Select more than one object with the Object tool. Choose Distribute from the Object menu to display the Distribute dialog box. Click on a horizontal and/or vertical button to specify the distribution type. Select from the How pop-up menu whether to distribute objects in their current bounding box or with a specified spacing. Click OK.
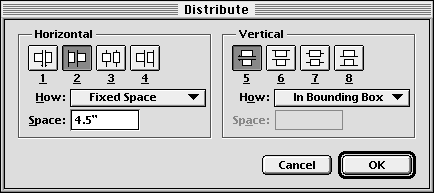
The examples below demonstrate horizontal bounding box distribution. The bounding box is shown by a dotted line to make the examples clear.